Depending on your needs, you might want to configure the CR-120N as a network scanner.
- Connect the CR-120N scanner's power cord.
- Connect a ethernet cable to the back of the scanner.
- Connect the scanner to a computer via the provided USB cable.
NOTE: The USB connection is only required until the network settings have been configured. Once configured for the network, the USB cable is no longer required.
- Power on the scanner.
- Start the [Canon imageFORUMLA Utility]
This is the application where you will be configuring the network setup. This utility requires a USB connection (see step 3 above).
- Select the CR-120 scanner in the list and click on [Properties].
This will bring up the Scanner Properties window.
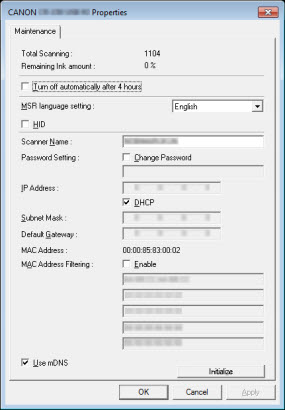
- Here is where you would set the [Scanner Name].

Scanner Name must be 1 to 15 characters in length and can include a-z, 0-9, and hyphens (-).
WARNING: The name cannot end with a hyphen!
- Place a check in the [Change Password] box and then enter an Admin password in the box below the checkmark.
- Assign the network information for the scanner.
If you wish to use DHCP, then simply put a check in the box next to [DHCP] and click on the "OK" button at the bottom of the window.
Once the network settings have been applied to the scanner, you can disconnect the USB cable and access the scanner via it's Web Menu (open a browser and type the scanner's IP address in the URL field).

