
Added Control with Speedlite 470EX-AI's Personal Functions
| Article ID: ART170265 | | | Date published: 05/07/2018 | | | Date last updated: 05/07/2018 |
Description
Added Control with Speedlite 470EX-AI's Personal Functions
Solution
To see the Speedlite 470EX-AI in action, check out our video gallery here!
Canon’s Speedlite 470EX-AI introduces automatic bounce flash capability, and we’ve outlined in other articles here that this can be tremendous for both entry-level photographers as well as the experienced shooter. Auto Intelligent Full-auto Bounce, and the AI.B Semi-auto bounce, can open new doors in the quest for natural-looking indoor flash pictures.
One of the most innovative features is this Speedlite’s ability to automate the process of moving the flash head to preserve the same initial bounce flash angle, when a photographer moves from shooting horizontal to vertical pictures, or vice-versa. Normally, just two quick taps on the camera’s shutter button is all that's required to activate this.
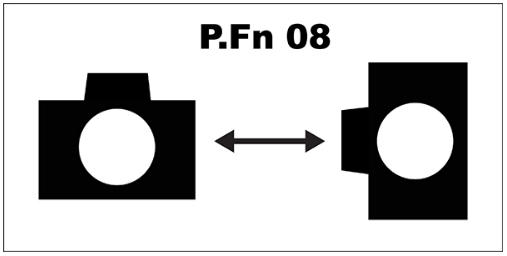
But Speedlite 470EX-AI includes a range of additional options, and three of its Personal Functions — accessed on the flash’s dot-matrix LCD panel — can really fine-tune the flash’s behavior during bounce flash shooting. In this article, we’ll explain these specific flash Personal Functions in detail, since they’re directly linked to expanding your options during AI.B bounce flash shooting.
Speedlite Personal Functions — What Are They?
Let’s explain this, because even though high-end Canon Speedlites in the past have certainly had both Custom Functions and Personal Functions built into the flash, many users may not have ever scratched the surface of what they do, or how to even find them.
First, to be clear, these are options to change certain settings within the flash, and these functions are indeed flash Personal Functions. They’re completely in addition to any Custom Functions built into your Canon EOS camera.
Personal Functions can be thought of as a list of setup choices, where you can change different flash default settings, or alter how you access a certain feature while you’re shooting pictures. Again, Canon Speedlites like the 430EX- and 600EX-series units have had such options before, so the basic concept is not new to the Speedlite 470EX-AI.
Canon flashes so equipped have had both a list of “Custom Functions” as well as a separate list of “Personal Functions” on their menus. While the Custom Functions (abbreviated C.Fn) can also be accessed on the External Flash Control menu of recent Canon EOS cameras, when a Speedlite is attached, the list of flash Personal Functions (P.Fn) has to be accessed directly on the Speedlite’s rear LCD panel.
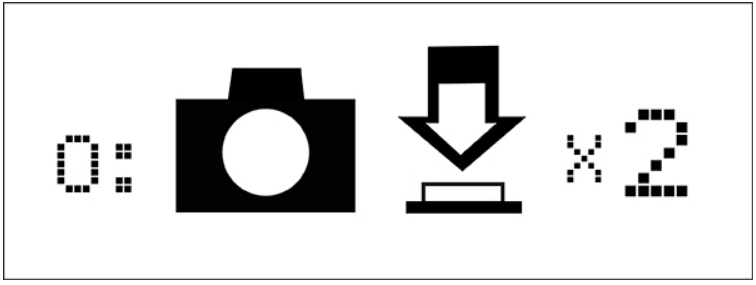
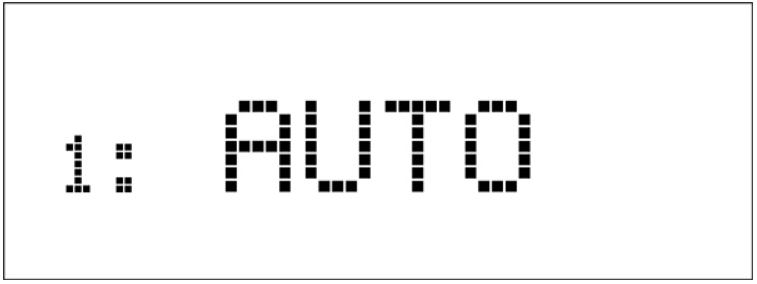
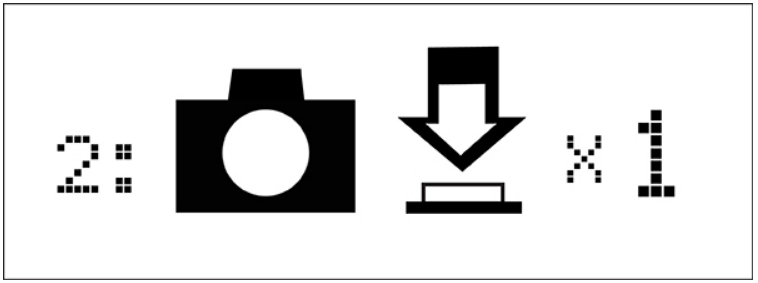
Finally, with each flash Custom Function and/or Personal Function (two separate lists, again all accessible on the flash’s LCD panel), you’ll have two or more choices. The factory default setting is always Option 0 (zero); any options will be numbered “1,” “2” and so on. You can always revert back to the initial default zero option by either going into the menu and individually setting any Function back to zero, or by changing all C.Fns or P.Fns back to zero with the “CLEAR” function on the Speedlite’s menu.
Three Personal Functions to Add Control to Automatic Bounce Flash
Again, Speedlite 470EX-AI adds three new Personal Functions, which directly affect the automatic bounce flash capabilities of this innovative new compact Speedlite. We’ll look at each one here, and give some insights into why you might want to use and apply these. And, we’ll show you graphics that simulate the ones you’ll see on the flash unit’s LCD panel, when you go into its Sub Menu and explore these Personal Functions.
P.Fn 07 — Maximum bounce angle
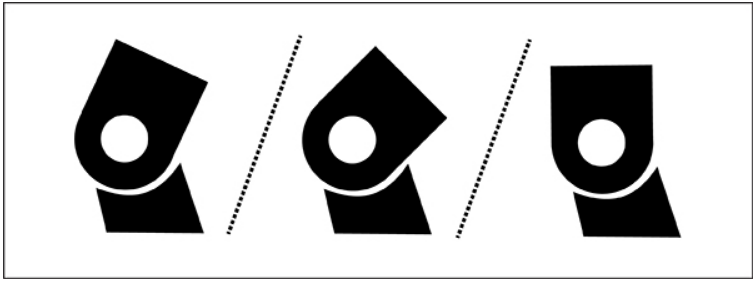
Speedlite 470EX-AI has the ability to not only tilt its flash head upward, but to actually angle it beyond 90° straight upward, so it’s aimed slightly behind the photographer. This can happen with its Full-auto Bounce, and the photographer is free to set it this way during Semi-auto bounce as well. The idea behind this is to take advantage of walls and surfaces that may be behind the photographer, and in some instances provide even more natural, soft bounce lighting.
By default, if you think of the Speedlite aimed directly at your subject as being a zero degree position, aiming it straight upward would be a 90° position, and tilting it further backward up to 120° from its original position is also possible.
However, in AI.B Full-auto Bounce, you may find the flash tilting so it’s facing upward and backward, in situations where there is no nearby wall or reflective surface behind the photographer. Or, you simply may prefer to angle it so it’s not facing away from the subject. Personal Function 7 allows you to change how far the flash head can tilt during motorized operation.
P.Fn 07-0 — 120°
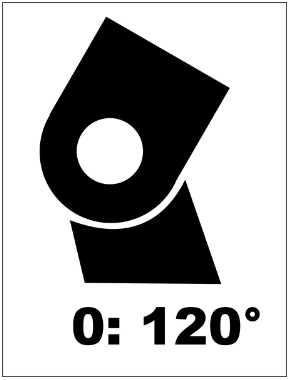
This is the factory default. Speedlite 470EX-AI is allowed to tilt the flash head up and backward, facing up to 30° away from the subject (120° total tilt, from its initial straight-on flash head setting)
P.Fn 07-1 — 140°
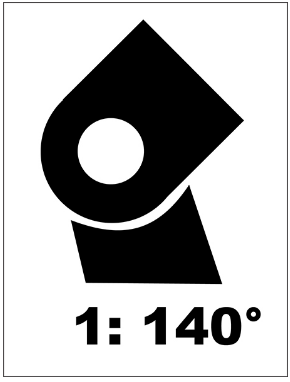
If you’re working indoors in smaller areas, with nearby light-colored ceilings and walls, this Personal Function option allows the flash head to tilt even farther backward, taking further advantage of walls and surfaces behind the photographer. The potential benefit? Less tendency for a very “overhead” character to the flash illumination, and arguably even better filling-in of shadows under eyes and noses in photos of people. Soft and more frontal illumination — from bouncing even farther backward — becomes possible. However, this would likely not be the right option if you’re working in larger areas, where walls may be much farther away (think of a photographer standing in the middle of a hotel ballroom or large meeting room as an environment where you might opt for the next choice instead).
P.Fn 07-2 — 90°

Option 2 limits the tilting to a straight-upward position of 90°, and no farther. This means that Full-auto Bounce will more often tend to tilt the flash upward but facing slightly toward the subject — a bounce position many experienced photographers are comfortable working with. And, as just mentioned above, this can help avoid possible errors if you are working in larger venues, where walls may be distant and not immediately behind the photographer.
Be aware that this 90° limit applies to Full-auto bounce only. If you set the 470EX-AI to its Semi-auto Bounce position, you can still manually tilt the flash head beyond this 90° (straight upward) position, and memorize it with the Angle Set button on the side of the flash.
Personal Function 08 — automatically re-position flash if camera is turned from horizontal to vertical
One of the coolest features of the motorized and automated bounce features of the Speedlite 470EX-AI is how quickly it can re-position the flash head to maintain the same bounce angle, if you switch from a horizontal shot to a vertical one (or, of course, vice-versa). By default, in either AI.B Full-auto Bounce, or Semi-auto Bounce, if you do move the camera after a bounce angle has been set, just tap the shutter button twice. This immediately causes the motorized flash head to swivel and tilt, and maintain the same bounce angle and position you were previously working with.
But you can change this double-tap activation with Personal Function 8. Here are your choices:
P.Fn 08-0 — tap shutter button twice
As explained directly above, this is the factory default to quickly take advantage of the automated tilt and swivel built into the Speedlite 470EX-AI. This works any time you change composition or even slightly change camera angle (such as aiming slightly upward or downward, from where you initially began shooting from). Tap halfway on the shutter button, like a double-click on a computer mouse, and the 470EX-AI will automatically move to preserve the same bounce angle. This applies in both Full-auto Bounce, and if you’ve initially set your own bounce angle with Semi-auto Bounce.
P.Fn 08-1 — continuous re-positioning of flash head, as you move the camera
This option really has the potential to speed up bounce flash operations, for users who quickly and frequently change from vertical to horizontal compositions. What it does is keep the flash head active to continually move and preserve your initial bounce angle, in response to any camera movement or compositional changes. Any time the camera’s meter timer is active — in other words, any time you can see numerical information in the camera’s viewfinder, under the focus screen — the 470EX-AI is “live,” and will react to how you position the camera, and preserve whatever bounce angle you began with.
This is a fantastic way to quickly work when shooting subjects like children indoors, or many other events where bounce flash is the answer to get the lighting you’re looking for.
Canon EOS cameras will turn the meter timer off (in other words, enter the first stage of “sleep”) typically after six seconds of inactivity, after the last button is touched. So if your viewfinder metering info goes blank, this continuous re-positioning of the 470EX-AI’s flash head likewise is halted. Just tap the shutter button once to wake it up again, and re-engage continuous updating of the motorized flash head, to preserve your initial bounce angle.
P.Fn 08-2 — tap once on shutter button to update bounce flash angle
If you prefer to be in charge of when the Speedlite 470EX-AI will begin to adjust its flash head after you’ve changed camera position, the option to tap the shutter button once, instead of twice, may be more intuitive and faster for you. This is especially true since if you’re working quickly, and rapidly change the camera from (for instance) a horizontal to vertical composition, you have to press the camera’s shutter button halfway to activate its metering system, and as the first step in taking the next picture. The 470EX-AI will update its flash head position as you do this, when P.Fn 08-2 is active.
Option 2 will also limit unnecessary flash head movement, if you’re simply holding the camera between shooting opportunities — you won’t hurt the flash if it does continually move in response to camera movement (as is the case with P.Fn 08-1, just described above), but you may prefer to dictate when the flash head does move.
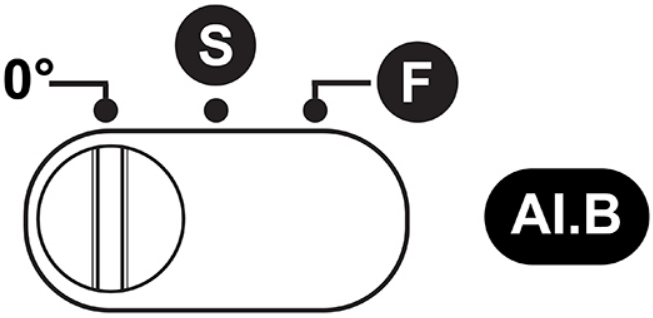
As mentioned above, this use of a single tap on the camera’s shutter button to maintain the same bounce angle will work with the Speedlite’s bounce angle switch in either the “S” or “F” positions.
Personal Function 09 — Manual bounce flash, at the 0° setting
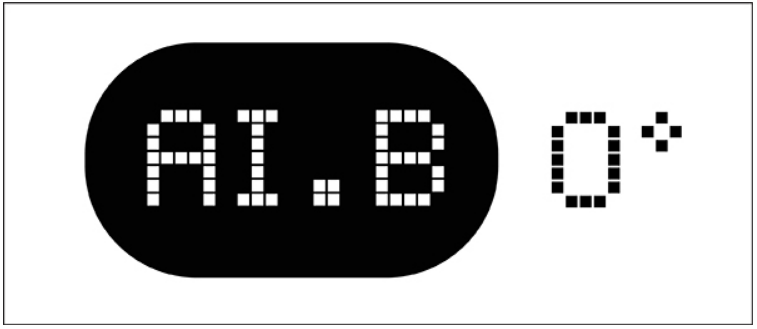
Yes, even with the technology built into the Speedlite 470EX-AI to automate the process of setting bounce flash angle, it’s possible to do the following:
Shoot conventional flash-on-camera pictures, with the 470EX-AI aimed directly at your subject
With the 470EX-AI off-camera, as a wireless E-TTL receiver unit, angle its flash head manually to any available angle you desire — straight at a subject, up at the ceiling, backwards inside an umbrella or softbox, and so on
Perform conventional, manually-set bounce flash, with the flash mounted on the camera’s accessory shoe, and its Bounce Angle Switch set to the 0° position.
On the back of the Speedlite 470EX-AI is a sliding, 3-position Bounce Mode Switch. The zero degree position is normally used for direct, straight-facing flash shooting only. But as we describe here, Personal Function 9 in the 470EX-AI can allow access to traditional bounce flash as well.
It’s this last item where flash Personal Function 9 comes into play. For experienced shooters who simply want to tilt their own flash head and perform bounce flash as they always have, Speedlite 470EX-AI will allow you to tilt its head upward and/or swivel it sideways, for indoor on-camera bounce flash. BUT: at the 0° position, as soon as you tap the camera’s shutter button, with everything at default settings, the flash head automatically swivels back to a straight-facing position.
You didn’t do anything wrong. By default, that 0° position indeed means the flash head expects to shoot pictures at 0°, in other words aimed straight at the subject. How can you do ordinary, manually-adjusted bounce flash? Set flash Personal Function 9 to its “1” option.
P.Fn 09-0 — zero degree, or straight-on shooting only
This is the out-of-the-box, factory default. As explained above, even if you tilt or swivel the flash head on the 470EX-AI, it instantly reverts to a straight-ahead position as soon as you touch the camera’s shutter button.
P.Fn 09-1 — Manual bounce flash is possible

Set Personal Function 9 to option “1,” and you now can manually tilt or swivel the flash head on the 470EX-AI and perform traditional bounce flash indoors. There’s absolutely no automatic positioning, or re-positioning, of the flash head, and you don’t need to press the Angle Set button to preserve any tilt/swivel position you set. Nor will the flash try to re-position itself to a straight-ahead position when you tap the shutter button halfway. It’s bounce flash as it always has been, prior to the introduction of this innovative Speedlite and its available automated bounce flash, at the “F” and “S” positions of its Bounce Mode Switch.
The Remaining Speedlite Personal Functions on the 470EX-AI
The three Personal Functions described in this article are completely new and noteworthy on this Speedlite, especially since they are directly related to different aspects of its automatic bounce capabilities. But there are a number of other flash Personal Functions on the 470EX-AI’s menu, which are repeated from previous Canon Speedlites. Since this may be new territory for some of our readers, we’ll briefly explain each of these here.
P.Fn 01 — LCD panel contrast
Pre-set the overall contrast for the Speedlite’s display on its rear LCD panel. This won’t alter its overall brightness, but it will make the black display characters and icons appear either more or less boldly against the panel’s background.
P.Fn 02 — LCD panel illumination color
This lets you select either a green-colored illumination of the 470EX-AI’s LCD panel, or change it to more of a yellow-orange color illumination. P.Fn 02 applies to what the illumination color is for ordinary flash photography, as a way to quickly visually distinguish a flash pre-set for general shooting, vs. one pre-set to be used as an off-camera receiver flash.
P.Fn 03 — LCD panel illumination color, when set as an off-camera “receiver” unit
Again, a choice of green or yellow-orange illumination of the flash’s LCD panel. By default, at its “0” option, Canon Speedlites illuminate in the yellow-orange color once they’re set to act as an off-camera receiver flash. With this P.Fn, you can change it to green illumination if you prefer.
P.Fn 04 — AF-assist beam method
This Personal Function controls which type of focus-assist beam will be used, when it’s mounted directly on an EOS camera, and One-Shot AF is active on the camera. The default is the near-infrared, patterned beam emitted from a section of the front of the Speedlite. But with Option 1, you can change this to using a series of rapid, low-power flashes from the Speedlite (white light from the flash unit), to quickly shed light on a subject and allow the AF system to focus in dark situations. With Option 1, you may find with some lenses that AF operation is quicker, especially if you’re using an off-center AF point in the camera.
P.Fn 05 — Quick Flash shooting, while the flash is recycling
Quick Flash is a feature Canon Speedlites have had for years. Basically, it allows the flash to fire a second shot, while it’s still in the recycle process after a first picture was taken a few moments previously. In other words, with Quick Flash, you can shoot during the recycle period. This can be valuable if you’re in situations where the ability to quickly see and respond to a sudden opportunity are important. However, this does mean that full power isn’t available to the flash (until it’s fully recycled), so some photographers prefer to disable Quick Flash, and avoid any risk of firing a second quick shot if there’s a risk of under-exposing a distant subject. Setting P.Fn 5 to Option 1 disables the Quick Flash function, and the flash won’t fire until it’s fully recycled.
P.Fn 06 — Direct changes by turning flash’s Select Dial
Settings like Flash Exposure Compensation normally require you to first press a button on the back of the flash, and then turn its rear Select Dial. Activating P.Fn 06-1, you can change this so that simply turning the Select Dial immediately starts to make an adjustment. This can be particularly useful to photographers who are working with the 470EX-AI on-camera, and expect to frequently fine-tune their flash exposures — particularly with EOS camera bodies that don’t have a direct Flash Exposure Compensation button on the camera.
Summary
In many instances, flash Personal Functions are settings you’ll tinker with once or twice, and then pretty much leave in place — after all, they primarily alter default “set-up” settings, letting you tailor some aspects of flash operation to the way you like to work.
But they do unlock some cool features, and in particular, Functions 7, 8 and 9 can let you leverage the terrific new auto bounce and swivel capabilities this Speedlite brings to Canon users. With a little understanding — hopefully enhanced by the content in this article — it’ll be easier to experiment with these, and make the right choices for you and the way you like to work with flash. And again, always remember you can change any of these Personal Functions, or for that matter the flash’s separate Custom Functions, at any time…so you can always go back to the out-of-the-box settings, if and when you need to.
Canon’s Speedlite 470EX-AI introduces automatic bounce flash capability, and we’ve outlined in other articles here that this can be tremendous for both entry-level photographers as well as the experienced shooter. Auto Intelligent Full-auto Bounce, and the AI.B Semi-auto bounce, can open new doors in the quest for natural-looking indoor flash pictures.
One of the most innovative features is this Speedlite’s ability to automate the process of moving the flash head to preserve the same initial bounce flash angle, when a photographer moves from shooting horizontal to vertical pictures, or vice-versa. Normally, just two quick taps on the camera’s shutter button is all that's required to activate this.
But Speedlite 470EX-AI includes a range of additional options, and three of its Personal Functions — accessed on the flash’s dot-matrix LCD panel — can really fine-tune the flash’s behavior during bounce flash shooting. In this article, we’ll explain these specific flash Personal Functions in detail, since they’re directly linked to expanding your options during AI.B bounce flash shooting.
Speedlite Personal Functions — What Are They?
Let’s explain this, because even though high-end Canon Speedlites in the past have certainly had both Custom Functions and Personal Functions built into the flash, many users may not have ever scratched the surface of what they do, or how to even find them.
First, to be clear, these are options to change certain settings within the flash, and these functions are indeed flash Personal Functions. They’re completely in addition to any Custom Functions built into your Canon EOS camera.
Personal Functions can be thought of as a list of setup choices, where you can change different flash default settings, or alter how you access a certain feature while you’re shooting pictures. Again, Canon Speedlites like the 430EX- and 600EX-series units have had such options before, so the basic concept is not new to the Speedlite 470EX-AI.
Canon flashes so equipped have had both a list of “Custom Functions” as well as a separate list of “Personal Functions” on their menus. While the Custom Functions (abbreviated C.Fn) can also be accessed on the External Flash Control menu of recent Canon EOS cameras, when a Speedlite is attached, the list of flash Personal Functions (P.Fn) has to be accessed directly on the Speedlite’s rear LCD panel.
Finally, with each flash Custom Function and/or Personal Function (two separate lists, again all accessible on the flash’s LCD panel), you’ll have two or more choices. The factory default setting is always Option 0 (zero); any options will be numbered “1,” “2” and so on. You can always revert back to the initial default zero option by either going into the menu and individually setting any Function back to zero, or by changing all C.Fns or P.Fns back to zero with the “CLEAR” function on the Speedlite’s menu.
Three Personal Functions to Add Control to Automatic Bounce Flash
Again, Speedlite 470EX-AI adds three new Personal Functions, which directly affect the automatic bounce flash capabilities of this innovative new compact Speedlite. We’ll look at each one here, and give some insights into why you might want to use and apply these. And, we’ll show you graphics that simulate the ones you’ll see on the flash unit’s LCD panel, when you go into its Sub Menu and explore these Personal Functions.
P.Fn 07 — Maximum bounce angle
Speedlite 470EX-AI has the ability to not only tilt its flash head upward, but to actually angle it beyond 90° straight upward, so it’s aimed slightly behind the photographer. This can happen with its Full-auto Bounce, and the photographer is free to set it this way during Semi-auto bounce as well. The idea behind this is to take advantage of walls and surfaces that may be behind the photographer, and in some instances provide even more natural, soft bounce lighting.
By default, if you think of the Speedlite aimed directly at your subject as being a zero degree position, aiming it straight upward would be a 90° position, and tilting it further backward up to 120° from its original position is also possible.
However, in AI.B Full-auto Bounce, you may find the flash tilting so it’s facing upward and backward, in situations where there is no nearby wall or reflective surface behind the photographer. Or, you simply may prefer to angle it so it’s not facing away from the subject. Personal Function 7 allows you to change how far the flash head can tilt during motorized operation.
P.Fn 07-0 — 120°
This is the factory default. Speedlite 470EX-AI is allowed to tilt the flash head up and backward, facing up to 30° away from the subject (120° total tilt, from its initial straight-on flash head setting)
P.Fn 07-1 — 140°
If you’re working indoors in smaller areas, with nearby light-colored ceilings and walls, this Personal Function option allows the flash head to tilt even farther backward, taking further advantage of walls and surfaces behind the photographer. The potential benefit? Less tendency for a very “overhead” character to the flash illumination, and arguably even better filling-in of shadows under eyes and noses in photos of people. Soft and more frontal illumination — from bouncing even farther backward — becomes possible. However, this would likely not be the right option if you’re working in larger areas, where walls may be much farther away (think of a photographer standing in the middle of a hotel ballroom or large meeting room as an environment where you might opt for the next choice instead).
P.Fn 07-2 — 90°
Option 2 limits the tilting to a straight-upward position of 90°, and no farther. This means that Full-auto Bounce will more often tend to tilt the flash upward but facing slightly toward the subject — a bounce position many experienced photographers are comfortable working with. And, as just mentioned above, this can help avoid possible errors if you are working in larger venues, where walls may be distant and not immediately behind the photographer.
Be aware that this 90° limit applies to Full-auto bounce only. If you set the 470EX-AI to its Semi-auto Bounce position, you can still manually tilt the flash head beyond this 90° (straight upward) position, and memorize it with the Angle Set button on the side of the flash.
Personal Function 08 — automatically re-position flash if camera is turned from horizontal to vertical
One of the coolest features of the motorized and automated bounce features of the Speedlite 470EX-AI is how quickly it can re-position the flash head to maintain the same bounce angle, if you switch from a horizontal shot to a vertical one (or, of course, vice-versa). By default, in either AI.B Full-auto Bounce, or Semi-auto Bounce, if you do move the camera after a bounce angle has been set, just tap the shutter button twice. This immediately causes the motorized flash head to swivel and tilt, and maintain the same bounce angle and position you were previously working with.
But you can change this double-tap activation with Personal Function 8. Here are your choices:
P.Fn 08-0 — tap shutter button twice
As explained directly above, this is the factory default to quickly take advantage of the automated tilt and swivel built into the Speedlite 470EX-AI. This works any time you change composition or even slightly change camera angle (such as aiming slightly upward or downward, from where you initially began shooting from). Tap halfway on the shutter button, like a double-click on a computer mouse, and the 470EX-AI will automatically move to preserve the same bounce angle. This applies in both Full-auto Bounce, and if you’ve initially set your own bounce angle with Semi-auto Bounce.
P.Fn 08-1 — continuous re-positioning of flash head, as you move the camera
This option really has the potential to speed up bounce flash operations, for users who quickly and frequently change from vertical to horizontal compositions. What it does is keep the flash head active to continually move and preserve your initial bounce angle, in response to any camera movement or compositional changes. Any time the camera’s meter timer is active — in other words, any time you can see numerical information in the camera’s viewfinder, under the focus screen — the 470EX-AI is “live,” and will react to how you position the camera, and preserve whatever bounce angle you began with.
This is a fantastic way to quickly work when shooting subjects like children indoors, or many other events where bounce flash is the answer to get the lighting you’re looking for.
Canon EOS cameras will turn the meter timer off (in other words, enter the first stage of “sleep”) typically after six seconds of inactivity, after the last button is touched. So if your viewfinder metering info goes blank, this continuous re-positioning of the 470EX-AI’s flash head likewise is halted. Just tap the shutter button once to wake it up again, and re-engage continuous updating of the motorized flash head, to preserve your initial bounce angle.
P.Fn 08-2 — tap once on shutter button to update bounce flash angle
If you prefer to be in charge of when the Speedlite 470EX-AI will begin to adjust its flash head after you’ve changed camera position, the option to tap the shutter button once, instead of twice, may be more intuitive and faster for you. This is especially true since if you’re working quickly, and rapidly change the camera from (for instance) a horizontal to vertical composition, you have to press the camera’s shutter button halfway to activate its metering system, and as the first step in taking the next picture. The 470EX-AI will update its flash head position as you do this, when P.Fn 08-2 is active.
Option 2 will also limit unnecessary flash head movement, if you’re simply holding the camera between shooting opportunities — you won’t hurt the flash if it does continually move in response to camera movement (as is the case with P.Fn 08-1, just described above), but you may prefer to dictate when the flash head does move.
As mentioned above, this use of a single tap on the camera’s shutter button to maintain the same bounce angle will work with the Speedlite’s bounce angle switch in either the “S” or “F” positions.
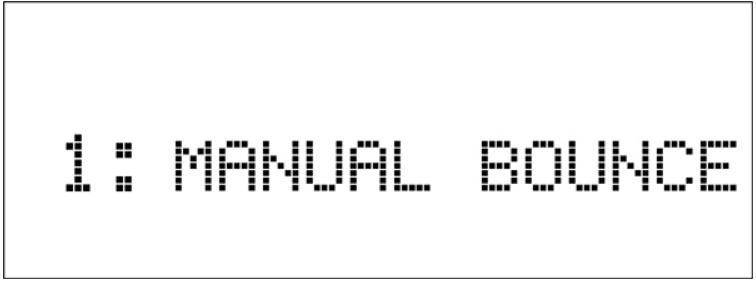
Personal Function 09 — Manual bounce flash, at the 0° setting
Yes, even with the technology built into the Speedlite 470EX-AI to automate the process of setting bounce flash angle, it’s possible to do the following:
Shoot conventional flash-on-camera pictures, with the 470EX-AI aimed directly at your subject
With the 470EX-AI off-camera, as a wireless E-TTL receiver unit, angle its flash head manually to any available angle you desire — straight at a subject, up at the ceiling, backwards inside an umbrella or softbox, and so on
Perform conventional, manually-set bounce flash, with the flash mounted on the camera’s accessory shoe, and its Bounce Angle Switch set to the 0° position.
On the back of the Speedlite 470EX-AI is a sliding, 3-position Bounce Mode Switch. The zero degree position is normally used for direct, straight-facing flash shooting only. But as we describe here, Personal Function 9 in the 470EX-AI can allow access to traditional bounce flash as well.
It’s this last item where flash Personal Function 9 comes into play. For experienced shooters who simply want to tilt their own flash head and perform bounce flash as they always have, Speedlite 470EX-AI will allow you to tilt its head upward and/or swivel it sideways, for indoor on-camera bounce flash. BUT: at the 0° position, as soon as you tap the camera’s shutter button, with everything at default settings, the flash head automatically swivels back to a straight-facing position.
You didn’t do anything wrong. By default, that 0° position indeed means the flash head expects to shoot pictures at 0°, in other words aimed straight at the subject. How can you do ordinary, manually-adjusted bounce flash? Set flash Personal Function 9 to its “1” option.
P.Fn 09-0 — zero degree, or straight-on shooting only
This is the out-of-the-box, factory default. As explained above, even if you tilt or swivel the flash head on the 470EX-AI, it instantly reverts to a straight-ahead position as soon as you touch the camera’s shutter button.
P.Fn 09-1 — Manual bounce flash is possible
Set Personal Function 9 to option “1,” and you now can manually tilt or swivel the flash head on the 470EX-AI and perform traditional bounce flash indoors. There’s absolutely no automatic positioning, or re-positioning, of the flash head, and you don’t need to press the Angle Set button to preserve any tilt/swivel position you set. Nor will the flash try to re-position itself to a straight-ahead position when you tap the shutter button halfway. It’s bounce flash as it always has been, prior to the introduction of this innovative Speedlite and its available automated bounce flash, at the “F” and “S” positions of its Bounce Mode Switch.
The Remaining Speedlite Personal Functions on the 470EX-AI
The three Personal Functions described in this article are completely new and noteworthy on this Speedlite, especially since they are directly related to different aspects of its automatic bounce capabilities. But there are a number of other flash Personal Functions on the 470EX-AI’s menu, which are repeated from previous Canon Speedlites. Since this may be new territory for some of our readers, we’ll briefly explain each of these here.
P.Fn 01 — LCD panel contrast
Pre-set the overall contrast for the Speedlite’s display on its rear LCD panel. This won’t alter its overall brightness, but it will make the black display characters and icons appear either more or less boldly against the panel’s background.
P.Fn 02 — LCD panel illumination color
This lets you select either a green-colored illumination of the 470EX-AI’s LCD panel, or change it to more of a yellow-orange color illumination. P.Fn 02 applies to what the illumination color is for ordinary flash photography, as a way to quickly visually distinguish a flash pre-set for general shooting, vs. one pre-set to be used as an off-camera receiver flash.
P.Fn 03 — LCD panel illumination color, when set as an off-camera “receiver” unit
Again, a choice of green or yellow-orange illumination of the flash’s LCD panel. By default, at its “0” option, Canon Speedlites illuminate in the yellow-orange color once they’re set to act as an off-camera receiver flash. With this P.Fn, you can change it to green illumination if you prefer.
P.Fn 04 — AF-assist beam method
This Personal Function controls which type of focus-assist beam will be used, when it’s mounted directly on an EOS camera, and One-Shot AF is active on the camera. The default is the near-infrared, patterned beam emitted from a section of the front of the Speedlite. But with Option 1, you can change this to using a series of rapid, low-power flashes from the Speedlite (white light from the flash unit), to quickly shed light on a subject and allow the AF system to focus in dark situations. With Option 1, you may find with some lenses that AF operation is quicker, especially if you’re using an off-center AF point in the camera.
P.Fn 05 — Quick Flash shooting, while the flash is recycling
Quick Flash is a feature Canon Speedlites have had for years. Basically, it allows the flash to fire a second shot, while it’s still in the recycle process after a first picture was taken a few moments previously. In other words, with Quick Flash, you can shoot during the recycle period. This can be valuable if you’re in situations where the ability to quickly see and respond to a sudden opportunity are important. However, this does mean that full power isn’t available to the flash (until it’s fully recycled), so some photographers prefer to disable Quick Flash, and avoid any risk of firing a second quick shot if there’s a risk of under-exposing a distant subject. Setting P.Fn 5 to Option 1 disables the Quick Flash function, and the flash won’t fire until it’s fully recycled.
P.Fn 06 — Direct changes by turning flash’s Select Dial
Settings like Flash Exposure Compensation normally require you to first press a button on the back of the flash, and then turn its rear Select Dial. Activating P.Fn 06-1, you can change this so that simply turning the Select Dial immediately starts to make an adjustment. This can be particularly useful to photographers who are working with the 470EX-AI on-camera, and expect to frequently fine-tune their flash exposures — particularly with EOS camera bodies that don’t have a direct Flash Exposure Compensation button on the camera.
Summary
In many instances, flash Personal Functions are settings you’ll tinker with once or twice, and then pretty much leave in place — after all, they primarily alter default “set-up” settings, letting you tailor some aspects of flash operation to the way you like to work.
But they do unlock some cool features, and in particular, Functions 7, 8 and 9 can let you leverage the terrific new auto bounce and swivel capabilities this Speedlite brings to Canon users. With a little understanding — hopefully enhanced by the content in this article — it’ll be easier to experiment with these, and make the right choices for you and the way you like to work with flash. And again, always remember you can change any of these Personal Functions, or for that matter the flash’s separate Custom Functions, at any time…so you can always go back to the out-of-the-box settings, if and when you need to.