|
|
Loading Paper LX-D1300 / LX-P1300
| Article ID: ART170328 |
| |
Date published: 05/15/2018 |
| |
Date last updated: 02/20/2024 |
Solution
Loading Paper
- Make sure the Power lamp is lit
If the Power lamp is off, press the Power key to turn on the printer.
- Pull the transport unit out of the printer
1. Raise the transport unit lever.

2. Pull this lever while holding the printer with one hand so that it does not move.
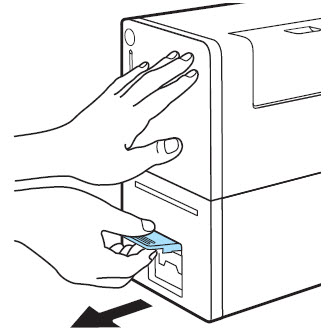
3. Pull the transport unit out with both hands as shown in the figure.

 CAUTION: CAUTION:
• When pulling the transport unit out of the printer, hold it securely with both hands so that it does not fall down.

• Do not put your hands inside the printer. Failures or physical injury could result. Ink adhered inside of the printer could stain clothes or hands.
 IMPORTANT: IMPORTANT:
• When pulling the transport unit out of the printer or inserting it in the printer, be careful not to hit it strongly against the table or shelf. The surface of the table or shelf could be damaged
- Remove the roll holder from the transport unit
When setting paper for the first time:
When replacing paper after the printer has run out of paper:
When replacing with paper of a different type or size:
When Setting Paper for the First Time
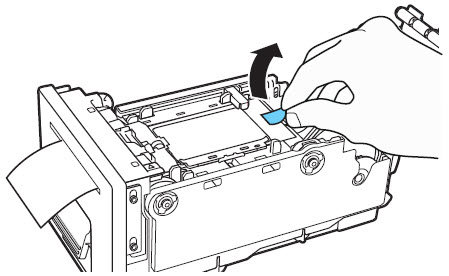
1. Open the paper set lever.
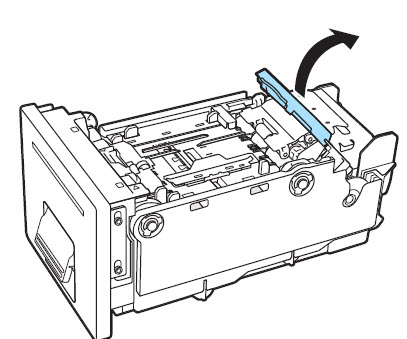
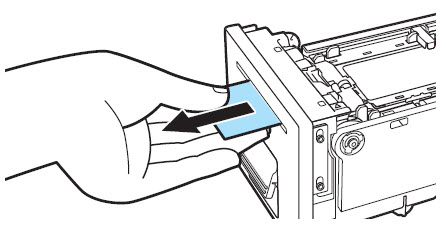
2. Remove the roll holder.

When Replacing Paper After the Printer Has Run out of Paper
1. Open the paper set lever.

2. Peel off the tape affixed at the end of the remaining paper
3. Pull out the remaining paper through the paper ejection slot
4. Remove the roll holder

IMPORTANT:
When replacing the paper before finishing printing, set new paper which is of the same type and size as that of the paper to be replaced. Using new paper of a different type or size could cause a printing error
When Replacing with Paper of a Different Type or Size
1.Open the paper set lever

2. Pull out the paper set between the paper guides onto the roll holder

3. Remove the roll holder

IMPORTANT:
Before removing the roll holder, be sure to pull paper out of the paper guides. Removing the roll holder with paper still set between the paper guides could damage the paper guides or sensor.
- Remove paper or a paper core from the roll holder
1. Remove the roll holder shaft
2. Remove the roll stopper (L) and roll stopper (R)

- Set new paper
1. Attach roll stoppers to paper
Attach the roll stoppers to paper so that paper is fed as indicated by the mark on the roll stopper (L)
Push the roller stoppers until they are pressed against paper without clearance
2. Insert the roll holder shaft until it clicks

- Set the roll holder in the transport unit as shown in the figure

 NOTE: NOTE:
If two or more types or sizes of paper are used, use of optional roll holders is recommended. For how to purchase the optional holders for this printer, contact the dealer
- Set the paper guide
While pressing on the top of the paper guide (A), move it to the paper width index (B) corresponding to the paper width

For example, in the illustration, the guide has been moved to the guide position “54 mm.”
NOTE:
For the default paper size, set the paper guide at the position shown in “Table 1 Guide positions of paper.” For the paper of custom paper size, confirm the guide position in advance using the printer driver.
|
Paper name
|
Guide position (mm)
|
|
1 x 1.5 Label/Gap
|
28
|
|
2 x 1.5 Label/Gap
|
54
|
|
2 x 3 Label/Gap
|
54
|
- Set paper
1. Pass the paper leading edge under the sensor (C), and align it with the paper alignment line (D).

Check that paper does not float above the paper guides (A and E).
If it is hard to feed paper in, check whether the paper guide is positioned properly
IMPORTANT:
• If paper has a large slack, take it up onto the paper roll to remove the slack appropriately. Paper having a large slack may touch the paper set lever, causing the printer to malfunction.
- Fix paper
1. Hold the paper set lever as shown in the figure.

2. Press the rollers (F) onto the paper surface.
3. With confirming the rollers (F) being firmly pressed onto paper surface, close the paper set lever.
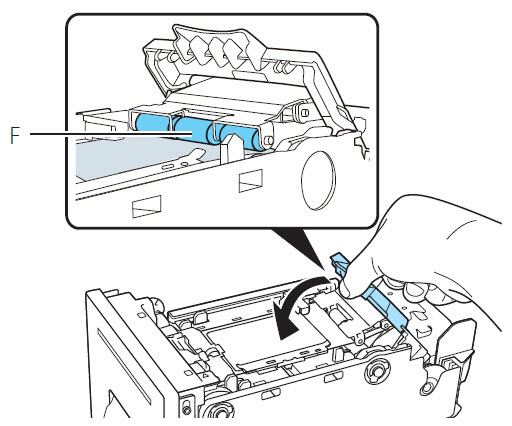
If the rollers are not pressed onto the paper surface, the paper set lever can not be closed.
- Set the transport unit in the printer
1. Slowly insert the transport unit as far as it will go.

If there is an interference in inserting the transport unit, check that the paper set lever is closed properly
2. Push the transport unit lever until it clicks
CAUTION:
• When returning the transport unit back inside the printer, be careful not to get your fingers caught between the transport unit and the inside body of the printer.
IMPORTANT:
• If the printer will not be used for a long period, remove paper from the printer to prevent it from discoloring. Put the removed paper in its original plastic bag or box, and store it in a place which is not exposed to high temperature, high humidity, and direct sunlight.
• If the printer will not be used for a long period, remove paper from the printer to prevent it from discoloring. Put the removed paper in its original plastic bag or box, and store it in a place which is not exposed to high temperature, high humidity, and direct sunlight.
• It is recommended that unpacked paper be used up in the shortest time possible
• Do not print outside the printable area of the dedicated paper
• When replaced with the paper of a different type or size, change the printer driver settings
• Printing on paper of a wrong size could stain the paper guides and transport area. If they are stained, clean them appropriately.
• For how to clean the transport area and paper guides
• Store the transport unit with it set in the printer
For support and service options, sign into (or create) your Canon Account from the link below.
My Canon Account
|
