|
|
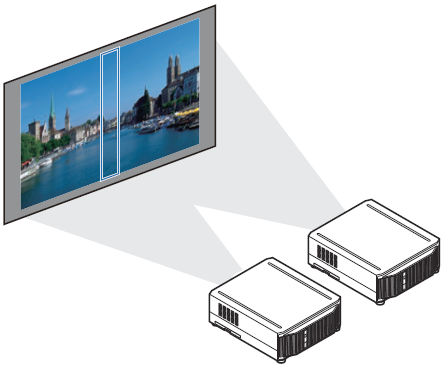
Projecting from Multiple Projectors at Once (Edge Blending) WUX7000Z / WUX6600Z / WUX5800Z
| Article ID: ART170377 |
| |
Date published: 05/17/2018 |
| |
Date last updated: 06/13/2018 |
Description
Projecting from Multiple Projectors at Once (Edge Blending) WUX7000Z / WUX6600Z / WUX5800Z
Solution
Overlapping edges of images from multiple projectors used together can be blended to make the overall image more seamless. This feature is called edge blending.
Follow these steps for basic edge blending with two projectors side by side. |
 |
Keep in mind when projecting from multiple projectors that each unit may have a different color balance. Thus, even with the same model, differences in color may be noticeable.
Select [Install settings] > [Professional settings] > [Edge blending] > [Adjust].
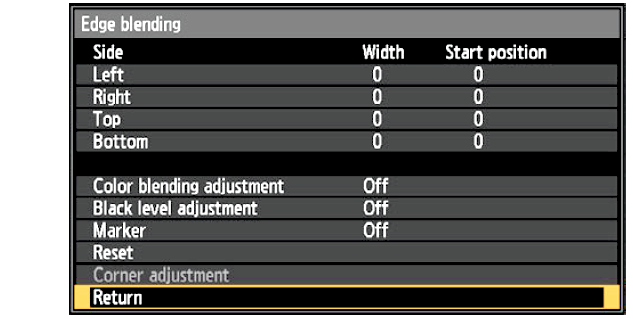
2 Set [Marker] to [On].
Marker lines are projected on the images. The red marker indicates the start position for adjustment, and the green marker, the end position.
Initially, only the red marker is visible when you prepare for edge blending, because it is projected over the green marker.
3 In [Side], select [Start position] and use the  buttons to move the start marker to the outer edge of the overlapping area. buttons to move the start marker to the outer edge of the overlapping area.
Do this for each edge; on the top, bottom, left, and right.
4 Select [Width] and use the buttons to move the end marker to the inner edge of the overlapping area.
Do this for each edge; on the top, bottom, left, and right.
 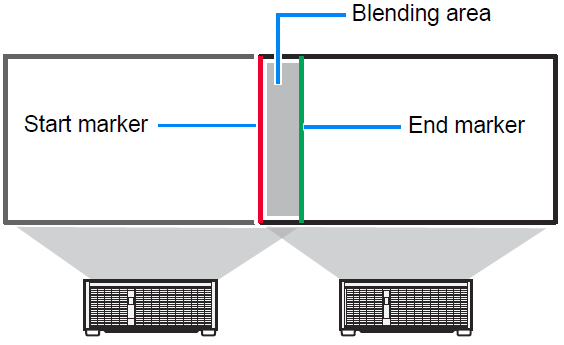
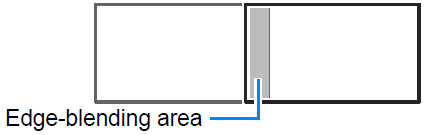
The area between the starting and ending markers is called the blending area.
Shading is applied to this area, and the brightness is adjusted to match portions that overlap with other areas. After you complete settings for one image, do the same thing for the other one to specify the blending area. Adjust the settings to make the blending area for each image the same.
5 Set [Marker] to [Off].
Adjusting the Overlapping Area
Adjust the overlapping area to create a smoother transition between projected images.
| Matching Colors in the Overlapping Area In overlapping projection, portions of images in the overlapping area that pick up other colors or are miscolored may be more noticeable. You can make this overlapping area appear less distracting by performing [Color blending adjustment]. |
 |
1 Select [Install settings] > [Professional settings] > [Edge blending] > [Adjust] > [Color blending adjustment] > [Adjust].
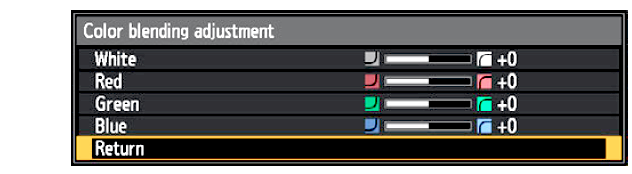
2 First adjust red, green, and blue together by changing the [White] value, and then adjust [Red], [Green], and [Blue] values individually.
3 Repeat this adjustment on all projectors
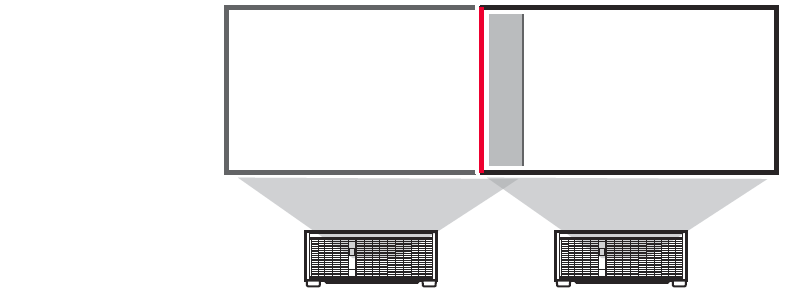
Matching Black in the Overlapping Area
In overlapping projection, dark colors are projected with less
intensity than other colors in the overlapping area. You can make
this overlapping area less distracting by adjusting the black
level of non-overlapping image areas.
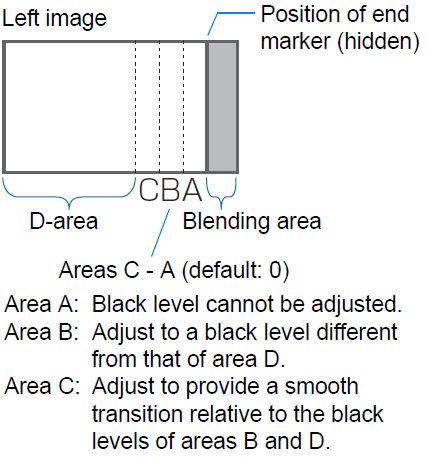
Here, the non-overlapping image area (from the end marker toward
the center of the image) is called area “D.”
Normally, three areas are identified in the context of end markers: A, B, and C.
In the following instructions, only area D is adjusted, and the widths of A, B, and C are left at the default value of 0. |
 |
To prepare for adjustment, select [System settings] > [User screen settings] > [No signal screen] > [Black], start projection with no input signal, and turn off the room lights, so that you can check dark image areas.
1 Select [Install settings] > [Professional settings] > [Edge blending] > [Adjust] > [Black level adjustment] > [Adjust].
2 Select [Adjustment type] > [Black level].
3 After selecting [D-area base], as you watch the image, adjust the values so that the brightness and colors of the blending area and area D match.

4 Repeat this adjustment on all projectors.
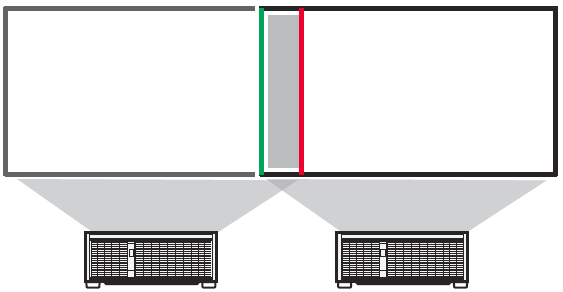
Making Overlapping Edges Less Noticeable
The black level along the right edge of area D (along the blending area) may be more noticeable than that of surrounding areas.
By adjusting the black level of area B, you can make the transition smoother.
To compensate, adjust each area as follows.
When the projected image has multiple blending areas (on the top, bottom, and
each side), the width of areas A, B, and C must be adjusted to suit these blending
areas.
In this example, instructions are given for adjusting area B. |
 |
1 Select [Install settings] > [Professional settings] > [Edge blending] > [Adjust] > [Black level adjustment] > [Adjust].

2 Select [Adjustment type] > [Area] > [Side] > [Right].
3 Select [B-width], and then adjust the width of area B to roughly match the area where the black level is noticeable.
4 Select [Adjustment type] > [Black level]. Adjust [B-area base] as you watch the image.
5 As you watch the image, adjust the width of areas A, B, and C.
6 Readjust the black level of area B, as needed.
• Results of adjusting the black level of area B are applied to all sides.
• If you perform adjustments using [Color blending adjustment] or other menus, that may not eliminate the distracting colors and differences in brightness in areas where the images overlap.
• Blending can be fine-tuned by adjusting [Adjustment type] > [Black level] > [Red], [Green], and [Blue].
Corner Adjustment
Projected images from multiple projectors used in overlapping projection must be precisely repositioned. Positions of each corner in the blending area can be aligned with the blending area of the reference projector.
1 On the reference projector, configure keystone (P152) and edge-blending settings, and then set the edge-blending markers to [On]
2 Select [Install settings] > [Professional settings] > [Edge blending] >[Adjust] > [Corner adjustment].
3 Select a point to adjust, and move it so that the image as a whole looks symmetrical.
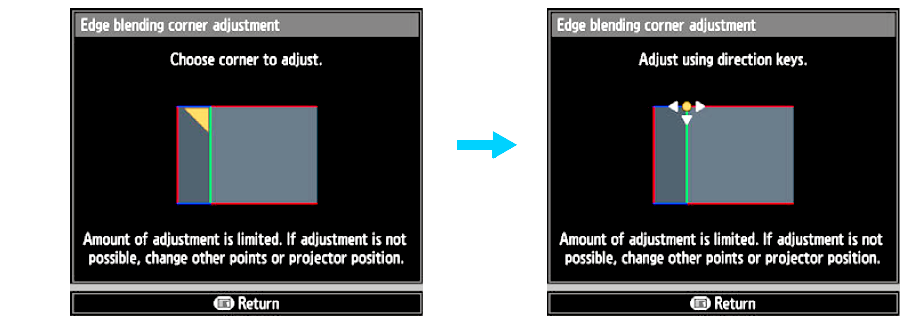
4 As you watch the projected images, fine-tune markers of the projector you are adjusting so that they overlap the reference projector markers as much as possible.

5 Set the reference projector’s edge-blending markers to [Off]
• First, complete [Side] adjustment
• Sides set to an edge-blending width of 12 or more can be adjusted when [Keystone] is set to [Corner adjustment] and the aspect ratio is [16:10].
• To reset adjustment, use [Keystone]
• A small edge-blending width may limit the amount of adjustment available
|
