You can change the copy settings such as magnification and intensity.
Print Settings Screen
How to display the print setting screen varies with the copy menu.
-
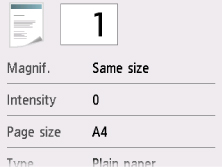
In Standard copy:
The following screen is displayed by selecting Settings on the Copy standby screen.
-
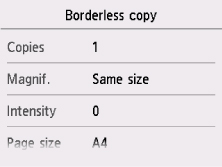
In Borderless copy, Frame erase copy, or ID card copy:
The following screen is displayed before copying.
Setting Items
Flick to display setting items and select the setting item to display the settings. Select to specify the setting.
 Note
Note
-
Depending on the copy menu, some setting items cannot be selected. This section describes the setting items in Copy.
The setting item which cannot be selected is displayed grayed out.
-
Some settings cannot be specified in combination with the setting of other setting item or the copy menu. If the setting which cannot be specified in combination is selected,  and Error details are displayed on the touch screen. In this case, select on the upper left on the touch screen to check the message and change the setting.
-
The settings of the page size, media type, etc. are retained even if the printer is turned off.
-
When copying starts in the copy menu that is not available with the specified setting, The specified function is not available with current settings. is displayed on the touch screen. Change the setting, following the on-screen instructions.
Following setting items can be changed.
-
Magnif. (Magnification)
Specify the reduction/enlargement method.
-
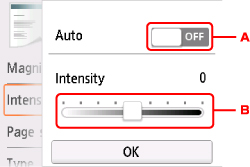
Intensity
Specify the intensity.
-
Select to activate/deactivate automatic intensity adjustment.
When ON is selected, the intensity is adjusted automatically according to the originals loaded on the platen glass.
-
Drag to specify the intensity.
-
Page size
Select the page size of the loaded paper.
-
Type (Media type)
Select the media type of the loaded paper.
-
Paper src
Select a paper source (Rear tray / Cassette / Auto) where paper is loaded.
Note
-
Print qlty (Print quality)
Adjust print quality according to the original.
 Important
-
If you use Draft with Type set to Plain paper and the quality is not as good as expected, select Standard or High for Print qlty and try copying again.
-
Select High for Print qlty to copy in grayscale. Grayscale renders tones in a range of grays instead of black or white.
-
Layout
Select the layout.
-
ADF duplex scan
Select whether to perform duplex scanning from the ADF.
-
2-sidedPrintSetting
Select whether to perform two-sided copying.
-
Collate
Select whether to obtain sorted printouts when making multiple copies of a multi-paged original.