Follow the steps below to connect your printer wirelessly to a Mac®.
Before you begin.
-
PIXMA MX350 support page.
-
PIXMA MX870 support page.
-
The version of macOS® installed on your computer will be automatically detected.
-
If the website doesn't detect which version is installed on your computer, select it from the operating system drop down menu.
Download the drivers.
-
You will need to download and install the CUPS printer driver, the scanner driver, and the ICA driver.
 For macOS 10.4, download and install Printer Driver 7.25.0 for the MX350, or 7.26.0 for the MX870, and the scanner driver.

-
Choose the Select button to the right of each of the drivers, then, select Download.
-
After you download the drivers, select the Software tab under Drivers & Downloads.
-
In the Software section, choose the Select button to the right of the Canon IJ Network Tool.
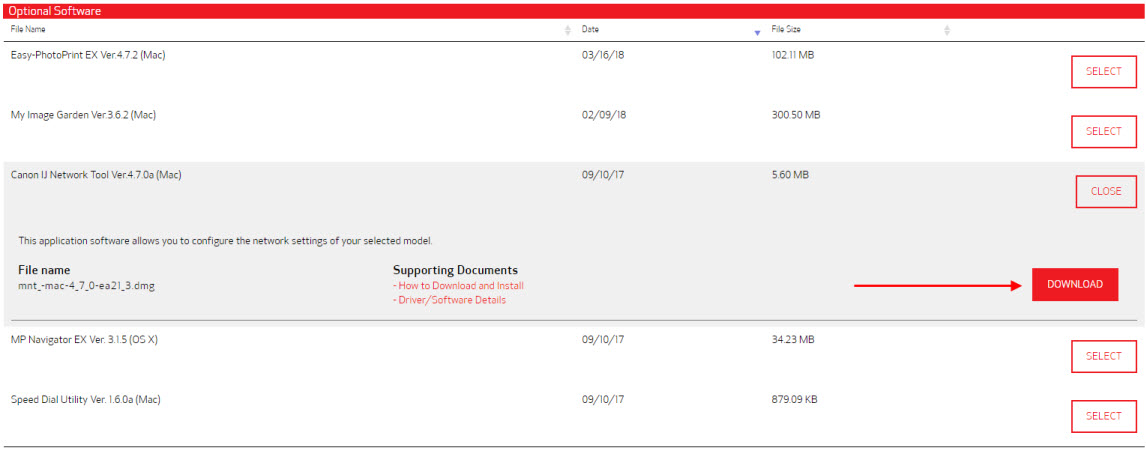
MP Navigator EX is a scan application for your PIXMA MX350 or MX870. It is not required, but is recommended if you wish to use the scan function on your device.
-
Choose Select, and then Download next to the IJ Network Tool and MP Navigator EX (optional).
-
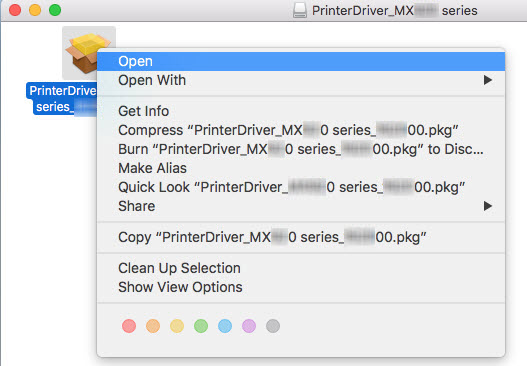
After all of these files have been downloaded, open them. A window will appear with a package file.

-
Double click the package file to open it.
If you have secuirty settings enabled on your computer, you may not be able to open the file because it wasn't downloaded from the App Store®. Right-click on the package file and choose Open to open the file.
-
Follow all on-screen instructions to install the file that you opened. Do this for each file that you downloaded.
Connect your printer wirelessly for macOS 10.5 through 10.11.
-
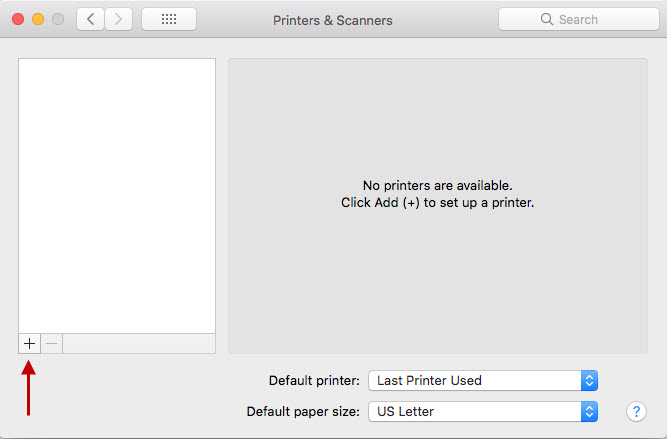
After the network connection has been established, select the Apple menu and choose System Preferences.
-
Choose Print & Fax, or Print & Scan, or Printers & Scanners. The name will vary based on which version of the Mac OS is installed.
-
Select the plus sign + towards the lower left part of the window. If a list of printers appears, select Add printer or scanner...
-
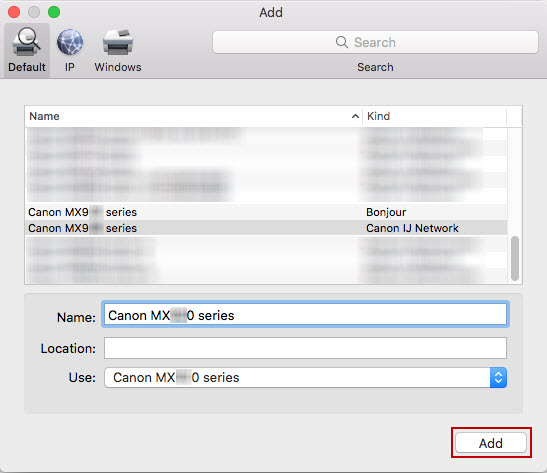
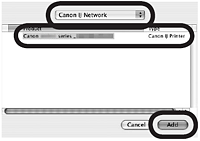
In the Add window, select the MX350 or MX870 with the Canon IJ Network in the Kind column to highlight it.
-
Make sure that Canon MX350 series or Canon MX870 series is selected in the Use drop down menu.
-
Select Add to add the printer to your printer list.
-
The printer is now ready to use.
Connect your printer wirelessly for macOS 10.4.
-
After the network connection has been established, select the Go menu in Finder.
-
Choose Utilities.
-
Double-click Printer Setup Utility.
-
Select Canon IJ Network in the pop-up menu. Select Canon MX350 series or Canon MX870 series in the list of printers.
-
Select Add.
-
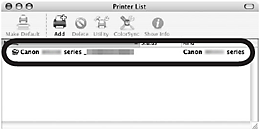
Confirm that the MX350 series or the MX870 series has been added to the printer list.
-
Quit the Printer Setup Utility.
-
The printer is now ready to use.
Options for non-wireless connection.
If your product issue was not resolved after following the steps above, or if you require additional help, please create or log in to your Canon Account to see your technical support options.
Or if you still need help, visit our Canon Community by clicking the button below to get answers:

____________________________________________________________________________________________
