
Updating the Firmware Using a USB Cable - imagePROGRAF PRO-1000
| Article ID: ART170983 | | | Date published: 07/20/2018 | | | Date last updated: 08/16/2022 |
Description
This article shows how to perform a firmware update for the imagePROGRAF PRO-1000 using a USB cable.
Solution
 After updating the firmware for your printer, uninstall the driver (if you are using a Windows PC) or remove the printer from your Printer List (if you are using a Mac). Then, download and install the latest printer driver from our website.
After installing the new driver, download and install the latest Media Configuration Tool from our website. It is also recommended that you download the latest Media Information File for the printer from our website. You can use these files to update the media information on the printer's operation panel as well as the printer driver.
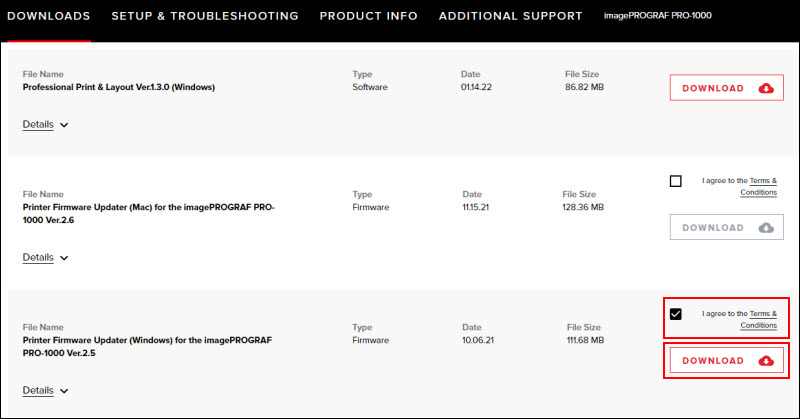
To update the firmware for your imagePROGRAF PRO-1000 using a USB cable, download the Printer Firmware Updater. Click here to access the Drivers & Downloads page for the PRO-1000. Scroll down the list of files to download. If you do not see the firmware update file in the list, click the Load More button to expand the list of files. Place a check in the box to indicate that you agree to the Terms and Conditions. Then, click Download.
 The firmware update file for Windows is used in the example below. If you have a Mac, place a check in the box for the Mac version of the firmware updater, then click Download.
If you are asked to run or save the file, save it to your computer.
If you are using a Windows PC, save the file where you can easily find it (such as on your desktop, or in a new folder you can access). Double-click on the .exe file that has been saved to your computer. A folder with the same name as the file will be created.

Open this folder to find the Printer Update.exe file referred to in the instructions below.
If you are using a Mac, open the .dmg file after it has been saved to your computer. A disk image will be mounted on your desktop. Open this disk image to find the Printer Update file referred to in the instructions below.
![]()
Requirements
-
Computer on which the printer driver is installed.
If you are using Windows, open the Properties window of the printer driver, display the Ports tab, and select Enable bidirectional support. For instructions on opening the Properties window, click here.
-
Printer that you are using
-
USB cable
-
Printer Update Utility
Check Whether Update is Necessary
You can check whether an update is required by printing the nozzle check pattern. Click here for instructions on printing the nozzle check pattern.
Check the software (firmware) version "Ver. X.XXX" that was printed in the nozzle check pattern print results. If the firmware version is earlier than Ver. 2.040, a firmware update is necessary.
Update according to "Firmware Version Update Procedure" described below.
Firmware Version Update Procedure
-
Connect the computer and the printer by using a USB cable.
If a LAN cable or a USB cable for camera connection is connected, disconnect those cables.
For models with card slots, remove all the cards if they are inserted in the card slots.
Make sure that only one printer is connected to the computer via a USB cable.
If you are using Mac OS, make sure that your computer is set up so that it does not enter its sleep mode.
-
If you are using Windows, double-click
 (Printer Update.exe) to start the Update utility.
If you are using macOS, double-click
(Printer Update) to start the Update utility. -
Check the contents of Step 1 that are displayed in the Printer Update Utility window, turn on the printer power, and then click Next.
If an error message is displayed, the possible causes are as follows:
-
Cause (1): The USB cable is not connected.
Corrective action: Connect the USB cable, and start over from step 1.
-
Cause (2): The downloaded update file is for a different printer.
Corrective action: Download the file for the printer to be updated, and start over from step 1.
-
Check the contents of Step 2 that are displayed in the Printer Update Utility, turn on the printer power, and click Start.

*Depending on the operating system you are using, the displayed operation windows may differ.
Printer name: Name of the printer connected to the computer.
Current software version: Software version of the connected printer.
Update software version: Software version to which the printer is to be updated at this time.
Do not turn off the printer or disconnect the USB cable until the update is complete. Doing so may cause an error.
If you are unable to click Start, the update was attempted on a printer that does not require firmware overwriting. Check the Current software version again. If it does not require the update then cancel it.
-
When the Step 3 window appears in the Printer Update Utility, check the message contents, and click Quit.
This completes the firmware update.
When the version update is complete, the printer power turns off automatically. To use the printer, first disconnect the power cable, reconnect it, and then turn on the power again.
If the power is turned off during the update, the update will not end normally. If the printer does not operate normally even if you turn off the printer power and then turn it back on again, the update may not have ended normally.
When using Windows, a new printer icon "Canon XXX series (Copy 1)" may be created during the update process. In some cases this icon may be set as the default printer. If this occurs manually set the original printer as the default. The "Canon XXX series (Copy 1)" icon be safely be deleted.
Error Causes and Corrective Actions
If an error is detected during operation of the Printer Update Utility, an error message is displayed.
If an error message is displayed, perform the operation described in the message instructions.
The following table lists the causes and corrective actions of the main error messages that may be displayed.
|
Message |
Cause |
Corrective action |
|---|---|---|
|
If you are using Windows or Mac OS |
||
|
This program does not support the operating system you are using. |
An attempt was made to run the Printer Update Utility on an operating system that the utility does not support. |
Run the Printer Update Utility on the supported operating system. |
|
More than one printer is connected. Make sure only one printer is connected with a USB cable, and then restart the utility. |
Two or more printers to be updated are connected to the computer. |
Connect only one printer. |
|
Could not update.Please wait a while and try again. If you still cannot update, turn on the printer again, and then restart the utility. |
The printer is not ready and the update cannot be started. |
Wait for a few minutes and restart the utility. |
|
An error occurred during the printer function update. Since the update failed, the printer cannot be used in its current condition. Turn on the printer again, and then be sure to restart the utility. |
The printer power was turned off or the USB cable was disconnected during execution of the update. |
Press OK button to terminate the Printer Update Utility. Turn off the printer power, wait a few seconds, and then turn on the power again. If the printer does not start normally or if the update cannot be executed, repairs are necessary. |
|
If you are using Windows |
||
|
The printer cannot be found. Check the following items, and then restart the utility:
|
|
|
|
If you are using Mac OS |
||
|
Mac OS X Classic is running. |
An attempt was made to operate the Printer Update Utility while Classic was running on Mac OS X. |
Stop Classic, and operate the Printer Update Utility from Mac OS X. |
|
The printer cannot be found. Check the following items, and then restart the utility:
|
|
|
If your product issue was not resolved after following the steps above, or if you require additional help, please create or log in to your Canon Account to see your technical support options.
Or if you still need help, visit our Canon Community by clicking the button below to get answers:

____________________________________________________________________________________________