|
Place originals on the platen glass or in the feeder. Use the platen glass when scanning thick or bound documents such as books. You can load two or more sheets of originals in the feeder so that they can be scanned continuously.
IMPORTANT
Use originals that are completely dry
- When placing originals, make sure that any glue, ink, or correction fluid on the originals has completely dried.
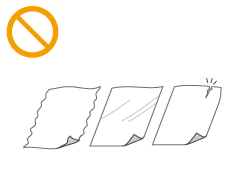
To avoid paper jams
- Do not place the following types of originals in the feeder as this may cause paper jams:
- Wrinkled or creased paper
- Carbon paper
- Curled or rolled paper
- Coated paper
- Torn paper
- Onion skin or thin paper
- Stapled or clipped originals
- Paper printed by a thermal transfer printer
- Transparencies
NOTE
To scan originals more accurately
- Originals placed in the feeder are scanned while being fed into the machine. On the other hand, originals placed on the platen glass remain in a fixed position while they are scanned. To ensure more accurate scanning results, placing originals on the platen glass is recommended.
To scan tracing paper or transparencies
- To scan transparent originals (for example, tracing paper or transparencies), place them on the platen glass.
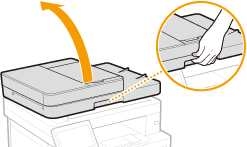
Placing Originals on the Platen Glass 1. Open the feeder.
2. Place the original face down on the platen glass.
- Align the corner of the original with the top-left corner of the platen glass.
NOTE
- To scan transparent originals (for example, tracing paper or transparencies), cover them with plain white paper.
3. Gently close the feeder.
 The machine is ready to scan the document.
NOTE
When scanning is complete
- Remove the original from the platen glass.
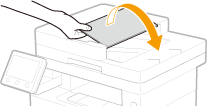
Placing Originals in the Feeder 1. Open the original supply tray.
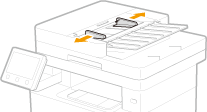
2. Spread the slide guides apart.
- Slide the slide guides outward until they are slightly farther apart than the actual original width.
3. Fan the original stack and align the edges.
- Fan the original stack in small batches, and align the edges by lightly tapping the stack on a flat surface a few times.
4. Place the original(s) face up in the feeder.
- Place the original(s) in the landscape orientation.
- Make sure that the original stack does not exceed the load limit line (
 ). ).
IMPORTANT
- Do not load originals of various sizes at the same time.
- If originals are loaded so that they exceed the load limit line, scanning may stop or a paper jam may occur.
5. Align the slide guides against the edges of the original.
- Slide the slide guides inward until they are aligned securely against the edges of the original.
The machine is ready to scan the original.
IMPORTANT
Align the slide guides securely against the edges of the original
- Slide guides that are too loose or too tight can cause misfeeds or paper jam.
While originals are being scanned
- Do not add or remove originals.
When scanning is complete
- Remove the scanned originals from beneath the feeder to prevent paper jams.
|