|
This section describes how to download images from your camera to the computer using EOS Utility Ver. 3.x.
The same procedures can be used to download movies as well as still images. However, downloading movies requires a much longer time due to their large data size.
IMPORTANT
When using computers installed with Windows operating systems, please log on to the computer as an administrator.
Downloading all the images that have not been transferred to the computer 1. Connect your camera and computer using an interface cable.
2. Set the camera's power to [ON].
3. EOS Utility Ver. 3.x starts automatically.
If EOS Utility does not start automatically, click the [Start] button, then select [All Programs], [Canon Utilities], [EOS Utility] and then [EOS Utility].
NOTE
- Windows 8: Right-click on the [Start] screen and click on [All apps] displayed at the bottom right of the screen to display the [Apps] screen. Then, click [EOS Utility].
- Windows 8.1: Click [
 ]on the bottom left of the [Start] screen to display the [Apps] screen, and then click [EOS Utility]. ]on the bottom left of the [Start] screen to display the [Apps] screen, and then click [EOS Utility].
- Windows 10: Click the [Start] button, then select [All apps], [Canon Utilities] and then [EOS Utility].
- Mac OS X: Click the [EOS Utility] icon on the Dock.
IMPORTANT
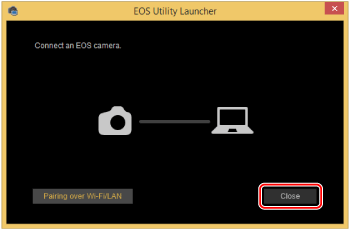
If you start EOS Utility Ver. 3.x before connecting the camera to the computer, the [EOS Utility Launcher] screen (shown in the example image below) will be displayed. In this case, please click [Close], and connect the camera to the computer after the window has closed.
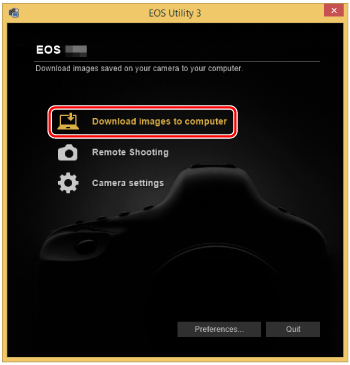
4. When the window shown below is displayed, click [Download images to computer]
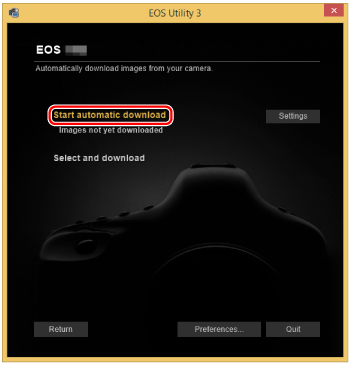
5. Click [Start automatic download] to download all the images on the memory card to the computer.
NOTE
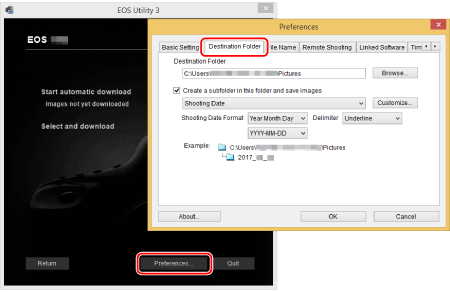
By default, the downloaded images are sorted into folders by their shooting date, and are saved in the [Pictures] folder on the computer. If you wish to change the destination for the downloaded images, click [Preferences] and specify the settings in the dialog box.
6. Download of images to the computer begins.
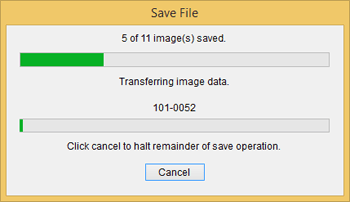
7. When images have been downloaded, click [Quit] and close EOS Utility.
Downloading selected images With EOS Utility Ver. 3.x, you can select the images you want and download them to your computer.
The procedure for downloading selected images to your computer is explained below.
1. Connect your camera and computer using an interface cable.
2. Set the camera's power switch to [ON].
3. EOS Utility Ver. 3.x starts automatically.
If EOS Utility does not start automatically, click the [Start] button, then select [All Programs], [Canon Utilities], [EOS Utility], and then [EOS Utility].
NOTE
- Windows 8: Right-click on the [Start] screen and click on [All apps] displayed at the bottom right of the screen to display the [Apps] screen. Then, click [EOS Utility].
- Windows 8.1: Click [ ]on the bottom left side of the [Start] screen to display the [Apps] screen, and then click [EOS Utility].
- Windows 10: Click the [Start] button, then select [All apps], [Canon Utilities] and then [EOS Utility].
- Mac OS X: Click the [EOS Utility] icon on the Dock.
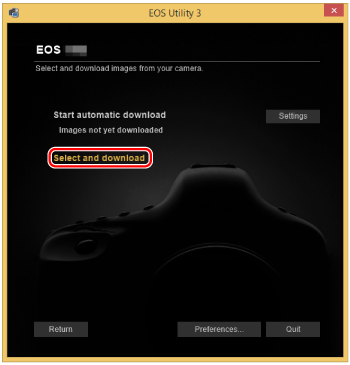
4. When the window shown in the example image below is displayed, click [Download images to computer].
5. Click [Select and download] to download the desired images to the computer.
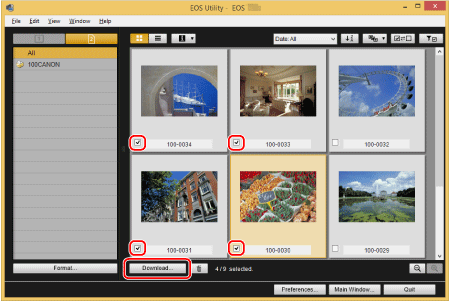
6. The viewer window appears and the images in the memory card are displayed.
View the images and checkmark images to download. Then click the [Download] button. (4 images have been selected in the example image below.)
NOTE
- An[
 ] icon will be displayed in the upper left of movie files. ] icon will be displayed in the upper left of movie files.
- You can click [
 ]to change the thumbnail order. ]to change the thumbnail order.
- You can click [
 ]to sort the images with various conditions and choose images you want to download. ]to sort the images with various conditions and choose images you want to download.
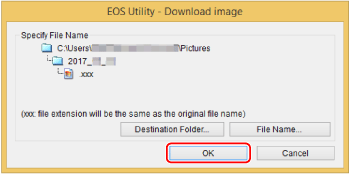
7. The [Download image] dialog box appears. If you want to change the destination, click [Destination Folder] and make the settings in the dialog box displayed.
NOTE
By default, the downloaded images are sorted into folders by their shooting date, and are saved in the [Pictures] folder on the computer.
8. Click the [OK] button to begin downloading images to your computer.
 9. When images have been downloaded, click [Quit] and close EOS Utility.
This completes the explanation of the procedures for downloading images.
|