How do I use the Cleaning Cards in my CR-L1 check scanner?
Article ID: ART172135
|
Date published: 10/05/2018
|
Date last updated: 10/05/2018
Description
If a black stripe appears on the back-side of scanned images or if dirt appears on the paper documents upon scanning or for preventative measures, we recommend that you clean your scanner as needed with a cleaning card.
Solution
It is best to perform a cleaning at the beginning and end of the day. A cleaning card does not clean the ink jet nozzles, so please remove the ink cartridge before using the cleaning cards.
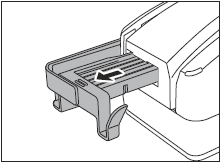
Place the cleaning card (for Check Path Cleaning) in the document tray.
Locate where you saved the file from Step 1 (Canon U.S.A. website), extract it and double-click the "CleanCR.exe" file shown below.
From the drop-down menu, please select the "CR-50/ 80/ L1" and click [OK].
With the Cleaning Card already in the feed pocket of the scanner, please click the "Clean" button.
The Cleaning Card will then proceed through the paper path as shown below.
Please repeat steps 3 and 6.
A typical cleaning consists of feeding the Cleaning Card 3-7 times. Each time you run the card through, invert and/or flip it in the feed pocket. If the scanner is extremely dirty, you may need to use another Cleaning Card.
When you have finished cleaning your scanner, please click on the "Close" button to exit out of the Canon Check Scanning Cleaning Tool.
Upon completion, please allow 1 to 2 minutes for the moisture on your scanner from the Cleaning Card to thoroughly dry before scanning documents.