You can specify the height and width of paper when its size cannot be selected from the Paper Size menu. Such a paper size is called "custom size."
The procedure for specifying a custom size is as follows:
-
Creating a new custom paper size
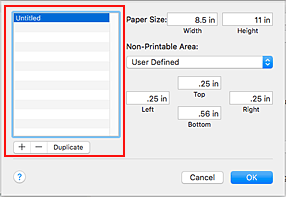
In the Print dialog window, select Manage Custom Sizes... from Paper Size.
In the displayed dialog, click +.
Untitled will be added to the list.
-
Setting details about the custom paper size
Double-click Untitled, enter the name of the paper size you want to register, and specify the Width and Height of the paper for Paper Size.
Select your model for Non-Printable Area, and enter the margins.
-
Registering the custom paper size
Click OK.
The custom size is registered.
 Note:
Note:
If the width and/or height you entered are invalid , a message will be displayed indicating the size is not supported .. Valid values will be listed in the body of the message.
Note
- If the application software that created the document has a function for specifying height and width values, use the application software to set the values. If the application software does not have such a function or if the document does not print correctly, perform the above procedure from the printer driver to set the values.
- To duplicate the registered paper size, select the paper size that you want to duplicate from the list, and click Duplicate.
- To delete a registered paper size, select the paper size that you want to delete from the list, and click -.
- Borderless printing on custom paper sizes is not supported.