
Setting the Microphone (XF705)
| Article ID: ART172473 | | | Date published: 11/13/2018 | | | Date last updated: 12/11/2018 |
Description
Setting the Microphone (XF705)
Solution
| Solution |
Recording Audio The camcorder features 4-channel linear PCM audio recording and playback. The sampling frequency is 48 kHz and the audio sampling bit depth is 24 bit. You can record audio using the INPUT terminals (commercially available microphones, analog line-in audio sources, AES/EBU digital audio sources), the MIC terminal (commercially available microphones) or the built-in microphone.
An audio signal will also be output with the video signal from the SDI terminal and HDMI OUT terminal. You can record this audio signal on an external recorder.
ã
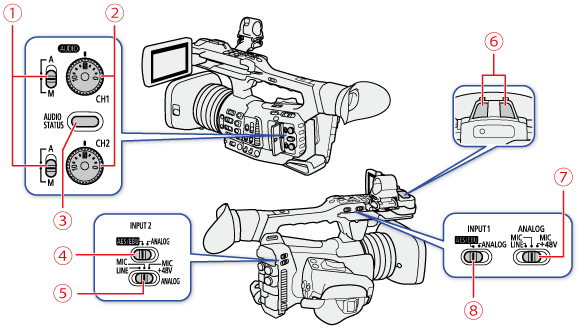
 : CH1/CH2 : CH1/CH2  (audio level) switches (audio level) switches : CH1/CH2 dials : CH1/CH2 dials : AUDIO STATUS button : AUDIO STATUS button : INPUT 2 switch (audio input selection) : INPUT 2 switch (audio input selection) : INPUT 2 terminal's ANALOG switch (analog audio source selection) : INPUT 2 terminal's ANALOG switch (analog audio source selection) : Built-in microphone : Built-in microphone : INPUT 1 terminal's ANALOG switch (analog audio source selection) : INPUT 1 terminal's ANALOG switch (analog audio source selection) : INPUT 1 switch (audio input selection) : INPUT 1 switch (audio input selection)Setting the Audio Input Type for the INPUT 1/INPUT 2 Terminals Using the INPUT 1/INPUT 2 terminals, you can record audio independently from a microphone or audio input source.
1. Set the audio input selection switch INPUT 1 or INPUT 2 to AES/EBU (digital audio) or ANALOG (analog audio).

2. If you selected analog audio, set the corresponding ANALOG (analog source selection) switch to MIC (microphone) or LINE (audio device).
Selecting the Audio Input Source for Audio Channels You can select the audio input source that will be recorded on CH1/CH2 or CH3/CH4, independently for each pair of audio channels.
1.
 -> [ -> [   Audio Setup] -> [Select CH1/CH2 Input] or [Select CH3/CH4 Input] Audio Setup] -> [Select CH1/CH2 Input] or [Select CH3/CH4 Input]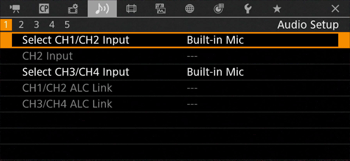
2. Select [INPUT Terminals] (external microphone or audio device), [MIC Terminal] (external microphone) or [Built-in Mic] (built-in microphone) and then press SET.

By default, when using analog audio sources (line in or microphone) connected to the INPUT terminals, each audio input is recorded to a separate audio channel (INPUT 1 to CH1 and INPUT 2 to CH2).
If necessary (for example, as an audio backup recording), you can record the same analog audio source connected to the INPUT 1 terminal to both audio channels, CH1 and CH2. In that case, you can adjust the audio recording levels of each channel independently of each other.
1. Press and hold the button on the POWER switch and set the switch to ON.

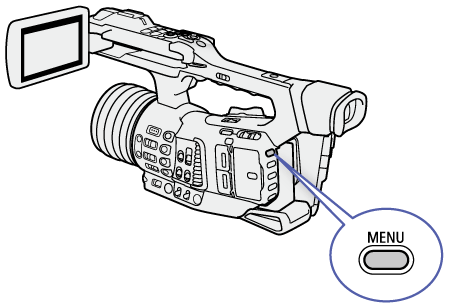
2. Press the MENU button.
3. Select [CH2 Input].
-> [ Audio Setup] -> [CH2 Input]
4. Select the desired option and then press SET.
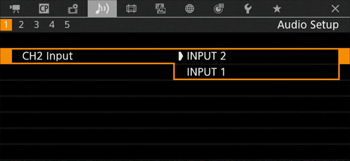
5. Press the MENU button to close the menu.
Adjusting the Audio Recording Level You can adjust the audio recording level of analog audio sources from the INPUT terminals, external microphones connected to the MIC terminal and the built-in microphone. For the INPUT terminals (analog sources) and MIC terminal, you can set the audio recording level to automatic or manual adjustment independently for each channel or for CH1/CH2 and CH3/CH4 as a set*.
The audio recording level of digital audio sources (AES/EBU) from the INPUT terminals cannot be adjusted.
The audio recording level of the built-in microphone can only be adjusted for a pair of channels (CH1/CH2 or CH3/CH4) as a set.
* Requires linking the audio level adjustment (ALC) of CH1/CH2 or CH3/CH4.
Set the
(audio level) switch of the desired channel to A (automatic) to let the camcorder automatically adjust that channelâs audio level.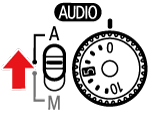
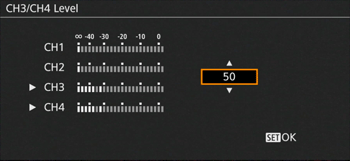
You can set the audio level for each channel manually from â to +18 dB.
1. Set the
(audio level) switch of the desired channel to M (manual).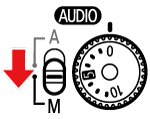
2. Turn the corresponding
dial to adjust the audio level.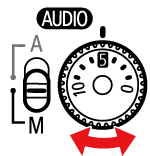
1. Press and hold the button on the POWER switch and set the switch to ON.
2. Press the MENU button.
3. Select [Audio Rec Level CH3], [Audio Rec Level CH4] or [Audio Rec Level CH3/CH4].
-> [  Audio Setup] -> [Audio Rec Level CH3], [Audio Rec Level CH4] or [Audio Rec Level CH3/CH4] Audio Setup] -> [Audio Rec Level CH3], [Audio Rec Level CH4] or [Audio Rec Level CH3/CH4]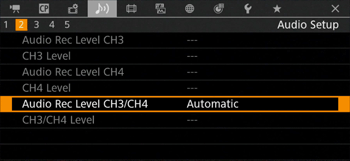
4. Select [Automatic] or [Manual].
-> [ Audio Setup] -> [Automatic] or [Manual]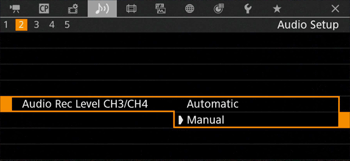
5. Select [CH3 Level], [CH4 Level] or [CH3/CH4 Level].
-> [ Audio Setup] -> [CH3 Level], [CH4 Level] or [CH3/CH4 Level]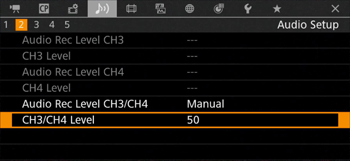
6. Push the joystick up/down to set the audio recording level and then press SET.
7. Press the MENU button to close the menu.
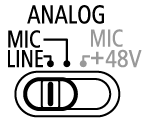
Microphone Sensitivity (INPUT Terminals) If you selected [INPUT Terminals] as the audio input for an audio channel, one of the INPUT switches is set to ANALOG, and the corresponding ANALOG switch is set to MIC or MIC+48V, you can select the external microphoneâs sensitivity.
1. Press and hold the button on the POWER switch and set the switch to ON.
2. Press the MENU button.
3. Select the menu setting for the INPUT terminal used.
-> [  Audio Setup] -> [INPUT 1 Mic Trimming] or [INPUT 2 Mic Trimming] Audio Setup] -> [INPUT 1 Mic Trimming] or [INPUT 2 Mic Trimming]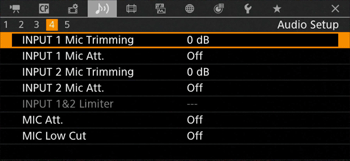
4. Select the desired level and then press SET.
+12 dB, +6 dB, 0 dB, -6 dB, -12 dB
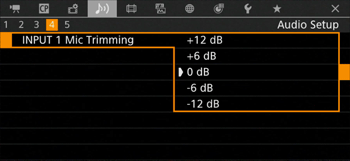
5. Press the MENU button to close the menu.
Microphone Attenuator (INPUT Terminals) If you selected [INPUT Terminals] as the audio input for an audio channel, one of the INPUT switches isãset to ANALOG, and the corresponding ANALOG switch is set to MIC or MIC+48V, you can activate the externalãmicrophoneâs attenuator (20 dB).
1. Press and hold the button on the POWER switch and set the switch to ON.
2. Press the MENU button.
3. Select the menu setting for the INPUT terminal used.
-> [ > [INPUT 1 Mic Att.] or [INPUT 2 Mic Att.]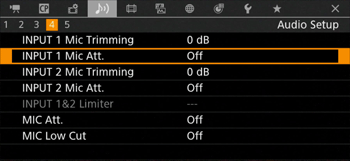
4. Select [On] and then press SET.
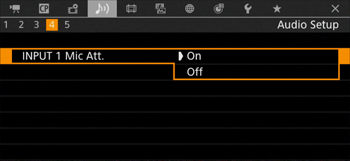
5. Press the MENU button to close the menu.
Microphone Attenuator (MIC Terminal) If you selected [MIC Terminal] as the audio input for an audio channel, you can activate the external microphone's attenuator (20 dB).
1. Press and hold the button on the POWER switch and set the switch to ON.
2. Press the MENU button.
3. Select [MIC Att.].
-> [ Audio Setup] -> [MIC Att.]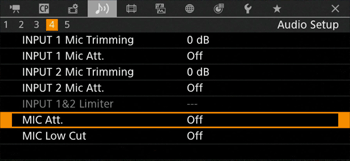
4. Select [On] and then press SET.
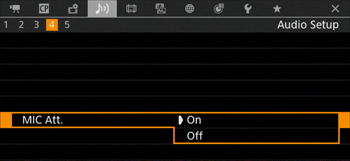
5. Press the MENU button to close the menu.
Low-Cut Filter (MIC Terminal) If you selected [MIC Terminal] as the audio input for an audio channel, you can activate the external microphone's low-cut filter.
1. Press and hold the button on the POWER switch and set the switch to ON.
2. Press the MENU button.
3. Select [MIC Low Cut].
-> [ Audio Setup] -> [MIC Low Cut]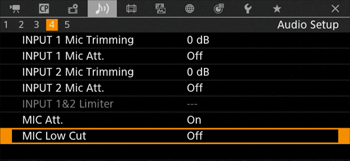
4. Select [On] and then press SET.
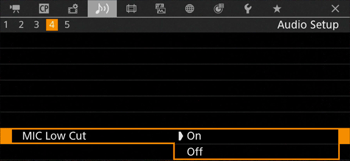
5. Press the MENU button to close the menu.
|
|
ID: 8204250100_EN_1
|
|
 , 5 corresponds to 0 dB, and 10 corresponds to +18 dB.
SIMS Doc Id
8204250100