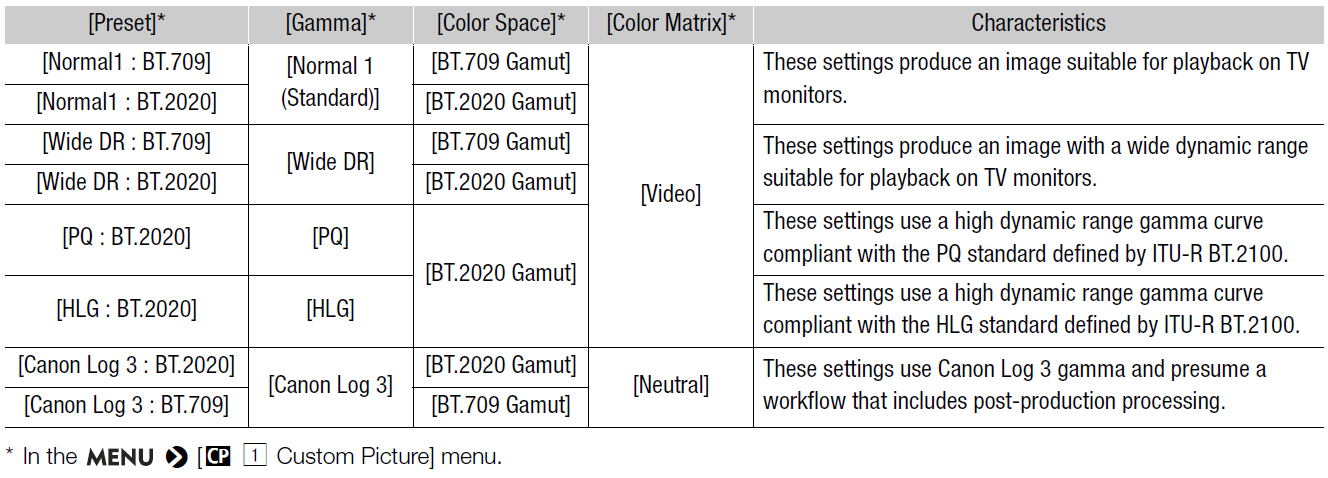
Preset Color Settings
The camcorder offers the following preset color settings (combinations of gamma curve, color space and color matrix). Alternatively, you can turn the presets off and set each of the main settings individually. You can even adjust the detailed custom picture settings as necessary
NOTES
• About the logarithmic gamma curve (Canon Log 3)
This gamma curve assumes the need for post-production processing. It was designed to make the most of the imaging sensor characteristics in order to obtain impressive levels of dynamic range.
- In

mode, you can apply a LUT to the LCD screen and viewfinder and to video output from the SDI terminal or HDMI OUT terminal to use gamma curve settings more suitable for viewing on a monitor screen.
- There are also other LUTs available that can be applied for processing in post-production. For the latest information on available LUTs, please visit your local Canon website.
1 Select [Select].

• When an optional RC-V100 Remote Controller is connected to the camcorder, you can press the remote controller’s CUSTOM PICT. button to open the

menu.
2 Select the desired file and then press SET.
• Select one of the custom picture files saved in the camcorder (C1 to C20). To use the settings of a custom picture file saved on a card, copy the file to the camcorder in advance
• When you close the menu, the selected custom picture file’s settings will be applied.
• The icon of the [Gamma] setting in effect will appear on the left of the screen. If the detailed settings were activated

is set to [On]),

will appear on the left of the screen.
3 Select [Preset].
4 Select the desired setting and then press SET.
• To select the gamma curve, color space or color matrix individually, select [Off] and continue the procedure with step 5. To use one of the preset settings as is, the rest of the procedure is not necessary.
5 Select [Gamma].

6 Select the desired gamma curve and then press SET.
• Repeat steps 5 and 6, selecting [Color Space] to select the color space, and/or [Color Matrix] to select the color matrix in the same way.
NOTES
• When the [Gamma] setting in the custom picture file is set to [PQ] or [HLG], slow motion recording is not available.
