
Shooting in Creative Zone modes on the EOS RP
| Article ID: ART173837 | | | Date published: 03/08/2019 | | | Date last updated: 03/11/2019 |
Description
Shooting in Creative Zone modes on the EOS RP
Solution
Creative Zone |
|
 |
|
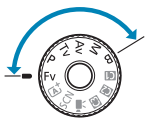 |
Creative Zone modes give you the freedom to shoot in a variety of ways by setting your preferred shutter speed, aperture value, exposure, and more. |
 |
To clear the shooting mode description displayed when you turn the Mode dial, press <SET>. | ||
 |
 |
.png) Make sure the Multi-function lock feature is off. Make sure the Multi-function lock feature is off. |
|
| Program AE | |||
| The camera automatically sets the shutter speed and aperture to suit the subject's brightness. This is called Program AE. * <P> stands for Program. * AE stands for Auto Exposure. |
|||
|
|
|||
 |
 |
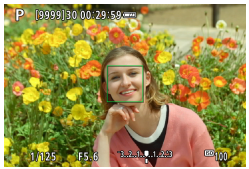
Set the Mode dial to <P>. | |
 |
 |
Focus on the subject. | |
|
Aim the AF point over the subject and press the shutter button halfway. | ||
 |
Once the subject is in focus, the AF point turns green (with One-Shot AF). | ||
|
The shutter speed and aperture are set automatically. |
||
 |
 |
Check the display. | |
|
As long as the exposure value is not blinking, standard exposure will be obtained. |
||
 |
Take the picture. | ||
|
Compose the shot and press the shutter button completely. | ||
 |
 |
|
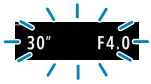
If the "30" shutter speed and the lowest f/number blink, it indicates underexposure. Increase the ISO speed |
 |
|
|
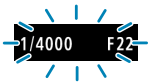
If the "1/4000" shutter speed and the highest f/number blink, it indicates overexposure. Lower the ISO speed or use an ND filter (sold seperately) to reduce the amount of light entering the lens. |
|
Differences Between <P> and < > Modes > Modes |
|
|
In <> mode, many functions, such as the AF method and metering mode, are set automatically to prevent spoiled shots. The functions you can set are limited. On the other hand, with <P> mode, only the shutter speed and aperture are set automatically. You can freely set the AF method, metering mode, and other functions. |
|
| Program Shift | ||
|
In <P> mode, you can freely change the shutter speed and aperture combination (Program) set automatically by the camera while maintaining the same exposure. This is called Program shift. | |
|
To shift the program, press the shutter button halfway, then turn the  dial until the desired shutter speed or aperture is displayed. dial until the desired shutter speed or aperture is displayed. |
|
|
Program shift will be canceled automatically when the metering timer ends (exposure setting display turns off). | |
|
Program shift cannot be used with flash. | |
| Shutter-Priority AE | |||
| In this mode, you set the shutter speed and the camera automatically sets the aperture to obtain the standard exposure matching the brightness of the subject. This is called shutter-priority AE. A faster shutter speed can freeze the action of a moving subject. A slower shutter speed can create a blurred effect, giving the impression of motion. * <Tv> stands for Time value. 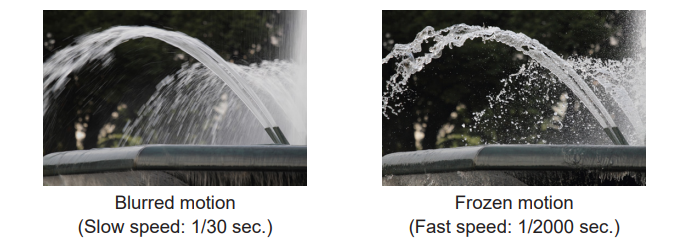 |
|||
|
|
|||
 |
|
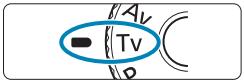
Set the Mode dial to <Tv>. | |
 |
|
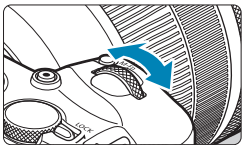
Set the desired shutter speed. | |
|
Turn the < > dial to set it. > dial to set it. |
||
|
Once the subject is in focus, the AF point turns green (with One-Shot AF). | ||
|
The shutter speed and aperture are set automatically. |
||
 |
|
Check the display. | |
|
As long as the exposure value is not blinking, standard exposure will be obtained. | ||
|
The aperture is set automatically. | ||
 |
|
Check the display and shoot. | |
|
As long as the aperture is not blinking, the standard exposure will be obtained. | ||
 |
|
|
If the lowest f/number blinks, it indicates underexposure. Turn the dial to set a slower shutter speed until the aperture stops blinking or set a higher ISO speed. |
 |
|
|
If the highest f/number blinks, it indicates overexposure. Turn the dial to set a faster shutter speed until the aperture stops blinking or set a lower ISO speed. |
|
Shutter Speed Display | |
|
For example, "0"5" indicates 0.5 sec. and "15"", 15 sec. | |
| Aperture-Priority AE | |||
| In this mode, you set the desired aperture and the camera sets the shutter speed automatically to obtain the standard exposure matching the subject brightness. This is called aperture-priority AE. A higher f/number (smaller aperture hole) will make more of the foreground and background fall within acceptable focus. On the other hand, a lower f/number (larger aperture hole) will make less of the foreground and background fall within acceptable focus. *<Av> stands for Aperture value (aperture opening). 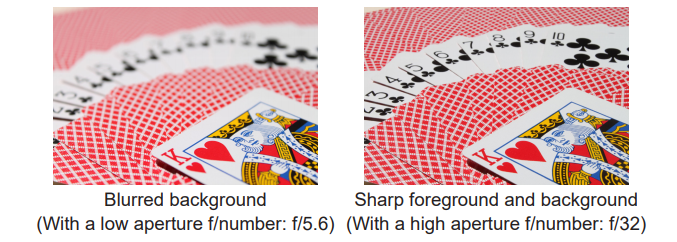 |
|||
|
|
|||
 |
|
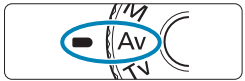
Set the Mode dial to <Av>. | |
 |
|
Set the desired aperture. | |
|
Turn the <> dial to set it. |
||
|
|
Focus on the subject. | |
|
Press the shutter button halfway. | ||
|
The shutter speed is set automatically. |
||
 |
|
Check the display and shoot. | |
|
As long as the shutter speed is not blinking, the standard exposure will be obtained. | ||
 |
|
|
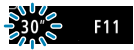
If the "30" shutter speed blinks, it indicates underexposure. Turn the dial to set a larger aperture (lower f/number) until the shutter speed blinking stops or set a higher ISO speed. |
 |
|
|
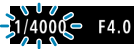
If the "1/4000" shutter speed blinks, it indicates overexposure. Turn the dial to set a smaller aperture (higher f/number) until the shutter speed blinking stops or set a lower ISO speed. |
|
Aperture Value Display | |
|
The higher the f/number, the smaller the aperture opening will be. The f/number displayed varies depending on the lens. If no lens is attached to the camera, "F00" will be displayed for the aperture. | |
Depth-of-Field Preview  |
||
Press the button you have assigned to depth-of-field preview (using [ C.Fn III-5: Customize buttons], to stop down the lens to the current aperture setting and check the area in focus (depth of field). C.Fn III-5: Customize buttons], to stop down the lens to the current aperture setting and check the area in focus (depth of field). |
||
|
|
The larger the aperture value, the wider the area in focus, from the foreground to the background. |
|
Exposure is locked (AE lock) as you hold down the button assigned to depth-of-field preview. | |
| Manual Exposure | |||
| In this mode, you set both the shutter speed and aperture as desired. To determine the exposure, refer to the exposure level indicator or use a commercially available exposure meter. This method is called manual exposure. * <M> stands for Manual. |
|||
|
|
|||
 |
|
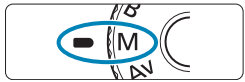
Set the Mode dial to <M>. | |
|
Set the ISO speed. | ||
|
With ISO Auto, you can set exposure compensation. |
||
 |
|
Set the shutter speed and aperture. | |
|
To set the shutter speed, turn the <> dial. To set the aperture, turn the < > dial. > dial. |
||
 |
|
Focus on the subject. | |
|
Press the shutter button halfway. | ||
|
The exposure setting will be displayed. | ||
|
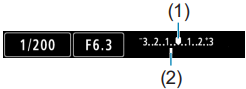
Check the exposure level mark  to see how far the current exposure level is from the standard exposure level. to see how far the current exposure level is from the standard exposure level.(1) Standard exposure index. (2) Exposure level mark. |
||
 |
 |
Set the exposure and take the picture. | |
|
Check the exposure level indicator and set the desired shutter speed and aperture. | ||
| Exposure Compensation with Auto ISO | ||
| If the ISO speed is set to [AUTO] for manual exposure shooting, you can set exposure compensation as follows: | ||
|
Touch the exposure level indicator. | |
|
[ : Expo.comp./AEB] : Expo.comp./AEB] |
|
|
Quick Control screen |
|
|
|
If ISO Auto is set, the ISO speed setting will change to obtain the standard exposure with the set shutter speed and aperture. Therefore, you may not obtain the desired exposure effect. In this case, set the exposure compensation. |
|
|
With the camera set to the <M> mode + ISO Auto +  (Evaluative metering) and [ (Evaluative metering) and [ C.Fn I-7: AE lock meter. mode after focus] set to the default setting, holding down the shutter button halfway will lock the ISO speed after focus is achieved with One-Shot AF. C.Fn I-7: AE lock meter. mode after focus] set to the default setting, holding down the shutter button halfway will lock the ISO speed after focus is achieved with One-Shot AF. |
|
When ISO Auto is set, you can press the  button to lock the ISO speed. button to lock the ISO speed. |
|
|
To compare the current exposure to the exposure when you pressed the button initially with a manually set ISO speed, press the button, recompose the shot, and check the exposure level indicator. |
|
|
Woth ISO Auto set and [C.Fn I-1: Exposure level increments] set to [1/2-stop], any 1/2-stop exposure compensation will be implemented with the ISO speed (1/3 stop) and shutter speed. However, the shutter speed displayed will not change. |
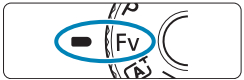
| Flexible-Priority AE | |||
| In this mode, you can set shutter speed, aperture, and ISO speed manually or automatically and combine these settings with your choice of exposure compensation. Shooting in <Fv> mode, with control over each of these parameters, is equivalent to shooting in <P>, <Tv>, <Av>, or <M> mode. *<Fv> stands for Flexible value. |
|||
|
|
|||
 |
|
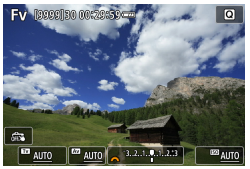
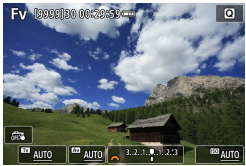
Set the Mode dial to <Fv>. | |
 |
|
Set the shutter speed, aperture, and ISO speed. | |
|
Turn the <> dial to select an item to set. A [] icon appears to the left of the selected item. |
||
|
Turn the <> dial to set the option. |
||
|
To reset the setting to [AUTO], press the  or or  key. key. |
||
 |
|
Set the amount of exposure compensation. | |
|
Turn the <> dial and select the exposure level indicator. A [] icon appears to the left of the exposure level indicator. |
||
|
Turn the <> dial to set the option. |
||
|
To reset the setting to [±0], press the or key. |
||
Combinations of Functions in <Fv> Mode
| Shutter Speed |
Aperture | ISO Speed | Exposure Compensation |
Shooting Mode |
| [AUTO] | [AUTO] | [AUTO] | Available | Similar to <P> |
| Manual selection |
||||
| Manual selection |
[AUTO] | [AUTO] | Available | Similar to <Tv> |
| Manual selection |
||||
| [AUTO] | Manual selection |
[AUTO] | Available | Similar to <Av> |
| Manual selection |
||||
| Manual selection |
Manual selection |
[AUTO] | Available | Similar to <M> |
| Manual selection |
--- |
|
|
Blinking values indicate that the values set will cause underexposure or overexposure. Adjust the exposure until the value stops blinking. |
|
Slow-sync shooting is not used under low light when you have set up <Fv> mode to resemble <Av> or <P> mode, even when [Slow synchro] in [ : External Speedlite control] is set to [1/180-30sec. auto]. : External Speedlite control] is set to [1/180-30sec. auto]. |
|
|
Values for shutter speed, aperture, and ISO speed that are set to [AUTO] are underlined. |
|
You can set shutter speed, aperture, and ISO speed to [AUTO] and exposure compensation to [±0] in steps 2 or 3 by pressing the  or or  key. key. |
Long (Bulb) Exposures
| In this mode, the shutter stays open as long as you hold down the shutter button completely, and closes when you let go of the shutter button. This photographic technique is called "bulb exposure". Use bulb exposures for night scenes, fireworks, the heavens, and other subjects requiring long exposures. | |||
|
|
|||
 |
|
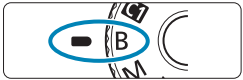
Set the Mode dial to <B>. | |
 |
|
Set the shutter speed, aperture, and ISO speed. | |
|
Turn the <> dial to set it.. |
||
|
|||
| |
Take the picture. | ||
|
The exposure will continue for as long as you keep the shutter button pressed completely. | ||
|
The elapsed exposure time will be displayed on the screen. | ||
|
|
Do not point the camera toward an intense light source, such as the sun or an intense artificial light source. Doing so may damage the image sensor or the camera's internal components. |
|
Long bulb exposures produce more noise in the image than usual. | |
|
If ISO Auto is set, ISO 400 will be set. | |
|
When shooting bulb exposures with the self-timer instead of the bulb timer, keep pressing the shutter button completely (for the self-timer time and bulb exposure time). |
|
|
With [ Long exp. noise reduction], you can reduce the noise generated during long exposures. |
|
For bulb exposures, using a tripod and bulb timer is recommended. | |
|
You can also shoot bulb exposures by using Remote Switch RS-60E3 (sold seperately). | |
|
You can also use Wireless Remote Control BR-E1 (sold seperately) for bulb exposures. When you press the remote control's transmit button, the bulb exposure will start immediately or 2 sec. later. Press the button again to stop the bulb exposure. |
|
||||||
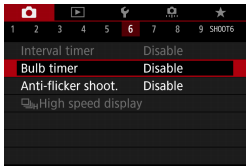
| You can preset the bulb exposure's exposure time. The bulb timer eliminates the need to keep holding down the shutter button during the bulb exposure. This reduces camera shake. The bulb timer can be set only in the <B> (bulb exposure). It cannot be set (or will not function) in any other mode. |
||||||
|
|
||||||
 |
|
Select [: Bulb timer]. |
||||
 |
|
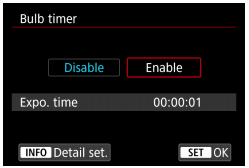
Select [Enable]. | ||||
|
Select [Enable], then press the <INFO> button. | |||||
 |
|
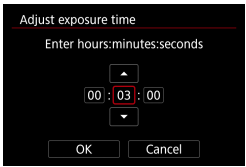
Set the desired exposure time. | ||||
|
Select the hour, minute, or second. | |||||
|
Press <SET> to display  . . |
|||||
|
Set the desired number, then press <SET>. (Returns to  .) .) |
|||||
 |
|
Select [OK]. | ||||
|
Take the picture. | |||||
|
Press the shutter button completely, and the bulb exposure will start and continue until the set time elapses. | |||||
|
 and the exposure time are displayed on the screen during bulb timer shooting. and the exposure time are displayed on the screen during bulb timer shooting. |
|||||
|
To cancel the timer setting, set [Disable] in step 2. | |||||
|
|
While the bulb timer is operating, if you press the shutter button completely and let go of it, the bulb exposure will stop. |
|
If you keep pressing the shutter button completely after the exposure starts, the bulb exposure will continue even after the set exposure time elapses. (The bulb exposure will not stop automatically when the set exposure time elapses.) | |
|
Changing shooting modes cancels the bulb timer and restores the setting to [Disable]. |