You can either select and erase images one by one or erase them in one batch. Protected images will not be erased.
 Once an image is erased, it cannot be recovered. Make sure you no longer need the image before erasing it. To prevent important images from being erased accidentally, protect them. Once an image is erased, it cannot be recovered. Make sure you no longer need the image before erasing it. To prevent important images from being erased accidentally, protect them. |
Erasing a single image.
| |
1. Playback the image to be erased
|
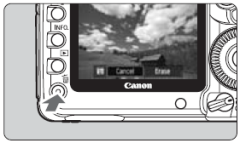 |
2. Press the < > button. > button.
- The Erase menu will appear at the bottom of the screen.
|
 |
3. Erase the image.
- Turn the <
 > dial to select [Erase], then press < > dial to select [Erase], then press < . The image displayed will be erased. . The image displayed will be erased.
|
Checkmarking [✔] images to be erased in a batch.
By checkmarking the images to be erased, you can erase multiple images at one time.
 |
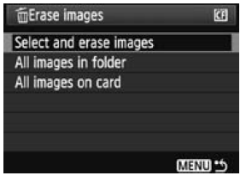
1. Select [Erase images].
- Under the [
 ] tab, select [Erase images], then press <>. ] tab, select [Erase images], then press <>.
|
|
2. Select [Select and erase images].
- Turn the <> dial to select [Select and erase images], then press <>.
- An image will appear.
- Press the <
 > button to display the three-image view. To return to the single-image display, press the < > button to display the three-image view. To return to the single-image display, press the < > button. > button.
|
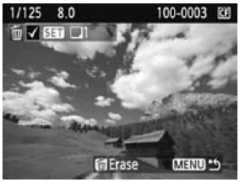 |
3. Select the image to be erased.
- Turn the <> dial to select the image to be erased, then press <>.
- The <✓> icon will be displayed on the upper left.
- To erase another image, repeat step 3.
|
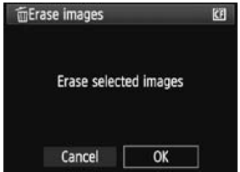 |
4. Erase the image.
- Press the <> button.
- Turn the <> dial to select [OK], then press <
 >. >.
- The selected image will be erased.
|
Erasing all images in a folder or on a card.
You can erase all the images in a folder or card at one time. When the [
Erase images] menu is set to [
All images in folder] or [
All images on card], all the images in the folder or card will be erased.
