Printing
This printer is compatible with the macOS standard printing system (AirPrint).
You can start printing right away after connecting this printer to your Mac without installing any special software.
Checking Your Environment
First, check your environment.
Print from a Mac
-
Check that printer is turned on
 Note
Note
- If Auto power on is enabled, printer automatically turns itself on when receiving a print job.
-
Load paper in printer
-
Select paper size and paper type from printer
Register the set paper size and paper type on the printer operation panel.
For instructions, see "Paper Settings."
-
Start printing from your application software
The Print dialog opens.
-
Select printer
Select your model from the Printer list in the Print dialog.
Note
- Click Show Details to switch the setup window to the detailed display.
-
Check print settings
Set items such as Paper Size to the appropriate size, as well as Feed from and Media Type from Media & Quality of the pop-up menu.
Select Auto Select for Media Type.
Remove the Two-Sided check mark if you are not printing on both sides of the paper.
 Important
- An error may occur if the paper size set in the print dialog is different from the paper size set on the printer. Select the correct items on the print dialog and the printer that correspond to the paper being printed.
- If printing in A4, A5, JIS B5, or US Letter, set the desired feed position (Main Trayor Rear Tray) from Feed from of the print dialog. If Auto Select is selected in Feed from, the feed position differs depending on Media Type. If Media Type is set to plain paper, it is fed from the cassette (main tray). If set to other types of paper, it is fed from the rear tray.
- If printing paper such as photo paper and postcards that cannot be printed on both sides, uncheck the Two-Sided checkbox.
Note
- Use the Print dialog to set general print settings such as the layout and the print sequence.
For information about print settings, refer to macOS help.
-
Click Print
The printer prints according to the specified settings.
Note
- It can take the Wi-Fi a few minutes to get connected after the printer turns on. Print after checking that the printer is connected to the network.
- You cannot print if Bonjour settings of printer are disabled. Check LAN settings of printerand enable Bonjour settings.
- Refer to "Cannot Print Using AirPrint" for printing problems.
- The display of the settings screen may differ depending on the application software you are using.
Printing of Envelopes
For printing on the envelope from Mac, refer to the following.
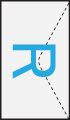
| Print result image |
Orientation of print data |
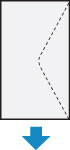
Orientation of loading envelope |
|
|
The print data is rotated by 180 degrees against the print result image.
|
Load the envelope in vertically with the address side facing up so that the folded flap of the envelope will be faced down on the right side.
|