Wireless LAN connection of your printer to an access point using the standard setup method - MX472 / MX479 / MX532
| Article ID: ART174849 |
| |
Date published: 07/15/2019 |
| |
Date last updated: 09/24/2019 |
Description
This article explains how to connect your printer to a wireless network via the Standard setup method. This will allow you to manually enter your network passphrase into the printer.
Solution
Your printer can be connected to a wireless network via the Standard setup method. This will allow you to manually enter your network passphrase into the printer. To connect your printer to your wireless network using the Standard setup method, please follow the steps below.
- With the printer powered on, press the Setup
 button.
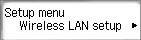
- In the Setup menu, Wireless LAN setup will be the first option. Press the OK button.
Note: If the message Press WPS button of the access point about 5 sec. and press [OK] of this printer appears on the screen, press the printer's Stop  button.

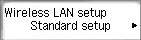
- Standard setup will be selected. Press the OK button.
- The printer will search for nearby wireless networks.

Use the arrow buttons 
 to select your wireless network from the list. Press the OK button twice.

- You will then be asked to enter the passphrase for your printer. Using the numeric keypad, enter your passphrase. Press the OK button when you are finished.

The printer will then attempt to connect to the network

- When the printer has connected to the network, press the OK button.

- Press the COPY
 button, the FAX
  button, or the SCAN
  button to place the printer in the COPY, FAX, or SCAN modes.
 Note
Note
- If the printer fails to connect to your wireless network, make sure that you have correctly entered your network passphrase and then attempt to connect to the network again. If the passphrase is correct and the printer still fails to connect to the network, try powering off the printer and unplugging your wireless router for 30 seconds. Plug the router back in, then power on the printer and follow steps 1-7 again.
Printer Support Home
