-
Check that printer is turned on.
-
Load three sheets of A4 or Letter-sized plain paper in cassette.
-
Select  (Setup) on the HOME screen.
The setup menu screen will appear.
-
Select  Maintenance.
The Maintenance screen will appear.
-
Select Print Head Alignment - Manual.

The confirmation screen will appear.
 To print and check the current head position alignment values, select Print the head alignment value.
-
Check the message and select Yes.
The operation panel is opened and the paper output tray is pulled out automatically.
The print head alignment pattern will be printed.
-
When Did the patterns print correctly? appears, make sure pattern was printed correctly, and if so, select Yes.
-
Check message and select Next.
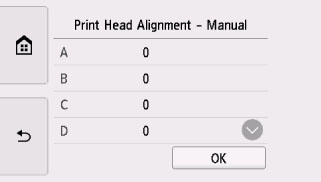
The input screen for head position alignment values is displayed.
-
Examine first patterns and tap A. In column A, find pattern in which streaks are least noticeable, and then select the number of that pattern.

If all patterns look different, choose the pattern in which vertical streaks are least noticeable.
Subtle vertical streaks

Noticeable vertical streaks

If all patterns look different, choose the pattern in which horizontal streaks are least noticeable.
Subtle horizontal streaks

Noticeable horizontal streaks

-
Repeat these steps until you have finished entering pattern numbers for columns B to H, and then select OK.
-
Check the message and select OK.
The second set of patterns is printed.
-
Examine the patterns and tap I. In column I, find pattern in which streaks are least noticeable, and then select the number of that pattern.
If all patterns look different, choose the pattern in which vertical streaks are least noticeable.
Subtle vertical streaks
Noticeable vertical streaks
-
Repeat these steps until you have finished entering pattern numbers for columns J to P, and then select OK.
-
Check the message and select OK.
The third set of patterns is printed.
-
Examine the patterns and tap a. In column a, find pattern in which stripes are least noticeable, and then select the number of that pattern.

If all patterns look different, choose the pattern in which horizontal stripes are least noticeable.
Subtle horizontal stripes

Noticeable horizontal stripes

-
Repeat these steps until you have finished entering pattern numbers for columns b to h, and then select OK.
-
When confirmation message appears, select OK.
