
Sending Images from a Camera to an iPhone (PowerShot G5 X Mark II)
| Article ID: ART175235 | | | Date published: 08/30/2019 | | | Date last updated: 09/03/2019 |
Description
Sending Images from a Camera to an iPhone (PowerShot G5 X Mark II)
Solution
| Solution |
Introduction Send images to a smartphone as follows.
By connecting to a Bluetooth-compatible smartphone via Bluetooth in advance, you can connect via Wi-Fi simply by performing an operation on the camera or smartphone.
You can use Wi-Fi to connect to a smartphone that is not compatible with Bluetooth or a smartphone that cannot use its Bluetooth function.
Connecting to a Bluetooth-compatible Smartphone via Wi-Fi  1. Confirm the smartphone's settings. 1. Confirm the smartphone's settings.
2. Download Camera Connect from the App Store and install it on the smartphone.
 3. Turn the camera on. 3. Turn the camera on.
4. Press the  button. button.
5. Use the zoom lever to choose the [  ] tab. ] tab. ã ã
6. Press the  / /  buttons to choose [ 1 ] tab.ã buttons to choose [ 1 ] tab.ã
7. Press the  / /  buttons to choose [Wireless communication settings], then press the buttons to choose [Wireless communication settings], then press the  button. button. ã ã
8. Press the / buttons to choose [Bluetooth function], then press the button.
9. Press the / buttons to choose [Bluetooth function] again, then press the button.
10. Press the / buttons to choose [Smartphone], then press the button.
11. Press the / buttons to choose [Pairing], then press the button.
12. Press the / buttons to choose [Do not display], then press the button.
13. A message is displayed indicating that pairing is in progress.
14. Touch the [ Camera Connect ](  ) application icon on the smartphone to start Camera Connect. ) application icon on the smartphone to start Camera Connect.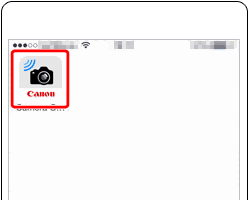
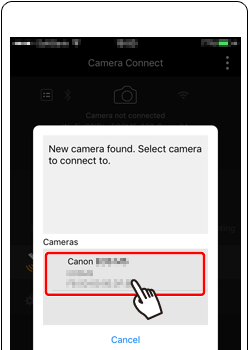
15. After the camera is recognized, a camera selection screen is displayed.
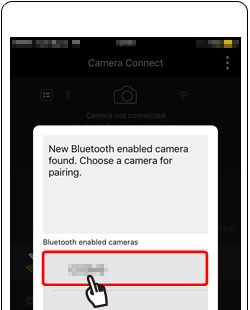
16. Choose the camera nickname, touch [Pair] to connect.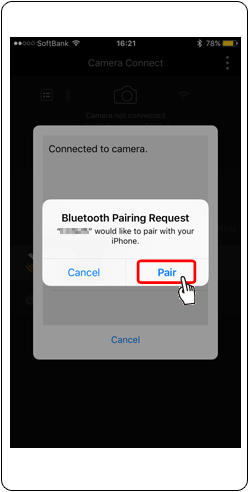
17. Press the / buttons to choose [OK], press the button.
18. Press the button of this screen.

19. Choose [Images on camera] in Camera Connect.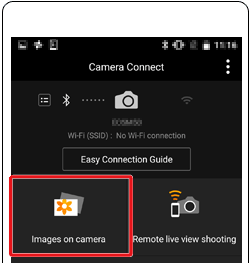
20. Changing to Wi-Fi connection.
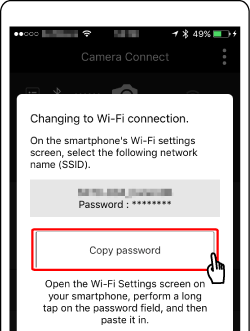
21. Display smartphone's Wi-Fi settings screen.
22. Choose the SSID displayed on the camera, paste the copied password.
23. Once the connection between the camera and the smartphone has been confirmed, press the home button to return to the home screen.
24. Open Camera Connect.
25. Use the smartphone to import images from the camera to the smartphone.
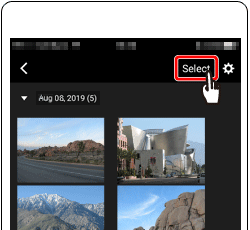
26. After the screen refreshes, choose the desired images ( ), and then touch [ ), and then touch [  ] on the bottom of the screen ( ] on the bottom of the screen ( ). ).

27. After the images have been saved, touch [  ] appearing in the upper right of the screen. ] appearing in the upper right of the screen.
28. Touch [  ] in the upper left of the screen to return to the menu screen. ] in the upper left of the screen to return to the menu screen.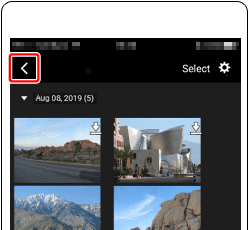
29. To end the connection, touch the [  ] icon displayed in the upper right of the screen. ] icon displayed in the upper right of the screen.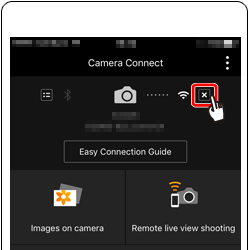
30. Touch [Yes].
Connecting to Smartphones via Wi-Fi with the Wi-Fi Button 1. Confirm the smartphone's settings.
2. Download Camera Connect from the App Store and install it on the smartphone.
3. Press the  button. button.
4. Press the / buttons to choose [  ], then press the button. ], then press the button.
5. Press the / buttons to choose [Register a device for connection], press the button. ã ã
6. / buttons to choose [Do not display], press the button.
7. The SSID (  ) and password ( ) and password (  ) will be displayed on the screen. ) will be displayed on the screen.
8. Turn Wi-Fi settings to ON in your smartphone, choose the SSID ( ) from step 7.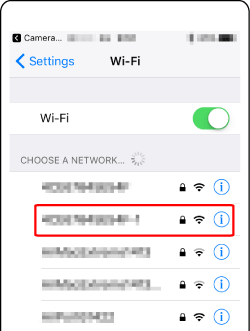
9. Input password from step 7 ( ). 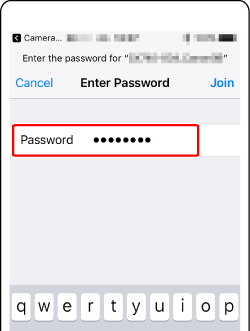
10. Once the connection between the camera and the smartphone has been confirmed, press the home button to return to the home screen.
11. Touch the [Camera Connect] ( ) application icon on the smartphone to start Camera Connect.
12. After the camera is recognized, a camera selection screen is displayed.
13. Press the / buttons to choose [OK], press the button.
14. The camera screen will show [Wi-Fi on].
15. Choose [Images on camera] in Camera Connect.
16. Use the smartphone to import images from the camera to the smartphone.
17. After the screen refreshes, choose the desired images (), and then touch [ ] on the bottom of the screen ().
18. After the images have been saved, touch [ ] appearing in the upper right of the screen.
19. Touch [ ] in the upper left of the screen to return to the menu screen.
20. To end the connection, touch the [ ] icon displayed in the upper right of the screen.
21. Touch [Yes].
On-Screen Keyboard Use the on-screen keyboard to enter information. Note that the length and type of information you can enter varies depending on the function you are using.

|
||||||||||
| Related Info |
Smartphone (Device) Specifications and System Requirements for a Wireless Connection with a Camera (Canon Camera Connect)
|
||||||||||
|
ID: 8204336200_EN_2
|
|||||||||||
 ã
ã

 ã
ã

 ] icon in the upper right of the screen.


SIMS Doc Id
8204336200