|
You can save images from the camera to a computer via Wi-Fi using EOS Utility (EOS software).
This page describes how to connect the camera and a computer directly via Wi-Fi.
IMPORTANT
- Wireless communication is not available while the camera is connected via an interface cable to a computer or other device.
- Other devices, such as computers, cannot be used with the camera by connecting them with an interface cable while the camera is connected to devices via Wi-Fi.
- The camera cannot be connected via Wi-Fi if there is no card in the camera (except for [
 ] ). ] ).
- The Wi-Fi connection will be terminated if you set the cameraâs power to < OFF >, or open the card slot/battery compartment cover.
- With a Wi-Fi connection established, the cameraâs auto power off does not function.
REFERENCE
- To connect to a computer via Wi-Fi using a Wi-Fi access point, see the camera's Advanced User Guide. The Advanced User Guide can be downloaded from the Canon Web site.
Prepare Necessary Items 1. Check your computer environment.
For the computer environments supporting Wi-Fi connection function, refer to the "Related Information" section at the end of the page.
2. Make sure that EOS Utility is installed on the computer.
IMPORTANT
- Settings may be disabled when an older version of software is used. Please make sure to install the EOS Utility version supported by your camera.
Connect the Camera and the Computer 1. Turn the camera on.

2. Press the <  > button.

3. Press the <  > button to choose the [  ] tab.
 ã 
4. Turn the <  > dial to choose [ Wi-Fi/Bluetooth connection ], press <  >.
 ã 
5. Turn the < > dial to choose [ Remote control (EOS Utility) ], press < >.

NOTE
6. Turn the < > dial to choose [ Add a device to connect to ], press < >.

7. Check the SSID (network name) and password.
- Check the SSID (
 ) and password ( ) and password (  ) displayed on the camera screen. ) displayed on the camera screen.
- In [Wi-Fi settings], if you set [Password] to [None], the password will not be displayed or required.

8. Select the SSID, then enter the password.
- On the computerâs network setting screen, select the SSID ( ) checked in step 3.
- For the password, enter the password ( ) checked in step 3.
9. Turn the < > dial to select [ OK ], then press < >.

10. The following message is displayed.
"******" represents the last six digits of the MAC address of the camera to be connected.

11. Start EOS Utility.
- For Windows 7, click the [Start] button and select [All Programs] ->[Canon Utilities] ->[EOS Utility] ->[EOS Utility].
- For Windows 8.1, click [
 ] on the bottom left side of the [Start] screen. On the [Apps] screen that is displayed, click [EOS Utility]. ] on the bottom left side of the [Start] screen. On the [Apps] screen that is displayed, click [EOS Utility].
- For Windows 10, click the [Start] button, then click [All Apps] and then click [EOS Utility].
- For Mac OS X, click the [EOS Utility] icon in the Dock.
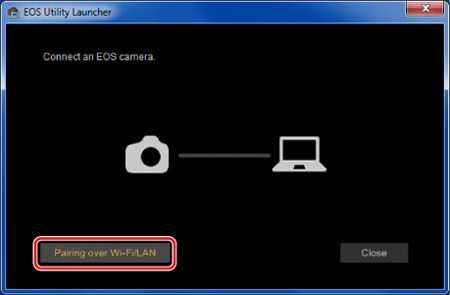
12. In EOS Utility, click [Pairing over Wi-Fi/LAN].
If a firewall-related message is displayed, select [Yes].
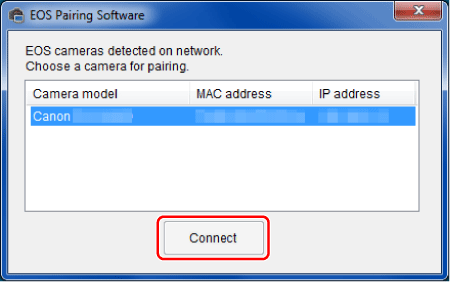
13. Select the camera to connect to, then click [Connect].
14. Turn the < > dial to select [ OK ], press < >.
- [ Wi-Fi on ] screen will appear.
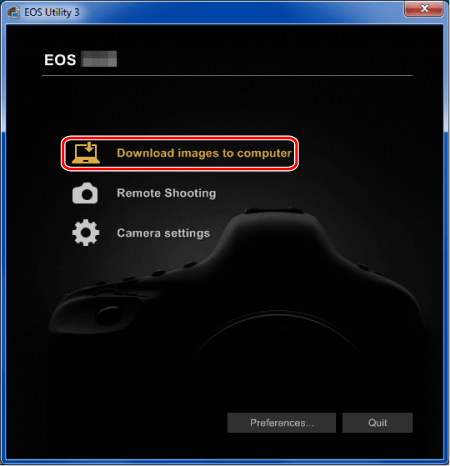
Send Images to the Computer 1. After the main window of EOS Utility appears, click [Download Images to computer].
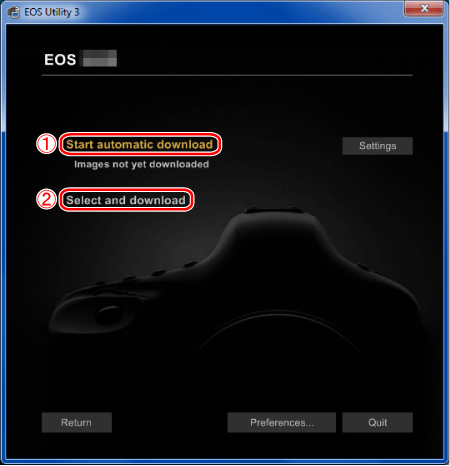
2. When the following window appears, click either to [Start automatic download] or to [Select and download] images.
NOTE
- By default, downloaded images are saved in [Pictures]. You can change the save destination for images to download in [Preferences].
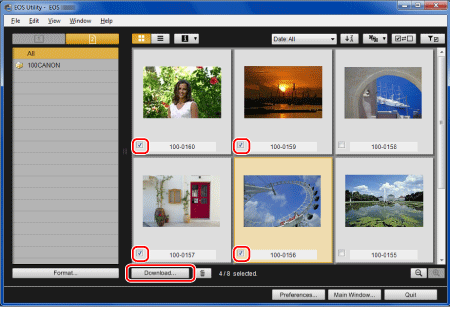
3. If you have selected [Select and download] images in step 2, the viewer window appears and the images in the memory card are displayed in a list.
In the displayed list of images, checkmark the images to download and click [Download] (here, 4 images are selected).
If you have selected [Start automatic download], proceed to step 5.
NOTE
- You can click the [
 ] button to change the thumbnail order. ] button to change the thumbnail order.
- For movie files, the [
 ] icon appears on the top left of the image. ] icon appears on the top left of the image.
- You can click [
 ] in the upper right of the window to sort the images with various conditions and choose images you want to download. ] in the upper right of the window to sort the images with various conditions and choose images you want to download.
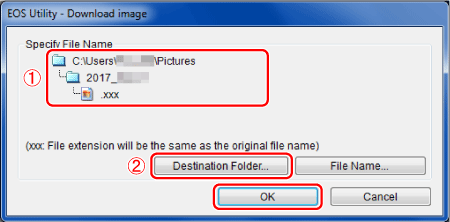
4. The [Download image] dialog box appears. To change the save destination, click [Destination Folder] and in the dialog box that appears, change the destination. Click [OK].
Displays the save destination on the computer
Specify the save destination
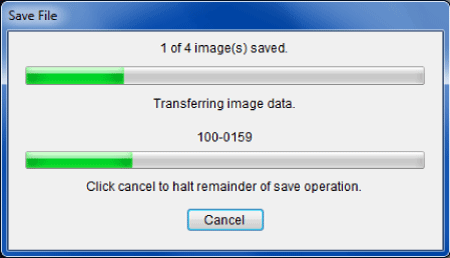
5. The images are downloaded to your computer.
6. When images have been downloaded, click [Quit] and close EOS Utility.
Downloading images is now complete.
|

 > <
> <  > keys.
 ã
ã