|
|
Updating the Firmware Using a USB Cable - PIXMA TS5120
| Article ID: ART175595 |
| |
Date published: 11/13/2019 |
| |
Date last updated: 11/13/2019 |
Description
This article shows how to perform a firmware update for the TS5120 using a USB cable.
Solution
To update the firmware for your PIXMA TS5120 using a USB cable, download the Printer Firmware Updater. Click here to access the Drivers & Downloads page for the TS5120. If the Firmware tab isn't automatically selected, click it. Click the Select button to the right of the Printer Firmware Updater you want to download. Place a check in the box to indicate that you have read and agree to the terms of the Disclaimer. Then, click Download.
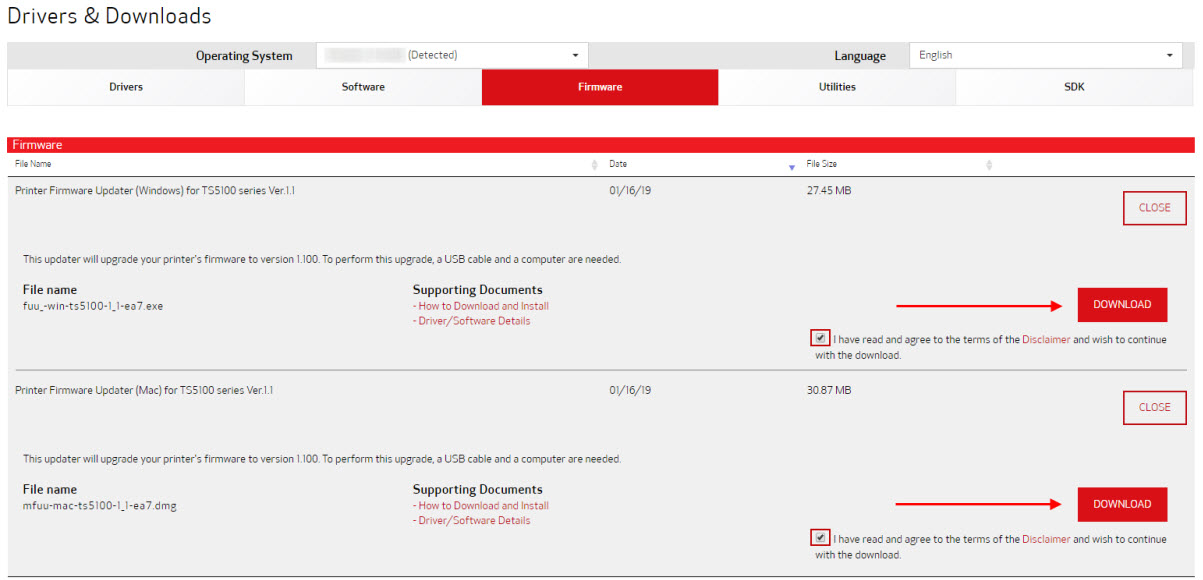
If you are asked to run or save the file, save it to your computer.
If you are using a Windows PC, save the file where you can easily find it (such as on your desktop, or in a new folder you can access). Double-click on the .exe file that has been saved to your computer. A folder with the same name as the file will be created.

Open this folder to find the Printer Update.exe file referred to in the instructions below.
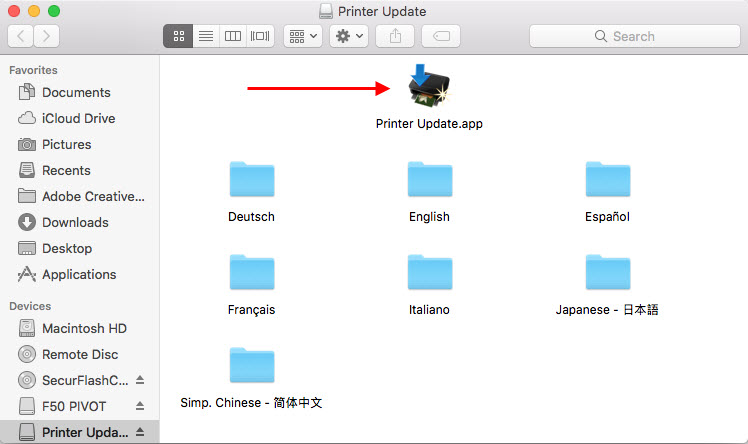
If you are using a Mac, open the .dmg file after it has been saved to your computer. A disk image will be mounted on your desktop. Open this disk image to find the Printer Update file referred to in the instructions below.
Requirements
- Computer on which the printer driver is installed.
- Printer that you are using
- USB cable
- Printer Update Utility
Firmware Update Procedure
- Connect the computer to the printer with a USB cable.
 Note Note
- Make sure that only one printer is connected to the computer via a USB cable.
 Important Important
- If you are using macOS, make sure that your computer is set up so that it does not enter its sleep mode.
- If you are using Windows, double-click
 (Printer Update.exe) to start the Update utility. (Printer Update.exe) to start the Update utility.
If you are using macOS, double-click (Printer Update) to start the Update utility.
- Read the information displayed in Step 1 in the Printer Update Utility window, turn on the printer power, and then click Next.
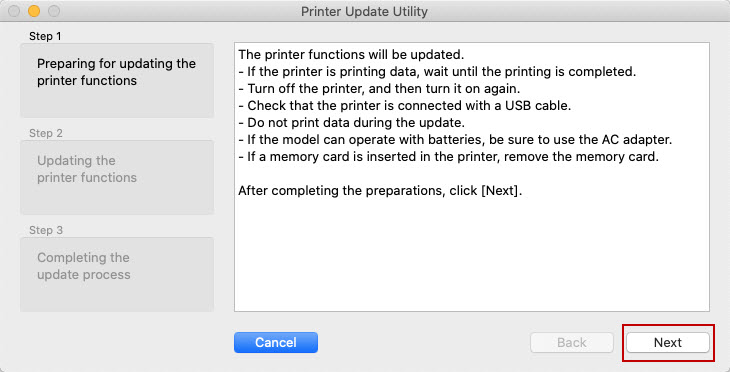
(The macOS version of this utility is shown. The Windows version will have a slightly different appearance.)
- When Step 2 is displayed, click Start to begin the update process. This may take several minutes to complete.
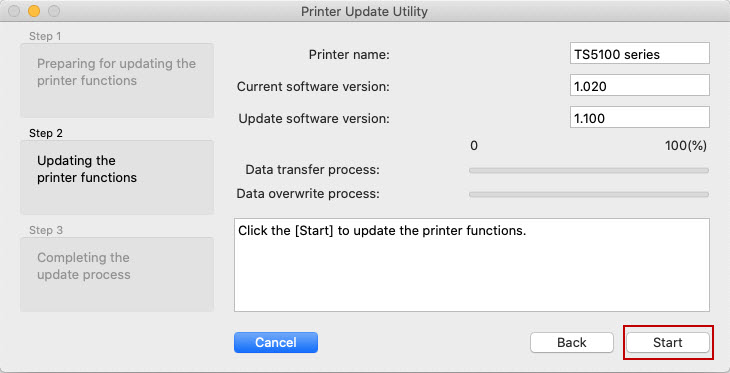
Printer name: Name of the printer connected to the computer.
Current software version: Software version of the connected printer.
Update software version: Software version of the printer after the update has finished.
Important
- Do not turn off the printer or disconnect the USB cable until the update is complete. Doing so may cause an error to occur.
Note
- If you are unable to click Start, the update was attempted on a printer that does not require firmware overwriting. Check the Current software version again. If it does not require an update, click Cancel.
- For additional information on the firmware update process, please click here.
- If you are using a Mac, click OK on the message indicating that the update is completed.
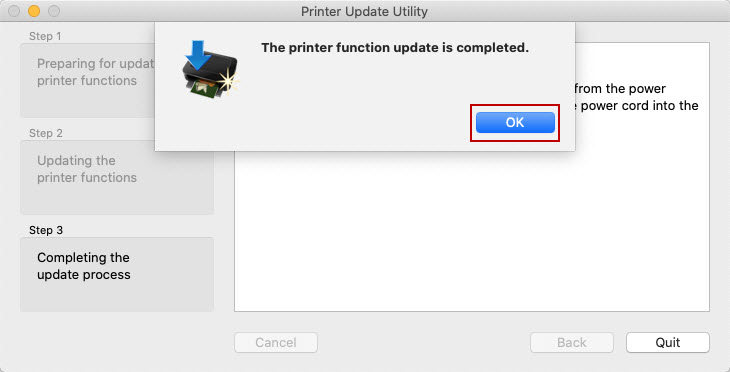
Otherwise, when the Step 3 window appears in the Printer Update Utility, read the information shown, then click Quit.

The firmware update process is complete.
The printer should turn off automatically. To use the printer, first disconnect the power cable, reconnect it, and then turn on the power again.
Note
- If the power is turned off during the update, the update will not end normally.
If the printer does not operate normally even if you turn off the printer power and then turn it back on again, the update may not have ended normally.
- When using Windows, a new printer icon Canon XXX series (Copy 1) may be created during the update process. In some cases this icon may be set as the default printer. If this occurs manually set the original printer as the default.
The Canon XXX series (Copy 1) icon be safely be deleted.
Error Causes and Corrective Actions
|
Message
|
Cause
|
Corrective Action
|
|
An error occurred during the printer function update.
Since the update failed, the printer cannot be used in its current condition.
Turn on the printer again, and then be sure to restart the utility.
|
The printer was turned off or the USB cable was disconnected during the update.
|
Click OK to exit Printer Update Utility. Turn off the printer, and then turn it back on after a few seconds.
Start Printer Update Utility again and run it.
If the printer does not operate properly, it needs repair.
|
|
The printer cannot be found.
Make sure that the printer is not in the following state:
|
-
The printer and the computer are not connected with a USB cable.
-
The printer is turned off.
-
The downloaded Printer Update Utility is not for the printer to be updated.
-
The printer is operating.
-
The printer driver is not installed. (Windows)
|
-
Connect the computer to the printer with a USB cable.
-
Turn on the printer.
-
Download the Printer Update Utility for the printer to be updated, and then start over from the beginning.
-
Wait for the printer operation to finish, and then run Printer Update Utility.
-
Install the printer driver.
|
|

