Connecting a Telephone Line to the Printer
The connection method will differ depending on your telephone line.
If the connection is incorrect, the printer cannot send/receive faxes. Connect the printer correctly.
 Important
-
Do not connect fax devices and/or telephones in parallel (US and Canada only).
If two or more fax devices and/or telephones are connected in parallel, the following problems may occur and the printer may not operate properly.
-
If you pick up the handset of the telephone that is connected in parallel during fax transmission or reception, the fax image may be corrupted or a communication error may occur.
-
Such services as Caller ID, etc. may not operate properly on the telephone.
If you cannot avoid parallel connections, set the receive mode to Tel. priority mode, understanding that the above problems may occur. You will only be able to receive faxes manually.
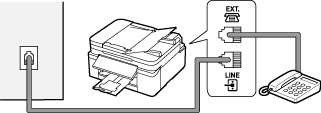
Basic Connection (Connecting with General Telephone line)
Make sure that the printer is turned off, connect one end of supplied telephone line cable to the telephone line jack near the "LINE" mark of the printer, then connect the other end to the telephone line jack on the wall or to the telephone line jack of the xDSL splitter.
When you connect the telephone to the printer, make sure that the printer is turned off, connect one end of the modular cable to the external device jack near the "EXT." mark of the printer, then connect the other end to the telephone line jack of the telephone.
Important
 Note
Note
-
Refer to Rear View for the position of the telephone line jack and the external device jack.
-
Before connecting a telephone or answering machine, remove the Telephone connector cap.
Connecting Various Lines
These are examples and could not be guaranteed to suit every connecting condition. For details, refer to the instruction manual supplied with the network device (control devices such as an xDSL (Digital Subscriber Line) modem or terminal adapter) you are connecting to this printer.
Note
-
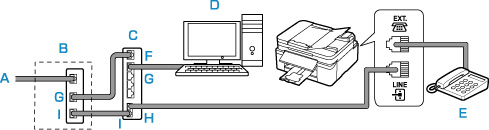
Connecting to an xDSL
- A: Analog Subscriber Line
- B: xDSL modem (splitter may not be built-in to the modem)
- C: Computer
- D: Telephone or answering machine
Important
-
When the splitter is not built-in to the xDSL modem, do not branch the telephone line before the splitter (wall side). And also, do not connect splitters in parallel. The printer may not be able to operate properly.
Note
-
Connecting to an ISDN Line
For details on ISDN (Integrated Service Digital Network) connection and settings, refer to the manuals supplied with your terminal adapter or dial-up router.