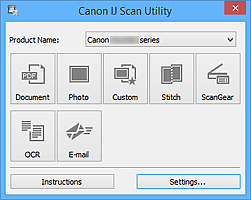
IJ Scan Utility Main Screen
Follow the steps below to start IJ Scan Utility.
Windows 10:
From the Start menu, select All apps > Canon Utilities > IJ Scan Utility to start IJ Scan Utility.
Windows 8.1 / Windows 8:
Select IJ Scan Utility on the Start screen to start IJ Scan Utility.
If IJ Scan Utility is not displayed on the Start screen, select the Search charm, and then search for "IJ Scan Utility".
Windows 7/Windows Vista:
From the Start menu, select All Programs > Canon Utilities > IJ Scan Utility > IJ Scan Utility to start IJ Scan Utility.
You can complete from scanning to saving at one time by simply clicking the corresponding icon.
- Product Name
-
Displays the name of the product that IJ Scan Utility is currently set to use.
If the displayed product is not the one you want to use, select the desired product from the list.
In addition, for network connection, select one with "Network" after the product name.
 Note
Note
Document-
Scans items as documents and saves them to a computer.
Scan/save settings and the response after scanning can be specified in the Settings (Document Scan) dialog box.
Photo-
Scans items as photos and saves them to a computer.
Scan/save settings and the response after scanning can be specified in the Settings (Photo Scan) dialog box.
Custom-
Scans items with your favorite settings and saves the images to a computer. The item type can be automatically detected.
Scan/save settings and the response after scanning can be specified in the Settings (Custom Scan) dialog box.
Stitch-
Displays the Image Stitch window in which you can scan the left and right halves of an item larger than the platen and combine the scanned images back into one image.
Scan/save settings and the response after scanning can be specified in the Settings (Scan and Stitch) dialog box.
ScanGear-
Starts ScanGear (scanner driver) in which you can make image corrections and color adjustments when scanning.
Scan/save settings and applications can be specified in the Settings (ScanGear) dialog box.
OCR-
Scan text in scanned magazines and newspapers and display it in a specified application.
Scan/save settings and applications can be specified in the Settings (OCR) dialog box.
E-mail-
You can send scanned images via e-mail.
Scan/save settings and applications can be specified in the Settings (E-mail) dialog box.
Instructions- Opens this guide.
Settings...- Displays the Settings dialog box in which you can specify the scan/save settings and the response after scanning.