|
|
How to adjust Image Quality on the EOS 1Dx Mark III.
| Article ID: ART176321 |
| |
Date published: 02/03/2020 |
| |
Date last updated: 02/25/2020 |
Description
Setting image quality settings (size, resolution, quality, etc.) on the EOS 1Dx Mark III.
Solution
|
Image Quality
Image Quality
 Image Size Selection Image Size Selection
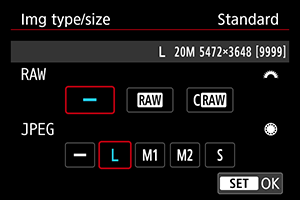
You can specify  , ,  , ,  , or , or  for JPEG images, for HEIF images, and for JPEG images, for HEIF images, and  or or  for RAW images. Image size can be set in either of the following ways. for RAW images. Image size can be set in either of the following ways.
Setting size via the menu
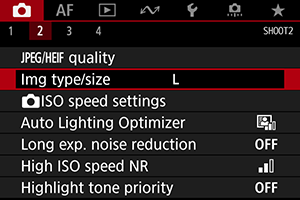
-
Select [ : Img type/size]. : Img type/size].
- The screen displayed varies depending on [Record func.] settings in [
 : Record func+card/folder sel.]. : Record func+card/folder sel.].
-
Set the image size.
Standard/Auto switch card/Record to multiple
- For RAW images, turn the
 dial, and for JPEG images, turn the dial, and for JPEG images, turn the  dial. dial.
- Press
 to set it. to set it.
Record separately
- When [Record func.] in [: Record func+card/folder sel.] is set to [Rec. separately], turn the dial to select [
 ] or [ ] or [ ], then press . Note that recording separately to and is not available for RAW images. ], then press . Note that recording separately to and is not available for RAW images.
- Select an image size on the screen displayed, then press .
Note
- In the viewfinder, maximum display of the number of shots available is 1999.
- is set automatically if you set both RAW and JPEG/HEIF to [
 ]. ].
- Two versions of each shot are recorded at your specified image quality when you have selected both RAW and JPEG/HEIF. Both images have the same file number but each has a different file extension, with .JPG for JPEG, .HIF for HEIF and .CR3 for RAW.
 / appears at the right in the viewfinder based on your JPEG/RAW selection. / appears at the right in the viewfinder based on your JPEG/RAW selection.- Meanings of image size icons are as follows: : RAW, : Compact RAW, JPEG: JPEG, HEIF: HEIF, : Large, : Medium 1, : Medium 2, : Small.
RAW Images
RAW images are raw data from the image sensor that are recorded to the card digitally as or , based on your selection. produces RAW images with smaller file sizes than .
RAW images can be processed using [ : RAW image processing] () to save them as JPEG or HEIF images. As the RAW image itself does not change, you can process the RAW image to create any number of JPEG or HEIF images with various processing conditions. : RAW image processing] () to save them as JPEG or HEIF images. As the RAW image itself does not change, you can process the RAW image to create any number of JPEG or HEIF images with various processing conditions.
You can use Digital Photo Professional (EOS software) to process RAW images. You can make various adjustments to images depending upon how they will be used and can generate JPEG, HEIF, or other types of images reflecting the effects of those adjustments.
Note
- To display RAW images on a computer, using Digital Photo Professional (EOS software, hereafter DPP) is recommended.
- Older versions of DPP Ver. 4.x do not support display, processing, editing, or other operations with RAW images captured by this camera. If a previous version of DPP Ver. 4.x is installed on your computer, obtain and install the latest version of DPP from the Canon website to update it (), which will overwrite the previous version. Similarly, DPP Ver. 3.x or earlier does not support display, processing, editing, or other operations with RAW images captured by this camera.
- Commercially available software may not be able to display RAW images captured by this camera. For compatibility information, contact the software manufacturer.
Guide to Image Quality Settings
See Performance Data for details on file size, number of shots available, maximum burst, and other estimated values.
Maximum Burst for Continuous Shooting
Approximate maximum burst is shown at the right in the viewfinder, on the Quick Control screen, and at the bottom of the Custom Quick Control screen.
Caution
- Maximum burst is shown even without a card in the camera, so make sure a card is inserted before shooting.
Note
- If the maximum burst is displayed as “99”, it indicates that you can shoot 99 or more shots continuously. Fewer shots are available for a value of 98 or lower, and when [
 ] is displayed in the viewfinder and on the top LCD panel, internal memory is full and shooting will stop temporarily. If you stop continuous shooting, the maximum burst will increase. After all captured images have been written to a card, you can once again shoot at the maximum burst listed in Performance Data. ] is displayed in the viewfinder and on the top LCD panel, internal memory is full and shooting will stop temporarily. If you stop continuous shooting, the maximum burst will increase. After all captured images have been written to a card, you can once again shoot at the maximum burst listed in Performance Data.
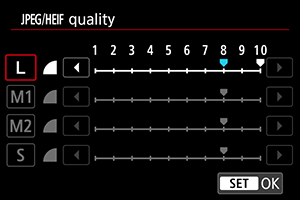
JPEG/HEIF Quality
-
Select [:  quality]. quality].
-
Select the desired image size.
- Select the image size, then press .
-
Set the desired quality (compression).
- Select the number, then press .
- Higher numbers offer higher quality (lower compression).
- Quality of 6–10 is indicated by
 , and 1–5, by , and 1–5, by  . .
Note
- The higher the quality, the fewer shots will be available. In contrast, the lower the quality, the more shots will be available.
|
|