|
|
How to set AF Microadjustments on the EOS 1Dx Mark III.
| Article ID: ART176331 |
| |
Date published: 02/03/2020 |
| |
Date last updated: 03/13/2020 |
Description
Please follow the procedures below to set AF microadjustments globally, by lens, and how to clear them.
Solution
|
AF Microadjustment
AF Microadjustment
Fine adjustment of the point of focus is possible when autofocusing in viewfinder shooting. Before adjustment, also refer to Precautions for AF Microadjustment and Notes for AF Microadjustment.
Caution
- Normally there is no need to adjust the position of focus. Perform this adjustment only if necessary. Make sure to note that performing this adjustment may prevent accurate focusing from being achieved.
Adjusting for All Lenses by the Same Amount
Keep adjusting, shooting, and checking the results to set the adjustment amount manually. During AF, regardless of the lens used, the point of focus will always be shifted by the adjustment amount.
-
Select [ : AF Microadjustment]. : AF Microadjustment].
-
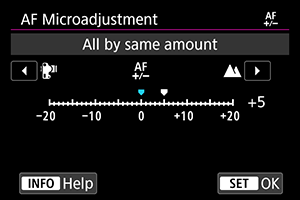
Select [All by same amount].
-
Press the  button. button.
-
Make the adjustment.
- Set the adjustment amount. The adjustment range is ±20 steps.
- Setting it toward “–:
 ” will shift the point of focus in front of the standard point of focus. ” will shift the point of focus in front of the standard point of focus.
- Setting it toward “+:
 ” will shift the point of focus to behind the standard point of focus. ” will shift the point of focus to behind the standard point of focus.
- After making the adjustment, press
 . .
- Select [All by same amount], then press .
-
Check the result of the adjustment.
- Take a picture and view it () to check the results of adjustment.
- Adjust toward “+: ” to correct focusing in front of your targeted position, and adjust toward “–: ” to correct focusing behind it.
- Repeat the adjustment as necessary.
Caution
- If [All by same amount] is selected, separate AF adjustment will not be possible for the wide-angle and telephoto ends of zoom lenses.
Adjusting for Individual Lenses
You can make the adjustment for each lens and register the adjustment in the camera. You can register the adjustment for up to 40 lenses. When you autofocus with a lens whose adjustment is registered, the point of focus will always be shifted by the adjustment amount.
Keep adjusting, shooting, and checking the results to set the adjustment amount manually. If you use a zoom lens, make the adjustment for the wide-angle (W) and telephoto (T) ends.
-
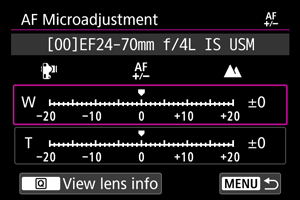
Select [Adjust by lens].
-
Press the button.
-
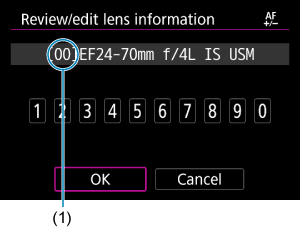
Check and change the lens information.
Displaying lens information
- Press the
 button. button.
- The lens name is displayed with a 10-digit serial number. When the serial number is displayed, select [OK] and go to step 4.
- “0000000000” is displayed if the lens serial number is not recognized, and in this case, enter the number manually.
- For details on the asterisk “*” preceding some lens numbers, see Lens serial numbers.
Entering serial numbers
- Select the digit to be entered, then press so
 is displayed. is displayed.
- Enter the number, then press .
- After entering all the digits, select [OK].
Lens serial numbers
- In step 3, if the asterisk “*” appears in front of the 10-digit lens serial number, you can register only one unit of the same lens model. Even if you enter the serial number, the asterisk “*” will remain displayed.
- The serial number on the lens may differ from the serial number displayed on the screen in step 3. This is not a malfunction.
- If the lens serial number includes letters, enter only the numbers.
- If the lens serial number is eleven digits or longer, enter only the last ten digits.
- The location of the serial number varies depending on the lens.
- Certain lenses may not have a serial number inscribed. To register a lens that has no serial number inscribed, enter any serial number.
Note
- If [Adjust by lens] is selected and an extender is used, the adjustment will be registered for the lens and extender combination.
- If 40 lenses have already been registered, a message will appear. After you select a lens whose registration is to be erased (overwritten), you can register another lens.
-
Make the adjustment.
-
Single focal length lens
-
Zoom lens
- For a zoom lens, select the wide-angle (W) or telephoto (T) end. Pressing clears the purple frame and enables adjustment.
- Set the adjustment amount, then press . The adjustment range is ±20 steps.
- Setting it toward “–: ” will shift the point of focus in front of the standard point of focus.
- Setting it toward “+: ” will shift the point of focus to behind the standard point of focus.
- For a zoom lens, repeat this procedure and adjust it for the wide-angle (W) and telephoto (T) ends.
- After completing the adjustment, press the
 button to return to the screen in step 1. button to return to the screen in step 1.
- Select [Adjust by lens], then press .
-
Check the result of the adjustment.
- Take a picture and view it () to check the results of adjustment.
- Adjust toward “+: ” to correct focusing in front of your targeted position, and adjust toward “–: ” to correct focusing behind it.
- Repeat the adjustment as necessary.
Note
- When shooting with the intermediate range (focal length) of a zoom lens, the AF's point of focus is corrected automatically relative to the adjustments made for the wide-angle and telephoto ends. Even if only the wide-angle or telephoto end is adjusted, a correction will be made automatically for the intermediate range.
Clearing All AF Microadjustments
When [ Clear all] appears at the bottom of the screen, pressing the Clear all] appears at the bottom of the screen, pressing the  button will clear all the adjustments made for [All by same amount] and [Adjust by lens]. button will clear all the adjustments made for [All by same amount] and [Adjust by lens].
|
|