The paper loaded in the upper cassette is jammed.
If paper is loaded in the upper cassette is jammed, remove the paper following the procedure below.
 Important
-
The power cannot be turned off while the machine is sending or receiving a fax, or when the received fax or the unsent fax are stored in the machine's memory.
Make sure that the machine has completed sending or receiving faxes before disconnecting the power cord.
If you unplug the power cord, all the faxes stored in the machine's memory are deleted.
 Note
Note
-
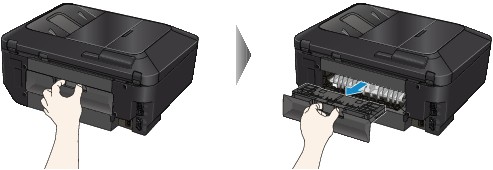
Pull out the rear cover.
-
Lift up the transport unit cover, then pull it out.
-
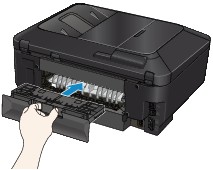
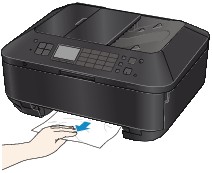
Pull out the paper slowly.
Note
-
Do not touch the inner parts of the machine.
-
If you cannot pull out the paper, open the paper output tray.
-
Insert the transport unit cover to the back of the machine.
-
Insert the rear cover to the back of the machine.
If you were not able to remove the paper out in step 3:
-
Detach the lower and upper cassettes.
-
Pull out the paper slowly.
-
If the paper is not loaded properly in the cassette, remove the paper, then reload it after aligning the edges of the sheets.
Note
-
Attach the cassettes to the machine, then press the OK button.
If you cannot remove the paper or the paper tears inside the machine, or if the paper jam error continues after removing the paper, the printer will require servicing.