Easy Scanning with One-click
You can complete from scanning to saving easily by simply clicking the corresponding icon.
1. Place the document face-down on the scanner glass.
2. On the Windows desktop, double-click the  MP Navigator EX icon.
-
Alternatively, on the Windows taskbar, click Start, point to (All) Programs, Canon Utilities, then MP Navigator EX. Then click MP Navigator EX.
-
The MP Navigator EX navigation mode screen or one-click mode screen opens.
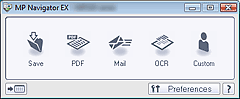
Navigation Mode Screen

One-click Mode Screen
3. Point to One-click.
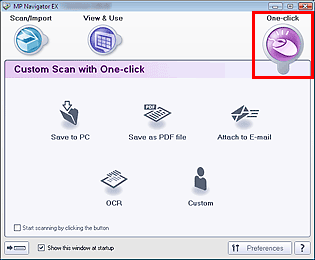
 Omit this step if the one-click mode screen opened in Step 2.
4. Click the corresponding icon.
Save to PC/Save
-
Scan and save documents. Document type is automatically detected. File format is automatically set. Files are saved to a computer.
-
When you click this icon, the Save dialog box opens and you can specify the scan/save settings
Save as PDF file/PDF
-
Scan documents, save them as PDF files and start the specified application.
-
The PDF dialog box opens when you click this button. Specify the scan/save settings and scan.
Attach to E-mail/Mail
-
Scan documents or photographs and attach them to e-mail.
-
The Mail dialog box opens when you click this button. Specify the save settings and e-mail software program, and scan.
MP Navigator EX is compatible with the following e-mail software programs:
If an e-mail software program does not operate properly, check that the program's MAPI is enabled. To enable MAPI, refer to the manual of the e-mail software program.
OCR
-
Scan text documents then extract text in the image and display it in Notepad (included with Windows).
-
When you click this icon, the OCR dialog box opens and you can specify the scan/save settings.

 For further procedures, refer to the manual of the application.
Custom
-
Scan documents or photographs and open them in the specified application.
-
The Custom dialog box opens when you click this button. Specify the scan/save settings and application, and scan.
- For further procedures, refer to the manual of the application.
- When saving multiple files, 4 digits are appended to each file name.
If your product issue was not resolved after following the steps above, or if you require additional help, please create or log in to your Canon Account to see your technical support options.
Or if you still need help, visit our Canon Community by clicking the button below to get answers:

____________________________________________________________________________________________
