Front View of the Main Components of the Printer - PIXMA TR150

Article ID: ART176653 | Date published: 03/26/2020 | Date last updated: 09/02/2021
 

Description

Learn about the main components on the front of the PIXMA TR150.

Solution

Review the information below to learn about the main components of the printer.

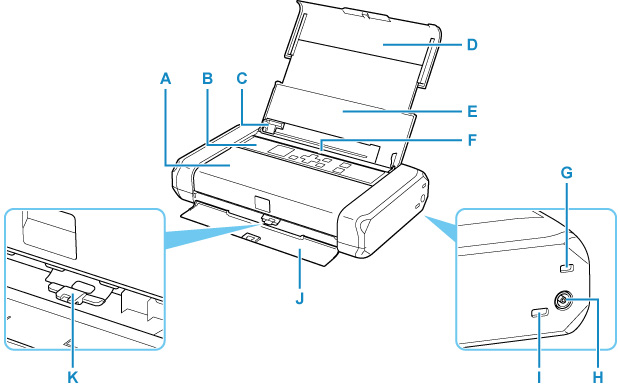
Main components front view

Front of printer

  • Print Head Cover (A).

    • Open to replace an ink tank or to remove jammed paper inside the printer.

  • Operation Panel (B).

  • Paper Guide (C).

    • Align with the left side of the paper stack.

  • Paper Support (D).

    • Extend to load paper in the rear tray.

  • Rear Tray Cover (E).

    • Open to load paper in the rear tray.

  • Rear Tray (F).

  • Security Slot (G).

    • Insert the security wire or other materials as a protection against theft.

  • AC Adapter Connector (H).

    • Plug in the supplied AC adapter plug here.

  • USB Port (I).

    • Plug in the USB cable to connect the printer with a computer.

  • Paper Output Slot Cover (J).

    • Printed paper is ejected.

  • Paper Thickness Lever (K).

    • Switches the clearance between the print head and the loaded paper to match the media type.

    • Set to the left for envelopes.

    • Set to the right for paper other than envelopes.
       

Good to know

  • Do not touch the metal casing.

  • Do not plug in or unplug the USB cable while printing.


If your product issue was not resolved after following the steps above, or if you require additional help, please create or log in to your Canon Account to see your technical support options.

Or if you still need help, visit our Canon Community by clicking the button below to get answers:

Link to Canon Community Forum


____________________________________________________________________________________________


Rate this Article
Was this article helpful?
Yes, This document is helpful
No, This document needs a clearer explanation
 
Please provide your comments