Aligning the Print Head Position from Your Computer
Print head alignment corrects the installation positions of the print head and improves deviated colors and lines.
This printer supports two head alignment methods: automatic head alignment and manual head alignment.
The procedure for performing manual print head alignment is as follows:
 Print Head Alignment
-
Open the printer driver setup window.
-
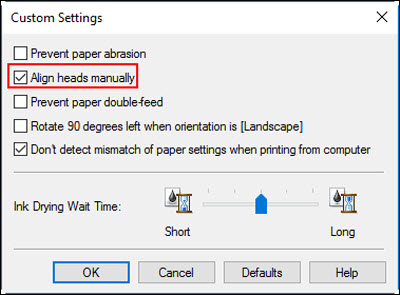
Select Custom Settings on the Maintenance tab

-
Check the Align heads manually check box.
-
Select OK and when the confirmation message appears, select OK.
-
Select Print Head Alignment on the Maintenance tab.
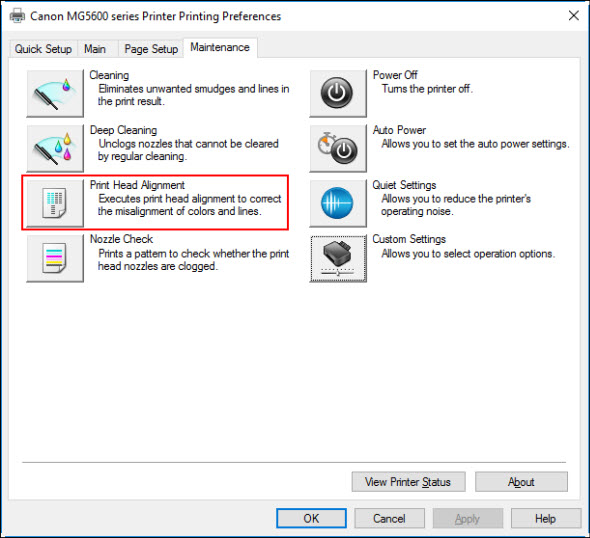
The Start Print Head Alignment dialog box opens..
-
Load two sheets of A4 size or Letter size plain paper into the cassette.
-
Make sure that the printer is on and select Align Print Head.
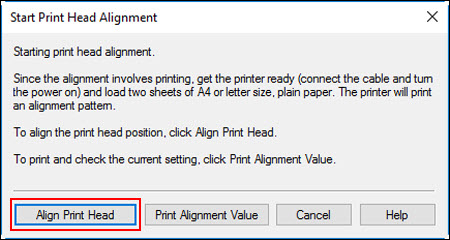
Follow the instruction in the message.
 Do not open the operation panel while printing is in progress.
-
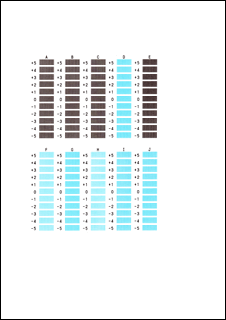
Enter the numbers of the patterns with the least noticeable streaks in the associated boxes.
Even if the patterns with the least noticeable streaks are selected in the preview window, their numbers are automatically entered in the associated boxes.
When you have entered all the necessary values, select OK.
 If it is difficult to pick the best pattern, pick the setting that produces the least noticeable vertical streaks.

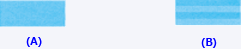
(A) Least noticeable vertical streaks
(B) Most noticeable vertical streaks
-
Confirm the displayed message and select OK.
The second pattern is printed.
Do not open the operation panel while printing is in progress.
-
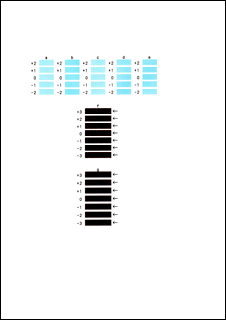
Enter the numbers of the patterns with the least noticeable stripes or streaks in the associated boxes.
Even if the patterns with the least noticeable stripes or streaks are selected in the preview window, their numbers are automatically entered in the associated boxes.
When you have entered all the necessary values, select OK.
If it is difficult to pick the best pattern, pick the setting that produces the least noticeable horizontal stripes.
(A) Least noticeable horizontal stripes
(B) Most noticeable horizontal stripes
If it is difficult to pick the best pattern, pick the setting that produces the least noticeable horizontal streaks.

(A) Least noticeable horizontal streaks
(B) Most noticeable horizontal streaks
To print and check the current setting, open the Start Print Head Alignment dialog box, and select Print Alignment Value.
If your product issue was not resolved after following the steps above, or if you require additional help, please create or log in to your Canon Account to see your technical support options.
Or if you still need help, visit our Canon Community by clicking the button below to get answers:

____________________________________________________________________________________________