EOS REBEL T8i: Protecting Images
| Article ID: ART176979 |
| |
Date published: 06/19/2020 |
| |
Date last updated: 09/15/2023 |
Description
Protecting Images
Solution
|
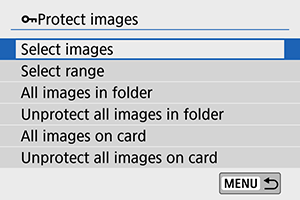
Protecting Images
You can protect important images from being accidentally erased.
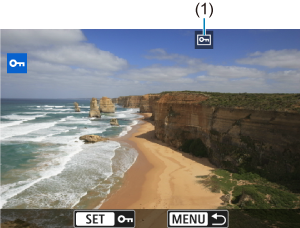
Specifying the Range of Images to be Protected
While looking at the images in the index display, you can specify the first and last images for a range to protect all the specified images at once.
-
Select [Select range].
- Select [Select range] in [
 : Protect images]. : Protect images].
-
Specify the range of images.
- Select the first image (start point).
- Next, select the last image (end point). The images in the specified range will be protected and the
 icon will appear. icon will appear.
- To select another image to be protected, repeat step 2.
Protecting All Images in a Folder or on a Card
You can protect all the images in a folder or on a card at once.
Caution
- If you format the card (), the protected images will also be erased.
Note
- Once an image is protected, it cannot be erased by the camera's erase function. To erase a protected image, you must first cancel the protection.
- If you erase all the images (), only the protected images will remain. This is convenient when you want to erase all unnecessary images at once.
|