Setting Paper Dimensions (Custom Size)
You can specify a custom paper size by following the instructions below.
-
In the Print Dialog, select Manage Custom Sizes... from Paper Size.
In the Custom Paper Sizes dialog, click +.
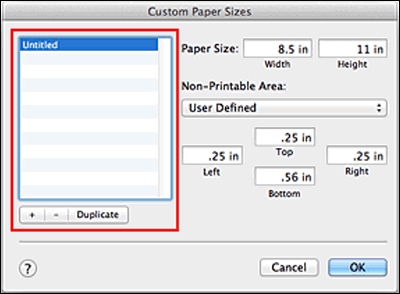
Untitled will be added to the list.
-
Double-click Untitled, enter the name of the paper size you want to register, and specify the Width and Height of the paper for Paper Size.
Select User Defined or your model for Non-Printable Area, and enter the margins.
-
Click OK.
The custom size is registered.
 If the application that created the document has a function for specifying height and width values, use the application to set the values. If the application does not have such a function or if the document does not print correctly, perform the above procedure.
 To duplicate the registered paper size, select the paper size that you want to duplicate from the Custom Paper Sizes list, and click Duplicate.
To delete a registered paper size, select the paper size that you want to delete from the Custom Paper Sizes list, and click -.