When remaining ink cautions or errors occur, the error message will appear on the LCD to inform you of the error. In this state, the printer cannot print or scan. Check the error message and take appropriate action.
Replacing Procedure
When you need to replace an ink cartridge, follow the procedure below.
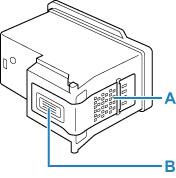
 Do not touch the electrical contacts (A) or print head nozzle (B) on an ink cartridge. The printer may not print properly if you touch them.
If you remove an ink cartridge, replace it immediately. Do not leave the printer with the ink cartridge removed.
Use a new ink cartridge for replacement. Installing a used ink cartridge may cause the nozzles to clog.
Furthermore, with such an ink cartridge, the printer will not be able to inform you when to replace the ink cartridge properly.
Once an ink cartridge has been installed, do not remove it from the printer and leave it out in the open. This will cause the ink cartridge to dry out, and the printer may not operate properly when it is reinstalled. To maintain optimal printing quality, use an ink cartridge within six months of first use.
 For Windows, if an ink cartridge runs out of ink, you can print with either color or black ink cartridge, in whichever ink remains, only for a while. However the print quality may be reduced compared to when printing with both cartridges. We recommend to use a new ink cartridge in order to obtain optimum qualities.Even when printing with one ink only, print with leaving the empty ink cartridge installed. If either of the color ink cartridge or black ink cartridge is not installed, an error occurs and the printer cannot print.
 Learn how to specify which ink cartridge(s) to print with.
Color ink may be consumed even when printing a black-and-white document or when black-and-white printing is specified.
Both color ink and black ink are also consumed in the standard cleaning and deep cleaning of the print head, which may be necessary to maintain the performance of the printer. When ink runs out, replace the ink cartridge immediately with a new one.
-
Make sure that the printer is powered on.
-
Open the scanning unit / cover.
The ink cartridge holder moves to the replacement position.

Do not hold the ink cartridge holder to stop or move it forcibly. Do not touch the ink cartridge holder until it stops completely.
The inside of the printer may be stained with ink. Be careful not to stain your hands or clothing when replacing the ink cartridge. You can easily wipe off the ink from the inside of the printer with tissue paper or the like.
Do not touch the metallic parts or other parts inside the printer.
If the scanning unit / cover is left open for more than 10 minutes, the ink cartridge holder may move and the Alarm lamp may light. In this case, close the scanning unit / cover, and then open it again.
-
Remove the empty ink cartridge.
-
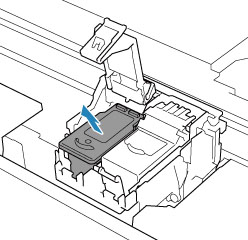
Pick up the ink cartridge locking cover to open it.

-
Remove the ink cartridge.
Handle the ink cartridge carefully to avoid staining of clothing or the surrounding area.
Discard the empty ink cartridge according to the local laws and regulations regarding disposal of consumables.
-
Prepare a new ink cartridge.
-
Take the new ink cartridge out of its package and remove the protective tape (C) gently.

If you shake an ink cartridge, ink may spill out and stain your hands and the surrounding area. Handle an ink cartridge carefully.
Be careful not to stain your hands and the surrounding area with ink on the removed protective tape.
Do not reattach the protective tape once you have removed it. Discard it according to the local laws and regulations regarding disposal of consumables.
Do not touch the electrical contacts or print head nozzle on an ink cartridge. The printer may not print properly if you touch them.
-
Install the ink cartridge.
-
Insert the new ink cartridge into the ink cartridge holder.
The color ink cartridge should be installed into the left slot and the black ink cartridge should be installed into the right slot.

-
Close the ink cartridge locking cover to secure theink cartridge.
Push the ink cartridge locking cover fully until a "click" sound is heard.

The printer cannot print unless both the color ink cartridge and black ink cartridge are installed. Be sure to install both cartridges.
-
Close the scanning unit / cover.
To close the scanning unit / cover, hold it up once, then take it down gently.

When closing the scanning unit / cover, be careful not to get your fingers caught.
When you start printing after replacing the ink cartridge, the printer starts cleaning the print head automatically. Do not perform any other operations until the printer completes the cleaning of the print head.
If the print head is out of alignment, as indicated by misaligned printed ruled lines or similar symptoms, align the print head.
The printer may make noise during operation.
If your product issue was not resolved after following the steps above, or if you require additional help, please create or log in to your Canon Account to see your technical support options.
Or if you still need help, visit our Canon Community by clicking the button below to get answers:

____________________________________________________________________________________________
