Load the original in the correct position according to the function to use. If you do not load the original correctly, it may not be scanned properly.
| Originals |
Function |
How to Load |
| Magazines, Newspapers, and Documents |
Copying or Faxing
|
|
|
Scanning by detecting the type and size of the original automatically
If you scan using the operation panel, select Auto scan for Doc.type in Scan.
|
|
Scanning by specifying a standard size (A4, Letter, etc.)
If you scan using the operation panel, select Document or Photo for Doc.type in Scan and specify a standard size (A4, Letter, etc.) for Scan size to scan originals.
|
| Photos, Postcards, Business Cards, and Disc (BD/DVD/CD) |
Scanning only one original
If you scan using the operation panel, follow the operation below.
- Select Auto scan for Doc.type in Scan.
- Select Photo for Doc.type in Scan and specify Auto scan for Scan size to scan originals.
|
|
|
Scanning two or more originals
If you scan using the operation panel, follow the operation below.
- Select Auto scan for Doc.type in Scan.
- Select Photo for Doc.type in Scan and specify Auto multi scan for Scan size to scan two or more originals.
|
|
 For details on how to load originals, see below.
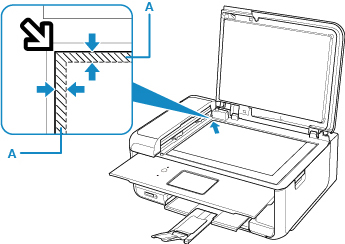
Loading the Original to Be Aligned with the alignment mark 
Place the original WITH THE SIDE TO SCAN FACING DOWN on the platen glass and align it with the alignment mark . Portions placed on the diagonally striped area cannot be scanned.
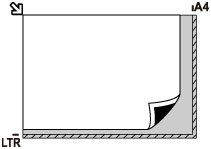
 The printer cannot scan the striped area (A) (0.04 inches (1 mm) from the edges of the platen glass).
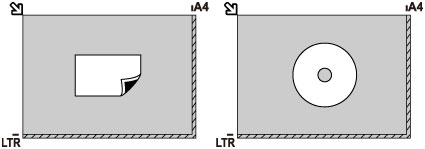
Loading Only One Original in the Center of the platen glass
Place the original WITH THE SIDE TO SCAN FACING DOWN, with 0.40 inches (1 cm) or more space between the edges (diagonally striped area) of the platen glass. Portions placed on the diagonally striped area cannot be scanned.
Loading Two or More Originals on the platen glass
Place the originals WITH THE SIDE TO SCAN FACING DOWN. Allow 0.40 inches (1 cm) or more space between the edges (diagonally striped area) of the platen glass and the originals, and between the originals. Portions placed on the diagonally striped area cannot be scanned.
You can place up to 12 items.
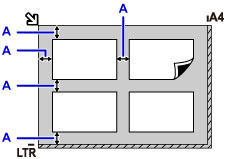
A: More than 0.40 inches (1 cm)
The Skew Correction function automatically compensates for the originals placed at an angle of up to approximately 10 degrees. Slanted photos with a long edge of 7.1 inches (180 mm) or more cannot be corrected.
Non-rectangular or irregular shaped photos (such as cut out photos) may not be scanned properly.
If your product issue was not resolved after following the steps above, or if you require additional help, please create or log in to your Canon Account to see your technical support options.
Or if you still need help, visit our Canon Community by clicking the button below to get answers:

____________________________________________________________________________________________
