Press the button to save the adjusted setting and return to the Picture Style selection screen.
Any settings you change from default values are displayed in blue.
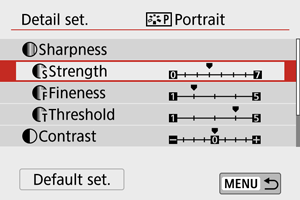
Settings and Effects
Sharpness
Strength
0: Weak outline emphasis
7: Strong outline emphasis
Fineness*1
1: Fine
5: Grainy
Threshold*2
1: Low
5: High
Contrast
-4: Low contrast
+4: High contrast
Saturation
-4: Low saturation
+4: High saturation
Color tone
-4: Reddish skin tone
+4: Yellowish skin tone
1: Indicates the edge thinness that enhancement applies to. The smaller the number, the finer the outlines that can be emphasized.
2: Contrast threshold between edges and surrounding image areas, which determines edge enhancement. The smaller the number, the more the outline will be emphasized when the contrast difference is low. However, noise tends to be more noticeable when the number is smaller.
Note
For movie recording, [Fineness] and [Threshold] settings are not shown in [Sharpness] and cannot be set.
By selecting [Default set.] in step 3, you can restore the parameter settings of the respective Picture Style to the defaults.
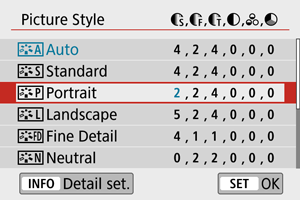
To shoot with the Picture Style you adjusted, first select the adjusted Picture Style, then shoot.
[] Monochrome Adjustment
[Filter effect]
With a filter effect applied to a monochrome image, you can make white clouds or green trees stand out more.
Filter
Sample Effects
N:None
Normal black-and-white image with no filter effects.
Ye:Yellow
Blue sky will look more natural, and white clouds will look crisper.
Or:Orange
The blue sky will look slightly darker. The sunset will look more brilliant.
R:Red
The blue sky will look quite dark. Fall leaves will look crisper and brighter.
G:Green
Skin tones and lips will appear muted. Green tree leaves will look crisper and brighter.
Note
Increasing [Contrast] intensifies the filter effect.
[Toning effect]
By applying a toning effect, you can create a monochrome image in the selected color. Effective when you want to create memorable images.