Settings (COPY) Dialog
Click COPY on the  (Scanner Button Actions) tab to display the Settings (COPY) dialog.
In the Settings (COPY) dialog, you can specify how to respond when printing images on a printer after scanning them using the scanner button.
 Selectable paper sizes and types vary by printer.
When multiple items are placed on the platen and Auto is selected for Source Type, each item is scanned individually and printed on a separate sheet of paper. To print multiple items on one sheet of paper, select an option other than Auto and select a standard size (A4, Letter, etc.) for Original Size.
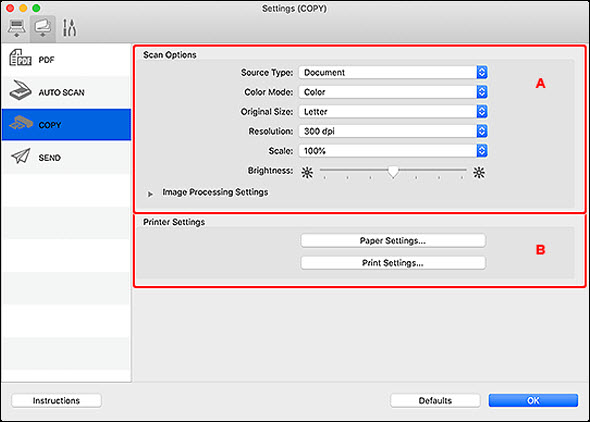
A: Scan Options Area
-
Source Type
-
Select the type of item to be scanned. Select Auto to detect the item type automatically and to set Color Mode, Original Size, and Resolution automatically as well.
 Item types supported by Auto are photos, postcards, business cards, magazines, newspapers, documents, and BD/DVD/CD.
To scan the following types of items, specify the item type or size. You cannot scan correctly with Auto.
-
A4 size photos
-
Text documents smaller than 2L (5 inches x 7 inches) (127 mm x 178 mm), such as paperback pages with the spine cut off
-
Items printed on thin white paper
-
Long narrow items such as panoramic photos
Reflective disc labels may not be scanned as expected.
Place items correctly according to the type of item to be scanned. Otherwise, items may not be scanned correctly.
In Auto Scan, the outline of the subjects is emphasized. Set the outline emphasis level with Unsharp Mask Level in the Settings (General Settings) dialog.
To reduce moire, set Source Type to Magazine.
-
Color Mode
-
Select the color mode in which to scan the item.
-
Original Size
-
Select the size of the item to be scanned.
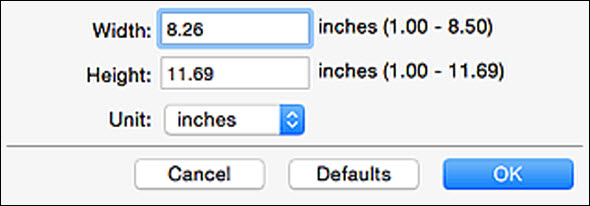
When you select Custom, a screen in which you can specify the paper size appears. Select a Unit, then enter the Width and Height, and then click OK.
Only Auto is available when Source Type is Auto.
Click Defaults in the screen in which you can specify the paper size to restore the specified settings to the default settings.
-
Resolution
-
Select the resolution of the item to be scanned.
The higher the resolution (value), the more detail in your image.
Only Auto is available when Source Type is Auto.
-
Scale
-
Select a scale according to the paper to print on and purpose of use.
Select Fit to Paper to resize the scanned image automatically to fit the paper to print on. Since the image's aspect ratio is maintained, margins may appear at the top and bottom or on the left and right depending on the size of the item and paper.
Select Custom to enter a value in scale setting. Enter a percentage (25 % to 400 %) and click OK.
Scanned images are printed on paper of the size specified on your printer.
-
Brightness
-
Adjust the image brightness.
Move the slider to the left to darken and right to brighten the image.
This function is available only when Magazine or Document is selected for Source Type.
-
Image Processing Settings
-
Click  (Right Arrow) to set the following. Available settings vary depending on the Source Type setting.
-
When Source Type is Photo:
When Color Mode is Black and White, Image Processing Settings is not available.
-
Sharpen outline
-
Emphasizes the outline of the subjects to sharpen the image.
Set the outline emphasis level in the Settings (General Settings) dialog.
-
When Source Type is Magazine or Document:
When Color Mode is Black and White, Image Processing Settings is not available.
-
Sharpen outline
-
Emphasizes the outline of the subjects to sharpen the image.
Set the outline emphasis level in the Settings (General Settings) dialog.
-
Reduce show-through
-
Sharpens text in an item or reduces show-through in newspapers, etc.
-
Reduce moire
-
Reduces moire patterns.
Printed materials are displayed as a collection of fine dots. "Moire" is a phenomenon where uneven gradation or a stripe pattern appears when such photos or pictures printed with fine dots are scanned.
Scanning takes longer than usual when you enable Reduce moire.
B: Printer Settings Area
-
Paper Settings...
-
You can specify the printer to use, paper size, etc.
Selectable paper sizes depend on the selected printer.
-
Print Settings...
-
You can specify the printer to use, printing method, number of copies to print, etc.
-
Instructions
-
Opens this guide.
-
Defaults
-
You can restore the settings in the displayed screen to the default settings.
If your product issue was not resolved after following the steps above, or if you require additional help, please create or log in to your Canon Account to see your technical support options.
Or if you still need help, visit our Canon Community by clicking the button below to get answers:

____________________________________________________________________________________________
