Settings (Driver) Dialog
Click Driver on the  (Scanning from a Computer) tab to display the Settings (Driver) dialog.
In the Settings (Driver) dialog, specify how to save images when scanning items with IJ Scan Utility Lite and how to respond after saving them.
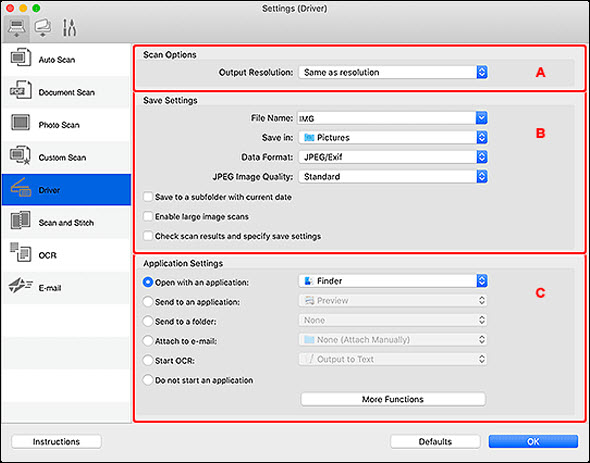
A: Scan Options
- Output Resolution
-
Set the output resolution. To use the resolution set in the screen displayed by clicking Driver in the IJ Scan Utility Lite main screen, select Same as resolution. To set a custom value, select Custom (xxxdpi). Output resolution of up to 19200 dpi can be set.
B: Save Settings Area
-
File Name
-
Enter the file name of the image to be saved. When you save a file, the date and four digits are appended to the set file name in the "_20XX0101_0001" format.
 When you select the Save to a subfolder with current date checkbox, the date and four digits are appended to the set file name.
-
Save in
-
Displays the folder in which to save the scanned images. To add a folder, select Add... from the pop-up menu, click  (Plus) in the displayed dialog, and then specify the destination folder.
The default save folder is the Pictures folder.
-
Data Format
-
Select the data format in which to save the scanned images.
You can select JPEG / Exif, TIFF, PNG, PDF, or PDF (Multiple Pages).
When PDF or PDF (Multiple Pages) is selected, images up to 9600 pixels x 9600 pixels can be scanned.
When the Enable large image scans checkbox is selected in Save Settings, or when Start OCR is selected in Application Settings, you can select JPEG / Exif, TIFF, or PNG.
When scanning with a network connection, scanning may take longer than usual when you set TIFF or PNG in Data Format.
-
JPEG Image Quality
-
You can specify the image quality of JPEG files.
 This appears only when JPEG / Exif is selected in Data Format.
-
PDF Compression
-
Select the compression type for saving PDF files.
-
Standard
-
It is recommended that you normally select this setting.
-
High
-
Compresses the file size when saving, allowing you to reduce the load on your network/server.
This appears only when PDF or PDF (Multiple Pages) is selected in Data Format.
-
Create a PDF file that supports keyword search
-
Select this checkbox to convert text in images into text data and create PDF files that support keyword search.
This appears only when PDF or PDF (Multiple Pages) is selected in Data Format.
PDF files that are searchable in the language selected in Document Language on the  (General Settings) tab of the Settings dialog are created.
-
Save to a subfolder with current date
-
Select this checkbox to create a current date folder in the folder specified in Save in and save scanned images in it. The folder will be created with a name such as "20XX_01_01" (Year_Month_Date).
If this checkbox is not selected, files are saved directly in the folder specified in Save in.
-
Enable large image scans
-
Select this checkbox to scan images up to 21000 pixels x 30000 pixels and 1.8 GB.
When this checkbox is selected, you can't select Send to an application, Send to a folder, Attach to e-mail, or Start OCR.
When this checkbox is not selected, images up to 10208 pixels x 14032 pixels can be scanned.
-
Check scan results and specify save settings
-
Displays the Save Settings dialog after scanning.
C: Application Settings Area
-
Open with an application
-
Select this when you want to enhance or correct the scanned images.
You can specify the application from the pop-up menu.
-
Send to an application
-
Select this when you want to use the scanned images as they are in an application that allows you to browse or organize images.
You can specify the application from the pop-up menu.
-
Send to a folder
-
Select this when you also want to save the scanned images to a folder other than the one specified in Save in.
You can specify the folder from the pop-up menu.
-
Attach to e-mail
-
Select this when you want to send e-mails with the scanned images attached.
You can specify the e-mail client you want to start from the pop-up menu.
-
Start OCR
-
Select this when you want to convert text in the scanned image into text data.
You can specify the application from the pop-up menu.
-
Do not start an application
-
Saves to the folder specified in Save in.
To add an application or folder to the pop-up menu, select Add... from the pop-up menu, click (Plus) in the displayed dialog, and then specify the application or folder.
-
Instructions
-
Opens this guide.
-
Defaults
-
You can restore the settings in the displayed screen to the default settings.
If your product issue was not resolved after following the steps above, or if you require additional help, please create or log in to your Canon Account to see your technical support options.
Or if you still need help, visit our Canon Community by clicking the button below to get answers:

____________________________________________________________________________________________
