Performing an ink flush will consume a great amount of ink.
Frequent ink flushes can rapidly consume ink, so only do this when necessary.
 Performing ink flush when the remaining ink level is not enough may damage the printer.
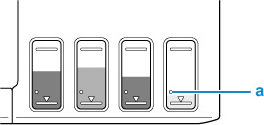
Before performing an ink flush, check the remaining ink level of all colors. If the remaining ink level is below the single dot (a), refill the ink tank of the corresponding color.
When performing an ink flush, check the free space of the maintenance cartridge. Ink flush consumes a lot of ink, and the consumed ink is discharged to the maintenance cartridge. If the free space is low, replace it with a new maintenance cartridge. If the available capacity of the maintenance cartridge is low, a message is displayed and the ink flush can't be performed.
Follow the steps below to perform an ink flush.
-
Make sure that the printer is powered on.
-
Press Setup  button.
The Setup menu screen appears.
-
Select Maintenance and press the OK button.
-
Select Ink Flush and press the OK button.
-
Check the displayed message and press the OK button.
-
Check the displayed message, select Yes and press the OK button.
-
Check the displayed message, select Yes and press the OK button.
The ink flush will begin.
 Don't perform any operations while the ink flush is in progress.
If your product issue was not resolved after following the steps above, or if you require additional help, please create or log in to your Canon Account to see your technical support options.
Or if you still need help, visit our Canon Community by clicking the button below to get answers:

____________________________________________________________________________________________
