When relocating the printer for changing your living place or repairing it, make sure of the following.
 Important information to know:
-
You can't take ink out of the ink tanks.
-
Make sure the tank cap is completely inserted.
-
Prepare for transporting the printer with the print head attached. This allows the printer to automatically cap the print head, thus preventing it from drying.
-
Don't remove the print head. Ink may leak.
-
If ink stains the inside of the printer, wipe them using a soft cloth dampened with water.
-
When transporting the printer, pack the printer in a plastic bag so that ink doesn't leak.
-
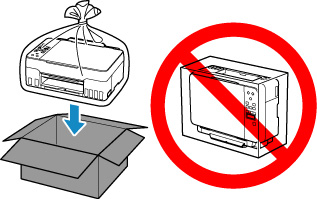
Pack the printer in a sturdy box so that it's placed with its bottom facing down, using sufficient protective material to ensure safe transport.
-
Don't tilt the printer. Ink may leak.
-
When a shipping agent is handling transport of the printer, have its box marked "THIS SIDE UP" to keep the printer with its bottom facing down. Mark also with "FRAGILE" or "HANDLE WITH CARE".
-
Please handle with care and ensure the box remains flat and NOT turned upside down or on its side, as the printer may be damaged and ink in the printer may leak.
-
Press the Setup button, use the 
 buttons to select Maintenance, and press the OK button.
-
Use the buttons to select Transport mode and press the OK button.
-
Use the buttons to select Yes and press the OK button.
If you don't want to enter the transporting mode, select No.
 When entering the transporting mode and proceeding with the procedure, the power is turned off automatically.
-
Open the scanning unit / cover (A) .

Don't touch tubes or other parts inside the printer. This can cause problems with the printer.
-
Turn the ink valve lever (B) to the left.
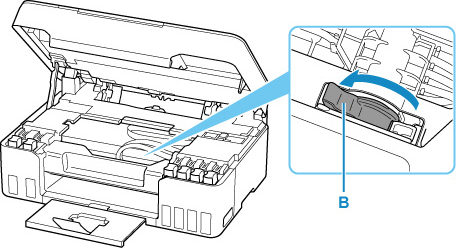
The inside of the printer may become stained with ink. Be careful not to get your clothes and your hands dirty.
-
Close the scanning unit / cover by holding it up once, then gently taking it down.
The printer is turned off.
-
Make sure that the ON lamp is off and unplug the power cord.
Don't unplug the printer while the ON lamp is lit or flashing, as it may cause malfunction or damage to the printer, making the printer unable to print.
-
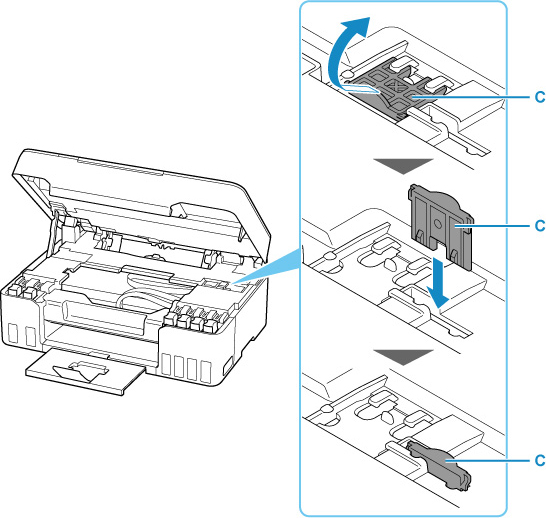
Open the scanning unit / cover again.
-
Remove the carriage stopper (C) and insert it all the way into the hole in the printer side.
Pull the carriage stopper forward while pulling it up and insert it in the same orientation.
-
Close the scanning unit / cover.
-
Retract the output tray extension and the paper output tray.
-
Retract the paper support.
-
Unplug the printer cable from the computer and from the printer, then unplug the power cord from the printer.
-
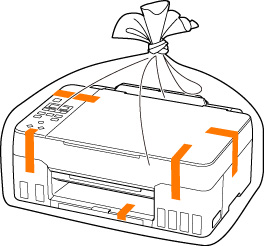
Use adhesive tape to secure all the covers on the printer to keep them from opening during transportation. Then pack the printer in the plastic bag.
Close and seal the opening of the bag with an object such as tape so as not to leak ink.
-
Attach the protective material to the printer when packing the printer in the box.
After transporting your printer, remove the carriage stopper, place it in the original position, turn the ink valve lever to the right, and then turn on the printer.
If your product issue was not resolved after following the steps above, or if you require additional help, please create or log in to your Canon Account to see your technical support options.
Or if you still need help, visit our Canon Community by clicking the button below to get answers:

____________________________________________________________________________________________
