Forwarding Scanned Data to Computer Using Operation Panel
Before forwarding scanned data to the computer, check the following:
Follow the procedure below to forward scanned data to the computer.
-
Make sure that the printer is powered on.
-
Load original on the platen (scanner glass) or in the ADF (Auto Document Feeder).
-
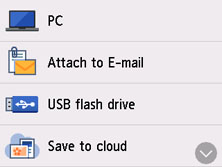
Select  Scan on the HOME screen.
The screen for selecting to which you save / forward the data is displayed.
-
Select  PC.
PC.
-
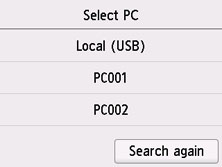
Select Local (USB) for a USB-connected computer, or select the computer to forward the scanned data for a network-connected computer.
The Scan standby screen is displayed.
-
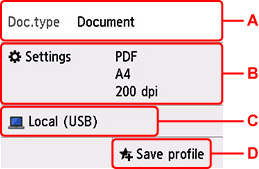
Specify settings as necessary.
-
Select the document type.
-
Document
-
Select to scan the document.
-
Photo
-
Select to scan the photo.
-
Displays the Scan settings screen.
-
Displays the screen to select the target computer.
-
Select to register the current scan settings as a custom setting.
-
Press the Black button or the Color button.
 If the original is not loaded properly, a message is displayed on the touch screen. Load the original on the platen (scanner glass) or in the ADF (Auto Document Feeder) according to the scan settings.
-
If you load the original on the ADF:
The printer starts scanning and scanned data is forwarded to the computer.
-
If you load the original on the platen:
-
When you select JPEG or TIFF for Format on the scan setting screen:
The printer starts scanning and scanned data is forwarded to the computer.
-
When you select PDF or Compact PDF for Format on the scan setting screen:
The confirmation screen asking you if you continue scanning is displayed after scanning is complete.

If you want continue scanning, load the original on the platen and start scanning.
If you don't continue scanning, select End. The scanned data is forwarded to the computer in one PDF file.
Scanned data is forwarded to the computer according to the settings specified in Canon IJ Scan Utility / Canon IJ Scan Utility Lite.
Remove the original on the platen or from the document output slot after scanning is complete.
You can use the following scanning methods:
-
Scanning with a WIA-compliant application (Windows)
-
Converting a scanned document to text (OCR) on a Windows PC or a Mac
-
Forwarding the scanned data to the computer using WSD (one of the network protocols supported in Windows)
-
When using Windows, the program selection screen may be displayed after pressing the Black button or the Color button.
In this case, select Canon IJ Scan Utility and click OK.
If your product issue was not resolved after following the steps above, or if you require additional help, please create or log in to your Canon Account to see your technical support options.
Or if you still need help, visit our Canon Community by clicking the button below to get answers:

____________________________________________________________________________________________

