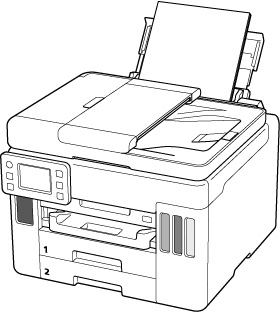
Paper Settings
By registering the paper size and the media type loaded on the rear tray or in the cassette, you can prevent the printer from misprinting by displaying the message before printing starts when the paper size or the media type of the loaded paper differs from the print settings.
 The default display setting is different between when you print or copy from the operation panel of the printer, when you print from Smartphone / tablet, when you print from Windows, and when you print from macOS.
After loading paper:
-
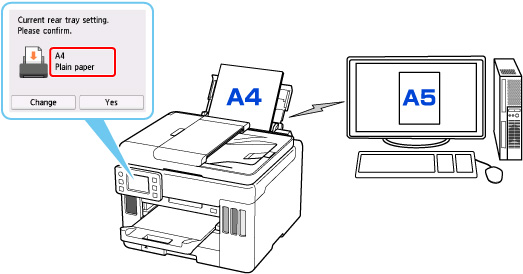
When you loading paper in the rear tray:
The screen to register the rear tray paper information is displayed.
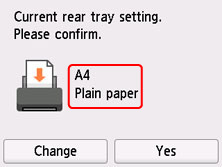
If the page size on the touch screen matches the size of the paper loaded in the rear tray, select Yes.
If not, select Change to change the setting in accordance with the size of the loaded paper.
-
When you insert the cassette:
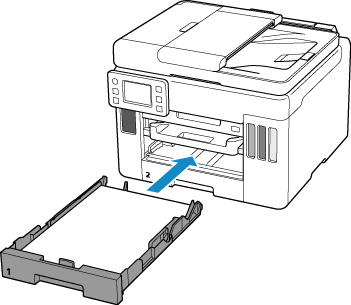
The screen to register the cassette paper information is displayed.
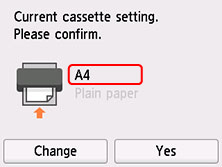
If the page size on the touch screen matches the size of the paper loaded in the cassette, select Yes.
If not, select Change to change the setting in accordance with the size of the loaded paper.
* You can load only plain paper in the cassette.
 Learn about the proper combination of paper settings you can specify on the Windows printer driver (media type / paper size) or on the touch screen.
When the paper settings for printing/copying are different from the paper information registered to the printer:
Ex:
When you start printing/copying, a message is displayed and the paper setting specified for printing/copying is shown under the message.
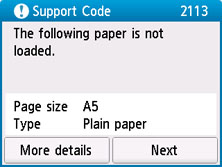
Check the message and select Next. When the screen to select the operation is displayed, select one of the operations below.
Depending on the setting, the choices below may not be displayed.
-
Print with the loaded paper.
-
Select if you want to print / copy on the paper loaded without changing the paper settings.
-
For example, when the paper setting for printing/copying is A5 and the paper information registered to the printer is A4, the printer starts printing / copying on the paper loaded in the rear tray or in the cassette without changing the paper size setting for printing/copying.
-
Replace the paper and print
-
Select if you want to print after replacing the paper of the rear tray or the cassette.
-
For example, when the paper size setting for printing / copying is A5 and the paper information registered to the printer is A4, you load A5 sized paper in the rear tray or in cassette 1 before you start printing / copying.
-
The paper information registration screen is displayed after replacing the paper. Register the paper information according to the paper that you loaded.
If you don't know what paper information to register to the printer, press the Back button when the screen to select the operation is displayed.
Learn about the proper combination of paper settings you can specify on the Windows printer driver (media type / paper size) or on the touch screen.
-
Cancel print
-
Cancels printing.
-
Select when you change the paper settings specified for printing/copying. Change the paper settings and try printing/copying again.
Default Setting for Displaying the Message which Prevents Misprinting
 When the message which prevents misprinting is disabled, the printer starts printing / copying even though the paper settings for printing/copying and the paper information registered to the printer are different.
If your product issue was not resolved after following the steps above, or if you require additional help, please create or log in to your Canon Account to see your technical support options.
Or if you still need help, visit our Canon Community by clicking the button below to get answers:

____________________________________________________________________________________________
