2113
Cause
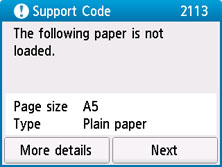
Paper settings specified when printing / copying don't match either the rear tray or the cassette paper information registered on the printer.
 Learn about the appropriate combination of the paper settings (media type / paper size) specified on the Windows printer driver and the paper information registered on the printer.
 For copying, make the paper settings for copying match the paper information for the cassette registered on the printer.
Learn how to register paper information on the printer.
If the paper source is set to be selected automatically and the paper settings specified when printing differ from either the rear tray or the cassette paper information registered on the printer, the following message appears on the printer's touch screen.
What to Do
Select Next on the printer's touch screen to display the screen below.
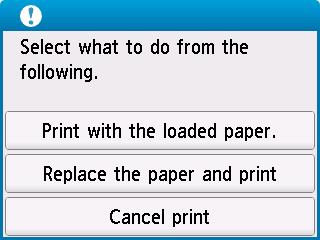
Select the appropriate action.
Depending on the settings, some of the options below may not be displayed.
-
Print with the loaded paper.
-
Select this option to print / copy on the loaded paper with the paper settings specified when printing / copying.
For example, when the paper size specified when printing is A5 and both the paper information for the rear tray and the paper information for the cassette are registered as A4, select this option to print on an A4 paper with the A5 setting.
-
Replace the paper and print
-
Select this option to print / copy after changing the paper in the rear tray or the cassette.
For example, when the paper size specified when printing is A5 and both the paper information for the rear tray and the paper information for the cassette are registered as A4, select this option to print after changing the paper in the rear tray or the cassette with an A5 paper.
After changing the paper, the paper information registration screen appears. Register the paper information on the printer according to the loaded paper.
 If you don't know the paper size and media type to be loaded in the cassette, press the printer's Back button. The paper size and media type are displayed.
Learn about the appropriate combination of the paper settings (media type / paper size) specified on the Windows printer driver and the paper information registered on the printer.
-
Cancel print
-
Cancels printing / copying.
Select this option when you want to change the paper settings specified when printing / copying. Change the paper settings and try printing / copying again.
You can configure the setting to hide the misprint prevention message. When set to hide the message, printing / copying begins regardless of whether the paper settings specified when printing / copying and the paper information of the cassette registered on the printer match.
Learn how to change whether to display the misprint prevention message when printing / copying by using the operation panel.
Learn how to change whether to display the misprint prevention message when printing from a Windows PC or a Mac:
If your product issue was not resolved after following the steps above, or if you require additional help, please create or log in to your Canon Account to see your technical support options.
Or if you still need help, visit our Canon Community by clicking the button below to get answers:

____________________________________________________________________________________________
