Settings (Attach to E-mail (Photo)) Dialog Box
Click Attach to E-mail (Photo) on the  (Scanning from the Operation Panel) tab to display the Settings (Attach to E-mail (Photo)) dialog box.
In the Settings (Attach to E-mail (Photo)) dialog box, you can specify how to respond when attaching images to an e-mail as documents after scanning them from the operation panel.
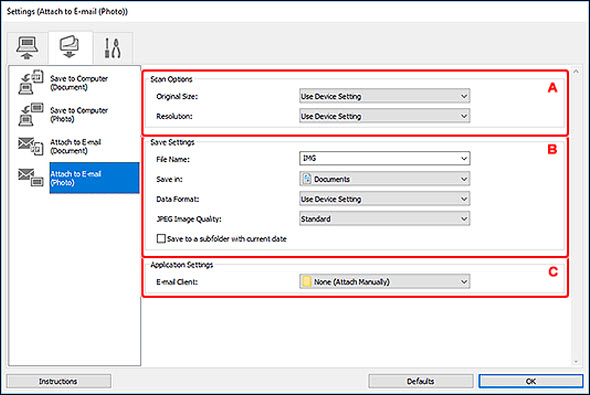
A: Scan Options Area
-
Original Size
-
Set from the operation panel.
-
Resolution
-
Set from the operation panel.
B: Save Settings Area
-
File Name
-
Enter the file name of the image to be saved. When you save a file, the date and four digits are appended to the set file name in the "_20XX0101_0001" format.
 When you select the Save to a subfolder with current date checkbox, the date and four digits are appended to the set file name.
-
Save in
-
Displays the folder in which to save the scanned images. To add a folder, select Add... from the pull-down menu, then click Add in the displayed Select Destination Folder dialog box and specify the destination folder.
The default save folders are as follows.
-
Data Format
-
Set from the operation panel.
-
JPEG Image Quality
-
You can specify the image quality of JPEG files.
-
Save to a subfolder with current date
-
Select this checkbox to create a current date folder in the folder specified in Save in and save scanned images in it. The folder will be created with a name such as "20XX_01_01" (Year_Month_Date).
If this checkbox is not selected, files are saved directly in the folder specified in Save in.
C: Application Settings Area
-
E-mail Client
-
Specify the e-mail client to use for attaching scanned images.
You can specify the e-mail client you want to start from the pull-down menu.
-
To add an application or folder to the pull-down menu, select Add... from the pull-down menu, then click Add in the displayed Select Application or Select Destination Folder dialog box and specify the application or folder.
-
Instructions
-
Opens this guide.
-
Defaults
-
You can restore the settings in the displayed screen to the default settings.
If your product issue was not resolved after following the steps above, or if you require additional help, please create or log in to your Canon Account to see your technical support options.
Or if you still need help, visit our Canon Community by clicking the button below to get answers:

____________________________________________________________________________________________
