Before Starting
 Information regarding error codes that may flash on the LCD (such as E02) can be found here.
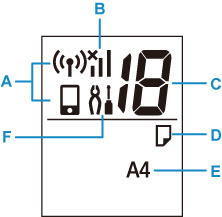
Indication of LCD
The number of copies, maintenance code, error code or various icons is displayed on the LCD.
-
A: Network status
-
Displays the current network status.
 Wi-Fi and Wireless Direct are enabled.
 Wi-Fi is enabled.
 Wireless Direct is enabled.
When the icon and the icon aren't displayed, Wi-Fi and Wireless Direct are disabled.
-
B: Current network status
-
Displays the current network status.
The icon differs depending on the network of use or the network status.
 (Signal strength: 81 % or more): You can use the printer over a Wi-Fi without any problems.
 (Signal strength: 51 % or more): The problem such as the printer cannot print may occur according to the network status. We recommend placing the printer near the wireless router.
 (Signal strength: 50 % or less): The problem such as the printer cannot print may occur. Place the printer near the wireless router.
 Wi-Fi is enabled but the printer is not connected to the wireless router.
-
C: Segment display
-
Displays the number of copies, maintenance code, or error code.
The number from 0 to 19 or alphabet is displayed.
-
D: Paper status
-
Appears during paper loaded on the rear tray. This icon also flashes while you select the paper size after pressing the Paper Select button.
* This icon does not appear if the paper mismatch detection function is disable.
-
E: Paper size
-
Displays the current paper size. The paper size also flashes while you select the paper size after pressing the Paper Select button.
-
F: Setup
-
Appears by pressing the Setup  button. During this icon, select a menu to perform printer maintenance and to change printer settings.
If your product issue was not resolved after following the steps above, or if you require additional help, please create or log in to your Canon Account to see your technical support options.
Or if you still need help, visit our Canon Community by clicking the button below to get answers:

____________________________________________________________________________________________
