Changing the length and the character alignment
After each tube or label is printed, it is output in a Half cut condition*. The length between half cuts is called the segment length. There are two modes for setting the segment length: Automatic and Specify.
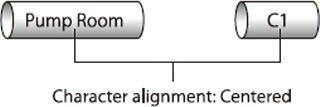
Furthermore, the positioning of characters printed on a tube or label is called the Alignment. There are two settings: Centered and Left.
*Initial setting
 The segment (cutting) length and character position can be set independently for each page.

Automatic
The optimal segment length is selected automatically, based on the number of characters entered, the size of the characters, and the character spacing. The character alignment is centered. Automatic is the initial setting.
Because the length of each tube is determined automatically on the basis of the number of characters, the size of the characters, and the spacing between each character, tube segments will be of different lengths if they have different numbers of characters.
Specify
The segment length is specified by the user. The segment length can be specified in steps of 0.25 mm within the range of 2 mm to 150 mm. If Automatic is set and one tube is produced with four characters while another is produced with two characters, the tube with two characters will be shorter. (Refer to the diagram above). In this situation, you can have the two-character tube and the four-character tube cut to the same length by selecting Specify and then setting the four-character tube segment length. The character alignment can be selected as either Centered or Left.
If the segment length is specified, the tube length is always the same, regardless of whether two or four characters are printed.
|
Character alignment: Centered
|
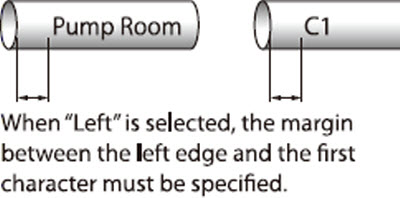
Character alignment: Left
|
|

|
|
About Printing Performed with the Segment Length Specified
When the specified segment length is shorter than 8.5 mm, the printer specifications change depending on the media type.
Depending on print media characteristics and the environment in which the printer is being ued, the segment length and the margins may vary slightly from the set values. The settings should only be considered as guidelines. The characteristics of tube in particular can cause significant variances. Information for making adjustments for these variances can be found here.
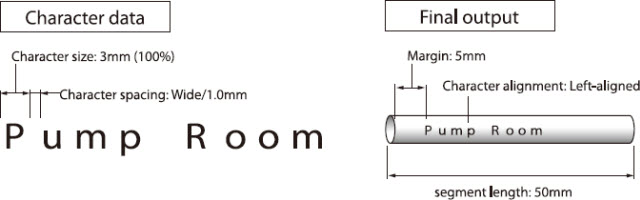
ex. Print the following character data with 50 mm specified as the segment length, "Normal" for the plate printing area, "Left" for character alignment, and 5 mm as the margin.
-
Press [Seg Len].
When the specified segment length is shorter than 8.5 mm, the printer specifications change depending on the media type.
|
Confirm that Page is selected.
|
-
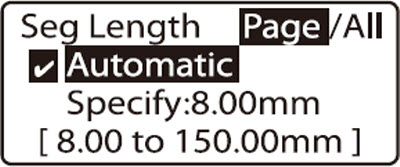
Press  or or  to select Specify, then enter 50 (the segment length. to select Specify, then enter 50 (the segment length.
If you accidentally enter an incorrect number, press [Back Space] to delete the number and then enter the correct one.
To change the segment length of all pages after entering characters, press  or or  to select All. to select All.
Some segment lengths cannot be specified depending on the character size.
|
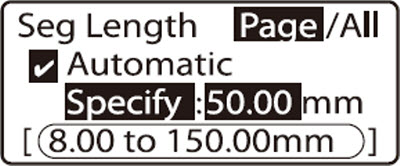
Segment length range that can be specified
|
-
Press [Enter].
|
|
-
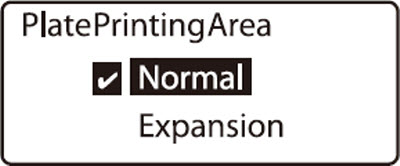
Press or to select Standard, then press [Enter].
|
|
-
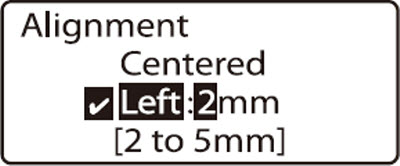
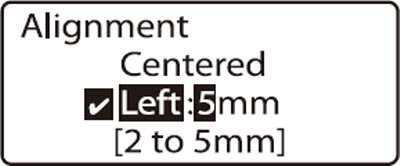
Press or to select Left, then enter 5 (the margin).
If you accidentally enter an incorrect number, press [Back Space] to delete the number and then enter the correct one.
|
|
|
If Normal is selected on the Plate Printing Area selection display, you can specify the left-justification margin between 2 mm and 5 mm.
If you select Expansion, you cannot specify the left-justifcation margin. It is fixed at 0mm.
|
|
|
If Expansion is selected on the Plate Printing Area selection display, only plates can be used as the printing media.
|
|
|
Press [Enter].
|
|
-
Enter character data in accordance with conditions.
|
|
-
Print.
|
Changing the segment length of all pages
If All is selected on the Seg Length selection display, characters typed exceeding the specified segment length are deleted. If 2.00 mm is specified as the segment length, all characters are deleted even when a page containing 6mm 100% characters exists. For this page, 2.00 mm is temporarily specified as the segment length and 6mm 100% is temporarily specified as the character size and therefore you cannot enter any character. Select Automatic on the Seg Length selection display or change the character size before entering characters.
It is recommended that you save the file before selecting All on the Cut Length selection display.
Adjusting the segment length
You can adjust the set segment length by +5%.
-
Press [Adjust].
|
|
-
Press or to select the print media, then press [Enter] to display the Adjustments screen.
This segment mength adjustment is intended for use with labels, and may not produce the corresponding effect with other media.
|
|
-
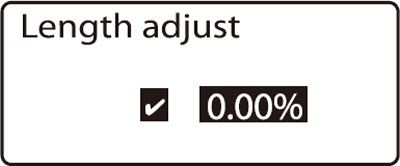
Press or to select Length adjust, then press [Enter].
|
|
-
Press or to select the adjustment value, then press [Enter].
You can enter a correction value for negative correction. However, if there is no correction space (part other than characters), no more correction can be made.
The minimum unit of correction which is handled internally is 0.085 mm.
If you enter the wrong number by mistake, press [Back Space] to delete the number and then enter the correct number.
|
|
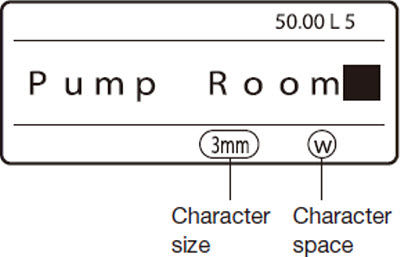
Segment length and character alignment screen display
The segment length and character alignment settings can be confirmed on the screen.
|
When segment length setting is Automatic
|
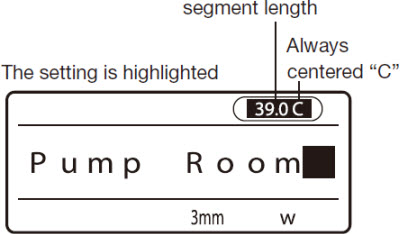
|
|
When Specify is selected on the Seg Length selection display and Normal is selected on the Plate Printing Area selection display
|
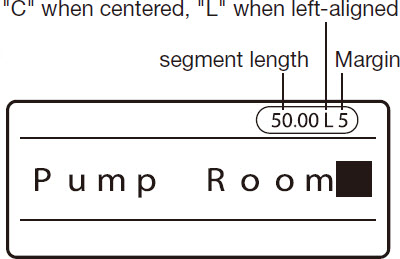
|
|
When Specify is selected on the Seg Length selection display and Expansion is selected on the Plate Printing Area selection display
|
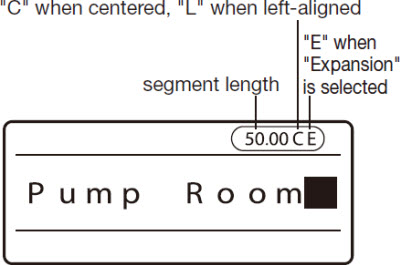
|
Use and to set values to the right of the decimal point when setting the label length.
If your product issue was not resolved after following the steps above, or if you require additional help, please create or log in to your Canon Account to see your technical support options.
Or if you still need help, visit our Canon Community by clicking the button below to get answers:

____________________________________________________________________________________________
