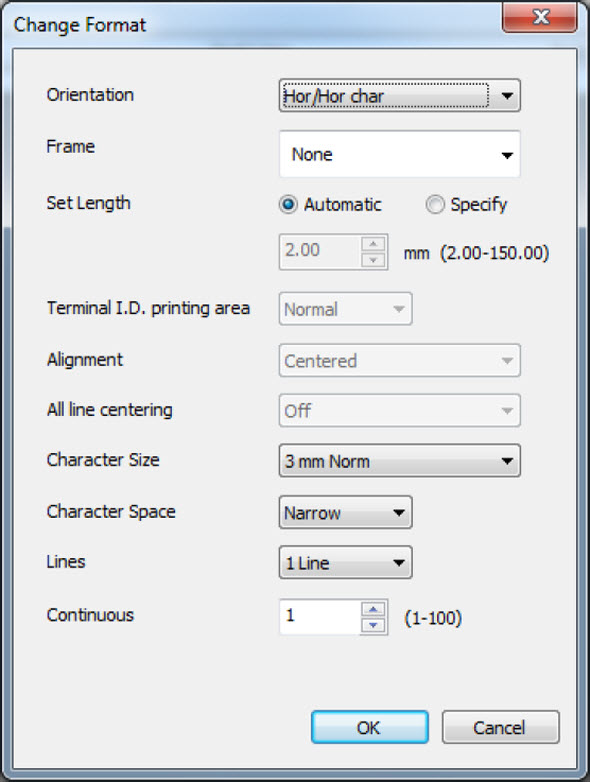
Mk2600PC - Format Settings

Article ID: ART180238 | Date published: 08/18/2021 | Date last updated: 08/19/2021
 

Description

This article provides information on format settings and settings procedures for Mk2600PC.

Solution

Format Settings

This article provides information on format settings and settings procedures.
You can set formats for individual pages, and there is also a default format used when creating or inserting new pages.
The procedure for setting a format for an individual page is described here. The procedure for setting the default format is the same.

  • If you try to change different page formats by selecting more than one page in the data list, the settings will revert to the unset state (become blank settings).

  1. In the data list, select the page whose format you want to change, then select Format Setting - Page Setting from the Edit menu.
    (To change the default format, select Format Setting - Default Setting from the Edit menu).

    The Change Format or Default Setting dialog box appears.

  2. Set each of the items.

    Change Format dialog box

    Orientation Selects the orientation for printing.
      Select from Hor/Hor char, Vert/Vert char or Vert/Hor char.
     
    • Vert/Hor char print is only available when no characters are entered.
    Frame Selects the type of frame to surround the characters.
      Select from None or
     
      The default at installation is None.
     
    • When the cut length is less than 6mm, you cannot select a frame.
    Set Length Selects the length of tube to be cut.
      With Specify selected, you can specify a length from 2-
      150mm (input value 200-15000).
      Select this to calculate the character string length from the
      character size, character space, frame and lines and fit the
      character string within the set length.
      The default at installation is Automatic.
     
    • The decimal part of the specified value is intentionally adjusted in units of 0.25 mm according to the specifications of the printer. To confirm the set length after the adjustment, click OK in step 3 to close the Change Format dialog box and see the value in Set Length on the main screen.

    • When set length is set to a value less than 8.5 mm, the specifications for printing depend on the media type.

    Terminal I.D. Select the Terminal I.D. printing area.
    printing area Select from Normal or Expansion.
      The default at installation is Normal.
     
    • If you select Expansion, the printing media shall become only the Terminal I.D.

    Alignment Selects the way in which characters are aligned.
      Select either CenteredLeft 2mmLeft 3mmLeft 4mm or
      Left 5mm.
      The default at installation is Centered.
     
    • If you select Automatic for Set length, you cannot select a character alignment.

    • When set length is set to a value less than 8.5 mm, the specifications for printing depend on the media type.

    All line centering Select a way in which characters are aligned of 2 Lines or 3
      Lines.
      Select from On or Off.
      The default at installation is Off.
     
    • If you select Automatic for Set length, you cannot select All line centering.

    • If you select 1 Line for Lines, you cannot select All line centering.

    • If you select Orientation of Vert/Hor char, you cannot select All line centering.

    Character Size Selects the size of the characters.
      Select either 1.3mm Norm, 2mm Half, 2mm Norm, 3mm Half,
      3mm Norm, 6mm Half or 6mm Norm.
      The default at installation is 3mm Norm.
    Character Space Selects the space between characters.
      Select from Narrow, Medium, or Wide.
      The default at installation is Narrow.
    Lines Selects the number of lines.
      Select either 1 Line, 2 Lines or 3 Lines.
      The default at installation is 1 Line.
     
    • When Character Size is set to 6mm Half or 6mm Norm, the number of lines is automatically set to 1 Line.
      (You cannot change the number of lines.)

    • You can select 3 Lines only when Character Size is set to 1.3mm Norm.

    Continuous Selects the number of items to be printed.
      Select from 1-100.
      The default at installation is 1.
  3. Click OK.
    ​The set length check takes place.

  • If there is a page to which the specified settings cannot be applied, a message appears asking whether to apply the changes only to those pages that can be changed.

  • If the settings cannot be applied to any pages, Cannot modify. appears.

  • During actual printing, the printer may automatically change the settings made at data creation according to the printing media type in order to maintain the required print quality.
     

Printing with [Specify] specified for Set length

When set length is set to a value less than 8.5 mm and Terminal I.D. printing area is Normal, the specifications for printing are as follows:

Media

Specifications applied when Set length is set to a value less than 8.5 mm

Terminal I.D.

You can specify a set length but you cannot select a character alignment.

Label

You can specify a set length but you cannot select a character alignment mode.

  • When characters are printed with Half Cut On selected, characters may not be aligned to the center.

Tube
Shrink Tube
4mm I.D. Strip
Clear Tube
Wrap Around

Even if a set length is specified on the Change Format screen, actual printing is performed assuming that Automatic is selected.
(The left and right end margins are 2.0 mm or more respectively.)

  • The printer automatically adjusts the set length according to the printing media type to maintain the required print quality.


If your product issue was not resolved after following the steps above, or if you require additional help, please create or log in to your Canon Account to see your technical support options.

Or if you still need help, visit our Canon Community by clicking the button below to get answers:

Link to Canon Community Forum


____________________________________________________________________________________________


Rate this Article
Was this article helpful?
Yes, This document is helpful
No, This document needs a clearer explanation
 
Please provide your comments