Aligning the Print Head
If printed ruled lines are misaligned or print results are otherwise unsatisfactory, adjust the print head position.
 If the remaining ink level is low, the print head alignment sheet will not be printed correctly. Replace the ink cartridge whose ink is low.
You will need a sheet of A4 or Letter-sized plain paper.
-
Make sure that the printer is powered on.
-
Load a sheet of A4 or Letter-sized plain paper in the front tray.
-
Press the Setup  button, use the
 buttons to select Maintenance, and press the OK button.
-
Use the buttons to select Head alignment and then press the OK button.
The print head alignment sheet will be printed.
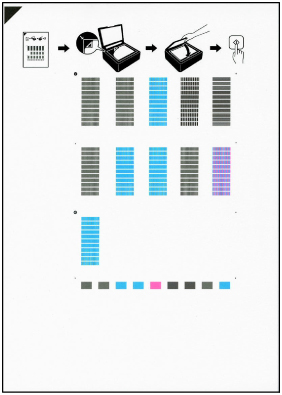
 Don't touch any printed part on the print head alignment sheet. If the sheet is stained or wrinkled, it may not be scanned properly.
If the print head alignment sheet was not printed correctly, press the Stop  button, and redo this procedure from the beginning.
-
Check the message on the pirnter and place print head alignment sheet on platen.
Place the print head alignment sheet WITH THE PRINTED SIDE FACING DOWN and align the mark  on the upper left corner of the sheet with the alignment mark
  .
.
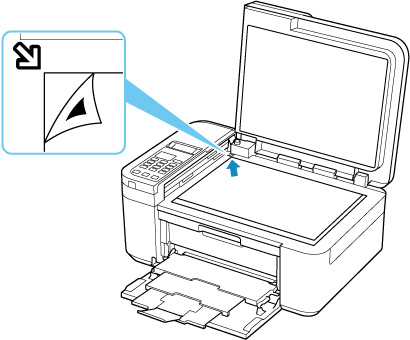
The print head alignment sheet can't be scanned if it is loaded in the ADF (Auto Document Feeder).
-
Gently close the document cover, then press the Black button or the Color button.
The printer starts scanning the print head alignment sheet, and the print head position will be adjusted automatically.
After the print head position adjustment completion message is displayed, remove the print head alignment sheet on the platen.
Don't open the document cover or move the print head alignment sheet on the platen until adjusting the print head position is complete.
For Windows, when the print results are still not satisfactory after adjusting the print head position as described above, adjust the print head position manually from the computer.
To print and check the current head position adjustment values, select Print align value from the Maintenance screen.
If your product issue was not resolved after following the steps above, or if you require additional help, please create or log in to your Canon Account to see your technical support options.
Or if you still need help, visit our Canon Community by clicking the button below to get answers:

____________________________________________________________________________________________
