Copy Four Pages onto a Single Page
You can copy four original pages onto a single sheet of paper by reducing each image. Four different layouts are available.
-
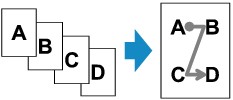
When Layout 1 is selected for 4-on-1 layout:
-
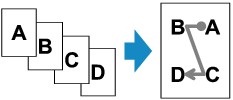
When Layout 2 is selected for 4-on-1 layout:
-
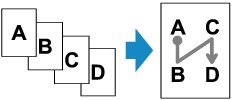
When Layout 3 is selected for 4-on-1 layout:
-
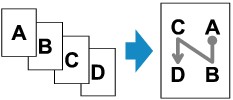
When Layout 4 is selected for 4-on-1 layout:
-
Make sure that the printer is powered on.
-
Load paper (plain paper / photo paper).
-
Press the COPY  button.
The Copy standby screen is displayed.
-
Press the Menu / Wireless connect  button.
The Copy menu screen is displayed.
-
Select Special copy, then press the OK button.
-
Select 4-on-1 copy, then press the OK button.
If a page size setting or a media type setting that cannot be used in 4-on-1 copying is selected, the screen like shown below is displayed.

-
Select a page size, then press the OK button.
-
Select a media type, then press the OK button.
-
Press the Menu / Wireless connect button, then use the 
 buttons to select a setting item.
Select 4-on-1 layout, press the OK button, then select the layout.
 The
The  (asterisk) on the LCD indicates the current setting.
-
Load originals on the platen (scanner glass) or in the ADF (Auto Document Feeder).
-
Use the buttons or the Numeric buttons to specify the number of copies.
-
Press the Black button or the Color button.
-
When the original has been loaded on the platen:
When the printer finishes scanning the first to the third page, the message below is displayed.

If you have the next page to scan, load it on the platen and press the OK button. The printer starts scanning.
If you do not need more scanning, press the Black button or the Color button to start printing. The printer starts printing.
You can add a copying job while printing.
-
When the document has been loaded in the ADF:
The printer starts scanning the next page automatically after a page finishes being scanned.
If Memory is full appears on the LCD when scanning, set the print quality to Standard or reduce the number of sheets of documents, then try copying again. If the problem is not resolved, set the print quality to Draft and try copying again.
If your product issue was not resolved after following the steps above, or if you require additional help, please create or log in to your Canon Account to see your technical support options.
Or if you still need help, visit our Canon Community by clicking the button below to get answers:

____________________________________________________________________________________________
