Print from a Mac
-
Make sure that the printer is powered on.
 If Auto power on is enabled, printer automatically turns itself on when receiving a print job.
-
Load paper (plain paper / photo paper) in the printer.
-
Register the set paper size and paper type on the printer operation panel.
-
Start printing from your software (typically, this is done by selecting Print... from the File menu).
-
Select your model from the Printer list in the Print dialog.
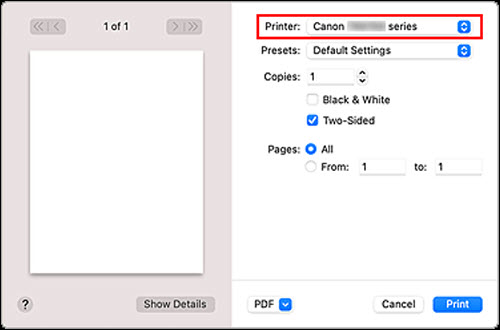
Click Show Details to switch the setup window to the detailed display.
-
Set items such as Paper Size to the appropriate size, as well as Media Type from Media & Quality of the pop-up menu.
Select Auto Select for Media Type.
Remove the Two-Sided check mark if you aren't printing on both sides of the paper.
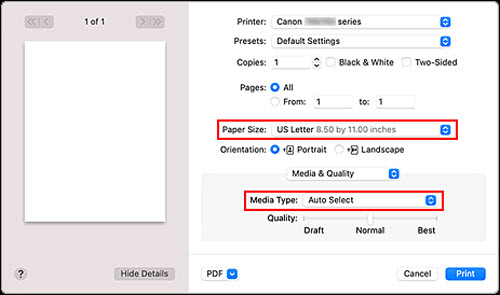
 An error may occur if the paper size set in the print dialog is different from the paper size registered on the printer. Select the correct items on the print dialog and the printer that correspond to the paper being printed.
If printing paper such as photo paper that cannot be printed on both sides, uncheck the Two-Sided checkbox.
Use the Print dialog to set general print settings such as the layout and the print sequence. For information about print settings, refer to macOS help.
-
Click Print.
The printer prints with to the specified settings.
It can take the Wi-Fi a few minutes to get connected after the printer turns on. Print after checking that the printer is connected to the network.
You cannot print if Bonjour settings of printer are disabled. Check the LAN settings of the printer and enable Bonjour settings.
The display of the settings screen may differ depending on the application software you are using.
Printing of Envelopes
For printing on the envelope from Mac, refer to the following.
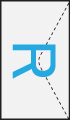
| Print result image |
Orientation of print data |
Orientation of loading envelope |
|
|

The print data is rotated by 180 degrees against the print result image.
|
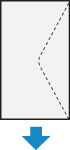
Load the envelope in vertically with the address side facing up so that the folded flap of the envelope will be faced down on the right side.
|
If your product issue was not resolved after following the steps above, or if you require additional help, please create or log in to your Canon Account to see your technical support options.
Or if you still need help, visit our Canon Community by clicking the button below to get answers:

____________________________________________________________________________________________
