Changing the cutting depth
If the cutter does not properly cut tube or tape label, try changing the cutting depth. The cutting depth for half cuts and for full cuts can be adjusted as described below. In addition, these adjustments can be made separately for each type of print media.
 If half cuts are made so deeply that they completely cut through the tube, adjust cutting to a shallower depth. Note that a deeper cutting depth will cause the cutter and the cutter receiver to wear out more quickly.
|
Half cut
|
Full cut
|
|

|
|
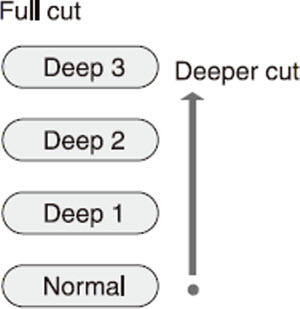
ex. Full cuts of label tape are not complete cuts, so increase the cutting depth by one step
-
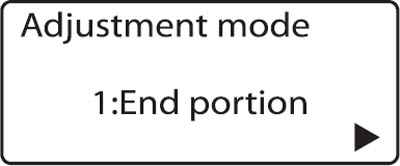
Press [Option].
|

|
-
Press  or or  to select 1:Adjustment, then press Adjustment mode [Enter]. to select 1:Adjustment, then press Adjustment mode [Enter].
|
|
-
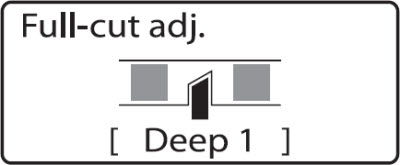
Press or to select 4:Full cut, then press Select media [Enter].
|

|
-
Press or to select 4:Label, then press [Enter].
The cutting depth can be set for each type of printing media.
|

|
-
Press  once so that Deep 1 appears. once so that Deep 1 appears.
When adjusting the depth for a half cut, pressing  reduces the depth. reduces the depth.
|
|
-
Press [Enter].
|
What to do if the cutter still does not cut well (Force full cut)
If the cutter will not cut well no matter how much you adjust the cutting depth, try using Force full cut. When force full cut is performed, the cutter cuts to the deepest depth possible. If the cutter still does not cut even when using force full cut, the cutter needs to be replaced.
-
Press [Option].
|
|
-
Press or to select 3:Maintenance, Maintenance mode then press [Enter].
|

|
-
Press  or or  to select 2:Full-cut, then press [Enter]. to select 2:Full-cut, then press [Enter].
|

|
-
Press [Enter].
|
If your product issue was not resolved after following the steps above, or if you require additional help, please create or log in to your Canon Account to see your technical support options.
Or if you still need help, visit our Canon Community by clicking the button below to get answers:

____________________________________________________________________________________________
