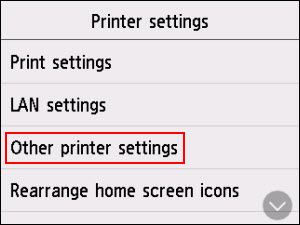
Other printer settings
 The administrator password is required to change the settings if it is enabled to change the settings on the operation panel using the administrator password.
 To access this area on the operation panel of the printer, select Setup
  , Device settings
  , then Other printer settings.
-
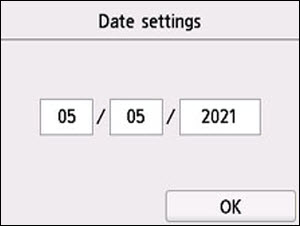
Date/time settings
Sets the current date and time.
-
Set the date:
-
Select a setting item to change.
-
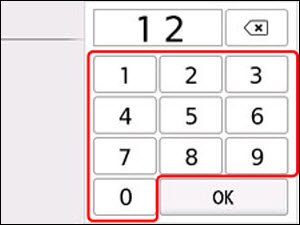
Select a number to enter.
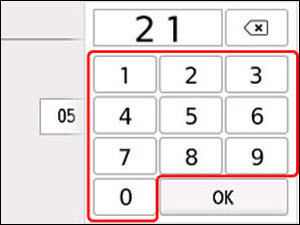
Enter only the last two digits of the year.
-
Select OK.
-
Select OK again when all settings are completed.
-
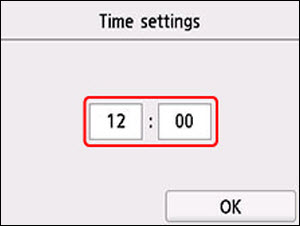
Set the time.
-
Select a setting item to change.
-
Select a number to enter.
Enter the date and time in 24-hour format.
-
Select OK.
-
Select OK again when all settings are completed.
-
Date display format
Sets the format of dates displayed on the touch screen and printed on photos.
 When ON is selected for Print date on the print settings screen in printing from a USB Flash Drive, the date is printed in the date display format you selected.
-
Daylight saving time setting
Enables/disables the summer time setting. If you select ON, you can select additional sub-settings. This setting may not be available depending on the country or region of purchase.
-
Start date/time
Sets the date and time that summer time starts.
Month: Specify the month.
Week: Specify the week.
DOW: Specify the day of the week.
The screen to set the shift time to start summer time will be displayed after specifying the items above and selecting OK.
After specifying the shift time and selecting OK, you can specify the end date/time.
-
End date/time
Sets the date and time that summer time ends.
Month: Specify the month.
Week: Specify the week.
DOW: Specify the day of the week.
The screen to set the shift time to end summer time will be displayed after specifying the items above and selecting OK.
Specify the shift time and select OK.
-
Sound control
Selects the volume.
-
Power control
Allows you to turn on/off the printer automatically to save electricity. In addition, you can specify the time and day to turn it on/off.
-
Use auto power control
Specifies the length of time to turn off the printer automatically when no operation is made or no printing data is sent to the printer. In addition, you can allow the printer to turn on automatically when a scanning command from a computer or printing data is sent to the printer.
-
Use scheduling
Specifies the time to turn on/off the printer automatically for each day of the week.
-
Do not use power control
Disables the function to turn on/off the printer automatically.
You can also select this setting by selecting (Setup) on the HOME screen, selecting ECO, and then selecting Power control.
-
Time zone
Specifies the time zone according to a country or region you live in.
Specifying the time zone to the printer allows you to display the correct time an e-mail was sent from the main unit on your mail software.
-
Original removal reminder
Selects whether the printer will display the reminder screen in case you forget to remove the original from the platen after scanning.
Depending on the type of original or the state of the document cover, forgetting to remove the original may not be detected.
-
Keyboard settings
Set the keyboard.
Select Full keyboard to select the keyboard layout from the following three types.
-
Ink level monitor
-
Resets the remaining ink count.
When adding the ink to the upper limit with the ink remained in the ink tank, reset the ink residual amount count to 100%.
-
Force ink tank selection
You can specify the ink to use.
-
All ink tanks
Use both color ink and black ink.
-
Black only
Use only black ink.
When any of the inks reached the lower limit line, printing and copying are disabled.
-
Fixed print quality
Specifies print quality when printing on plain paper.
-
Screen lock settings
Lock the screen to prevent the panel operation by someone other than the administrator.
If your product issue was not resolved after following the steps above, or if you require additional help, please create or log in to your Canon Account to see your technical support options.
Or if you still need help, visit our Canon Community by clicking the button below to get answers:

____________________________________________________________________________________________
